The Unsung Hero of the Workshop: The Great British Guide to Sawhorses
The definitive guide to the humble sawhorse. Learn its history, how to choose the best one for your shed or site, and how to use it safely and creatively.
This post may contain affiliate links. If you make a purchase through these links, we may earn a commission at no additional cost to you.
In every dusty workshop, cluttered garage, or busy building site across Britain, you’ll find one. It’s probably got a few paint splatters on it. It might be a bit battered. But it’s always there, ready to serve. We’re talking about the sawhorse, the simple, sturdy, and frankly brilliant invention that’s been the backbone of making things for centuries.
You might think, “It’s just a stand, isn’t it?” Well, yes and no. A sawhorse is a bit like a good cup of tea—it looks simple, but it makes everything better. It’s the difference between wrestling with a piece of timber on the floor and making a clean, straight cut with ease. It’s a pop-up workbench, a painter’s mate, and the most reliable assistant you’ll ever have.
But not all sawhorses are created equal. They’ve come a long way from the basic wooden A-frames our granddads knocked together in their sheds. Today, you’ve got folding metal beasts that can hold the weight of a small car, lightweight plastic models with clever gadgets, and designs that adjust to any height.
So, if you’re a weekend DIY warrior wanting to build a garden planter, or a professional tradesperson who needs a reliable setup on site, this guide is for you. We’re going to take a deep dive into the world of the sawhorse. We’ll look at where it came from, what it’s made of, and how to choose the perfect one for your next project. Let’s get started.
What Exactly is a Sawhorse? The Simple Answer
Before we get carried away, let’s get back to basics. A sawhorse is a beam with four legs used to support a workpiece at a comfortable height for tasks like sawing, drilling, or painting. Think of it as a sturdy, waist-high table with no top.
They almost always come in pairs. Why? Because with two sawhorses, you can support long items like a plank of wood, a door, or a full sheet of plywood. Place one at each end, and you’ve suddenly got a stable platform that’s ready for anything. This simple setup turns any space—a driveway, a garden, a dusty corner of a room—into an instant workshop.
Its name gives away its original job. A “horse” is an old-fashioned term for a frame that supports something, and this one was designed specifically to hold wood while you saw it. But as we’ll see, its uses go way beyond a simple haircut for a piece of timber.
A Quick Trip Through Time: The Sawhorse’s Surprisingly Long Story
The idea of a simple support stand is ancient. You can bet that as soon as humans started building things with wood, they figured out it was a lot easier than doing it on the ground. Woodworking benches that look a lot like modern sawhorses have been found in the ruins of ancient Rome and Egypt. They were essential for shipbuilders, carpenters, and furniture makers.
In Britain, the sawhorse was a common sight in the workshops of medieval craftsmen who built our great cathedrals and timber-framed houses. It was a simple, rugged tool, often built on-site from leftover timber. The classic A-frame design, with its splayed legs, was incredibly strong and stable—a design so good it’s still popular today.
For centuries, not much changed. The wooden sawhorse was the standard. But the 20th century brought new materials and new demands. As building sites got faster and tradespeople needed to move from job to job, the traditional sawhorse started to look a bit clumsy. It was heavy, took up a lot of space in the van, and couldn’t be easily stored.
This led to the invention of the modern sawhorse. Engineers started using steel to create folding sawhorses that were both strong and portable. Then came tough, lightweight plastics, which allowed for new features like built-in clamps and storage trays. Today’s sawhorses, like the heavy-duty folding models you see on professional sites, are the result of thousands of years of evolution. They’re tougher, smarter, and more versatile than ever before, but the core idea remains the same: to give you a rock-solid foundation for your work.
The Anatomy of a Sawhorse: What Are You Looking At?
While designs vary, most sawhorses share a few key parts. Understanding them helps you know what to look for when you’re choosing one.
The Top Beam: The Backbone of the Operation
This is the main horizontal part where your workpiece rests. On a traditional wooden horse, it’s just a solid piece of timber, often a “two-by-four.” On modern metal or plastic ones, it might be a shaped channel. Some have a non-slip surface to grip the wood better. A key feature to look for is a sacrificial top. This means you can screw a piece of wood onto the main beam. Why? So when your saw blade goes a little too far, it cuts into the cheap, replaceable wood, not the expensive sawhorse itself. It’s a brilliant touch that massively extends the life of your tool.
The Legs: For Standing Strong
The legs give the sawhorse its height and stability. The most important feature here is the splay, which means the legs angle outwards. This creates a wide base, making it much harder for the horse to tip over. Some sawhorses have individually adjustable legs. This is incredibly useful if you’re working on uneven ground, like a bumpy garden lawn or a sloping driveway. You can shorten one leg and lengthen another to make the top beam perfectly level. Non-slip rubber feet are also a great feature, stopping the horse from sliding around on smooth concrete floors.
The Braces and Gussets: Keeping it all Together
These are the supporting pieces that connect the legs to the top beam and to each other. On wooden sawhorses, these are often triangular pieces of plywood called gussets, which add a huge amount of strength at the joints. On folding metal sawhorses, the bracing is part of the hinge mechanism that allows the legs to tuck away neatly. A secure leg latch is vital here. It’s a mechanism that locks the legs firmly in place when open, preventing any chance of them collapsing while you’re in the middle of a cut.
Not All Horses Are the Same: A Guide to Modern Types
Choosing a sawhorse today isn’t as simple as it used to be. There’s a whole stable of different types, each with its own strengths. Let’s break them down.
The Traditionalist: The Classic Wooden Sawhorse
This is the old-school, no-nonsense design. It’s usually homemade, built from a few bits of timber.
- Pros: They are rock-solid, cheap to build if you have spare wood, and you can make them to any height or size you want. You can also screw things into them without worrying.
- Cons: They’re heavy, they don’t fold down, and they take up a ton of storage space. They’re best for a permanent workshop where you don’t need to move them often.
The Road Warrior: Folding Metal Sawhorses
This is the go-to choice for most professionals and serious DIYers. They’re typically made from tough steel and designed for a hard life on site.
- Pros: They boast enormous weight capacities—some pairs can hold over 1,000 kg! They fold down flat, making them easy to store and transport. Many have adjustable legs and other pro features.
- Cons: They can be heavy, and if the paint gets chipped, they can be prone to rust if left out in the British rain. Good ones can also be a bit pricey.
The Lightweight Champ: Modern Plastic Sawhorses
Made from high-impact polypropylene, these are surprisingly tough and very popular for home DIY jobs.
- Pros: They are very lightweight and easy to carry around. They’re rust-proof and often come with handy extras like built-in shelves for tools, cord hooks, and clamping systems. They are also usually the most affordable option.
- Cons: Their main drawback is a lower weight capacity compared to their steel cousins. They can also feel a bit less rigid, especially when dealing with very heavy loads.
The All-Rounder: Adjustable Height Sawhorses
Many metal and plastic models now come with telescopic legs. This isn’t a gimmick; it’s a game-changer.
- Why adjustability matters: Firstly, it saves your back. You can set the work surface to a comfortable height, so you’re not stooping all day. Secondly, it lets you work on uneven ground. And thirdly, you can set your sawhorses to the same height as your main workbench, effectively making your work surface much bigger.
The Space Saver: Stacking and Low-Profile Sawhorses
For those with very limited space in the shed or garage, there are compact options. Some plastic sawhorses are designed to stack neatly on top of each other. There are also low-profile trestles, which are shorter and designed for jobs closer to the ground, like supporting plasterboard for cutting.
Choosing Your Steed: How to Pick the Perfect Sawhorse for You
With so many options, how do you decide? Just think about what you’ll be doing, and focus on the features that matter most for those jobs.
First, Ask Yourself: What’s the Job?
- Are you a professional tradesperson? If you’re on site every day, you need something that can take a beating. Your priorities should be durability and weight capacity. A pair of heavy-duty folding steel sawhorses is almost certainly your best bet. Portability is also key, so look for a set that folds down quickly and has a carry handle.
- Are you a weekend warrior? If you’re tackling DIY projects like building shelves, painting doors, or doing a bit of gardening construction, you probably don’t need a 1,000 kg capacity. Your focus should be on versatility, ease of storage, and value for money. A good pair of folding plastic or medium-duty metal sawhorses will be perfect. Features like adjustable height and built-in clamps will be very useful.
The Big Four: Key Features to Consider
- Weight Capacity: This is how much weight the sawhorse can safely hold. It’s usually given in kilograms per horse, or for the pair. For light DIY, a capacity of 150 kg per horse is plenty. For heavy-duty construction, look for 500 kg or more per horse. Always check the manufacturer’s rating and never, ever overload them. It’s dangerous and just not worth the risk.
- Portability & Storage: How easy is it to move and store? If you have a small shed, a pair of sawhorses that fold down to just a few inches thick is a huge advantage. Check the weight of the sawhorse itself, too. If you’re going to be carrying them around a lot, a few extra kilos can make a big difference at the end of the day.
- Stability: A wobbly sawhorse is a nightmare. Stability comes from a wide footprint (the distance between the legs on the floor) and a rigid construction. Look for non-slip feet to stop it sliding on smooth surfaces. When you’re in the shop, give it a little shake. Does it feel solid? Is there any wobble in the leg joints? A good sawhorse should feel absolutely planted.
- Material: Steel, Wood, or Plastic?
- Wood: Best for a static workshop where tradition and customisation are key.
- Steel: The king of the building site. Choose steel for maximum strength and durability.
- Plastic: The champion of the home garage. Choose plastic for portability, weather resistance, and clever features at a good price.
Nice-to-Have Extras
These aren’t essential, but they can make life a lot easier:
- Material Support Pegs: These are arms that pop out from the side of the legs. They’re brilliant for supporting a large sheet of plywood or MDF on its edge while you cut it.
- Built-in Clamps: Some plastic models have channels or systems for holding clamps, which is great for keeping your work securely in place.
- Power Cord Hooks: A simple but clever feature to keep your cables tidy and prevent a trip hazard.
More Than a One-Trick Pony: Creative Uses for Your Sawhorses
The real magic of sawhorses is their versatility. They’re not just for sawing. Here are a few other ways they can earn their keep.
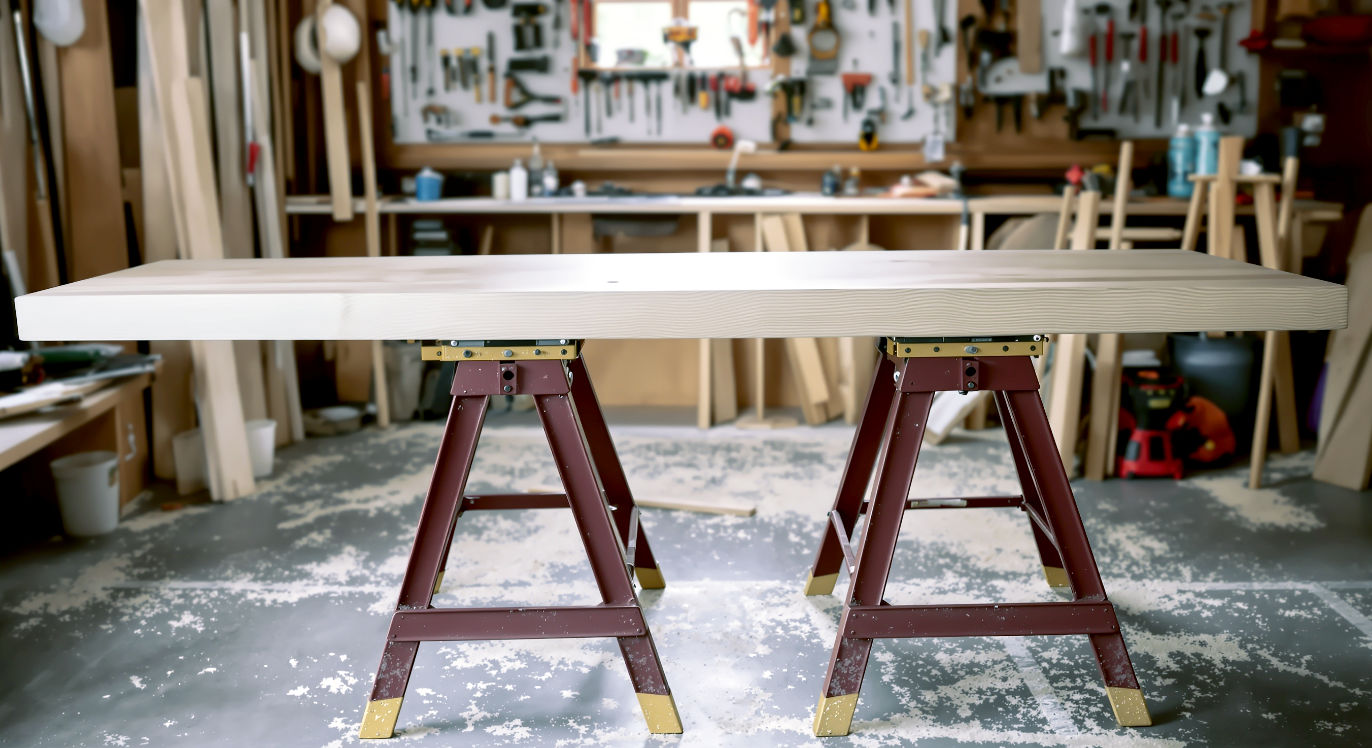
The Instant Workbench: Your Pop-Up Workshop
This is the number one alternative use. Lay a sturdy, flat object across a pair of sawhorses, and you have an instant work table. An old door, a sheet of thick plywood, or a kitchen worktop offcut are all perfect. This gives you a large, stable surface for assembling furniture, repairing tools, or any other project where you need a bit of space to work. And when you’re done, you can pack it all away in minutes.
The Painter’s Best Friend
Painting long things like skirting boards, fence panels, or doors is a pain. If you do it on the floor, you end up with a bad back. If you lean them against a wall, the paint runs. Sawhorses are the perfect solution. Lay your item across the pair, and you can walk all the way around it, painting every edge easily and at a comfortable height.
The Outdoor Companion
Sawhorses are brilliant for the garden. Use them to create a temporary potting bench. When it’s time to chop logs for the wood burner, a pair of sawhorses with a couple of notches cut in the top will hold the log securely. You can even throw a tablecloth over your temporary workbench to create an extra table for a summer barbecue.
Scaffolding? A Word of Warning
You will often see builders creating a low-level platform by putting a proper scaffolding plank across two sawhorses. This can be done, but it requires a huge amount of caution. You must use sawhorses that are heavy-duty, on perfectly level ground, and a plank that is certified for walking on. For the average DIYer, we would strongly advise against this. It’s far safer to use a proper work platform or step ladder.
Health & Safety First: How to Use Your Sawhorse Without a Trip to A&E
A sawhorse is a simple tool, but like any tool, it can be dangerous if used incorrectly. A collapsing support or a slipping workpiece can lead to serious injury. Follow these golden rules to stay safe.
- Stable Ground is Non-Negotiable: Always set up your sawhorses on a firm, level surface. Never use them on soft mud, a steep slope, or a wobbly floor. If the ground is slightly uneven, use adjustable legs to make the top level.
- Respect the Weight Limit: Know the maximum load your sawhorses can handle and never exceed it. Remember that the weight is for the pair combined, so don’t put the whole load on one.
- Secure Your Workpiece: Don’t just rest your wood on top, especially before cutting. Use clamps to hold it firmly in place so it can’t shift, wobble, or kick back when you’re sawing.
- Positioning Matters: When supporting a long board, place the sawhorses about a quarter of the way in from each end. This provides the most stable support and stops the ends from drooping or tipping.
- Check Before You Work: Before you place any load on them, give the sawhorses a quick push. Make sure the legs are fully extended and locked in place.
- Wear Your PPE: Always wear safety goggles to protect your eyes from sawdust and debris. Gloves can also help prevent splinters.
The Final Question: Should You Build or Buy?
For a long time, every woodworker built their own sawhorses. It was a rite of passage. Should you do the same?
The Joy of Building Your Own
There is a real satisfaction in making your own tools. It’s a great project for a beginner, it uses up scrap wood, and you can build them to the exact height and length you want. There are thousands of free plans online, from simple A-frames to more complex stacking designs. If you have the time and the tools, it’s a rewarding experience.
The Convenience of Buying Modern
However, a homemade wooden sawhorse can’t compete with the features of a modern, manufactured one. You can’t easily make it fold flat or have individually adjustable legs. The weight capacity won’t be tested and certified, and it will be heavier and bulkier than a metal or plastic equivalent. For most people, the convenience, portability, and advanced features of a shop-bought pair make them a much more practical choice.
The Future of the Humble Horse: What’s Next?
It’s hard to reinvent something so simple, but the sawhorse continues to get better. We’ll likely see the use of new composite materials that are even lighter and stronger than steel. We can expect to see more clever integration, with sawhorses designed to connect to create even larger work platforms, or with built-in power strips and lighting.
But no matter how fancy they get, their core purpose will never change. They will always be the simple, reliable workmate that helps us build, create, and repair.
Conclusion: The Reliable Workmate That’s Always Got Your Back
The sawhorse doesn’t demand much attention. It sits quietly in the corner until it’s needed. But when the time comes for a new project, it’s one of the first tools you’ll reach for. It’s a testament to good design—simple, strong, and incredibly useful.
Whether you choose a timeless wooden classic or a state-of-the-art folding model, a good pair of sawhorses will transform the way you work. They provide a safe, stable foundation that lets you concentrate on the job at hand. They are, without a doubt, the unsung heroes of the workshop, and a tool that has well and truly earned its place in every British shed.
Further Reading
To continue your journey into the world of DIY and woodworking, here are some highly respected resources:
- The DIY Doctor: An excellent UK-based website with practical advice on all sorts of home improvement projects. https://www.diydoctor.org.uk/
- Woodworking UK: A forum and resource hub for both amateur and professional woodworkers in the UK. https://www.ukworkshop.co.uk/
- Health and Safety Executive (HSE): For official guidance on staying safe when working with tools and equipment in the UK. https://www.hse.gov.uk/