How to Make Fresh Pasta: A Complete Step-by-Step Guide for the British Kitchen
Ready to ditch shop-bought pasta? Our definitive guide shows you how to make silky, delicious fresh pasta at home using simple ingredients. Perfect for beginners.
This post may contain affiliate links. If you make a purchase through these links, we may earn a commission at no additional cost to you.
There’s a special kind of magic in turning a handful of flour and a couple of eggs into a plate of silky, delicious pasta. We’re not talking about the stuff that rattles out of a blue box. We’re talking about the real deal: tender, golden ribbons that cook in minutes and taste a world away from anything you can buy in the supermarket.
For many, making fresh pasta sounds like something best left to Italian nonnas or chefs in fancy restaurants. It seems complicated, messy, and frankly, a bit of a faff. But I’m here to tell you that’s just not true. At its heart, making pasta is one of the simplest and most rewarding things you can do in your kitchen. It’s a chance to slow down, get your hands a little bit floury, and create something truly wonderful from scratch.
This guide is your complete companion to making fresh pasta at home. We’ll walk through everything, from picking the right flour at your local shop to kneading the dough, rolling it out (with or without a machine), and cutting it into beautiful shapes. Forget the myths and the fear. By the end of this, you’ll be serving up plates of homemade pasta like a pro. Right then, let’s get started.
The Heart of the Matter: Understanding Your Ingredients
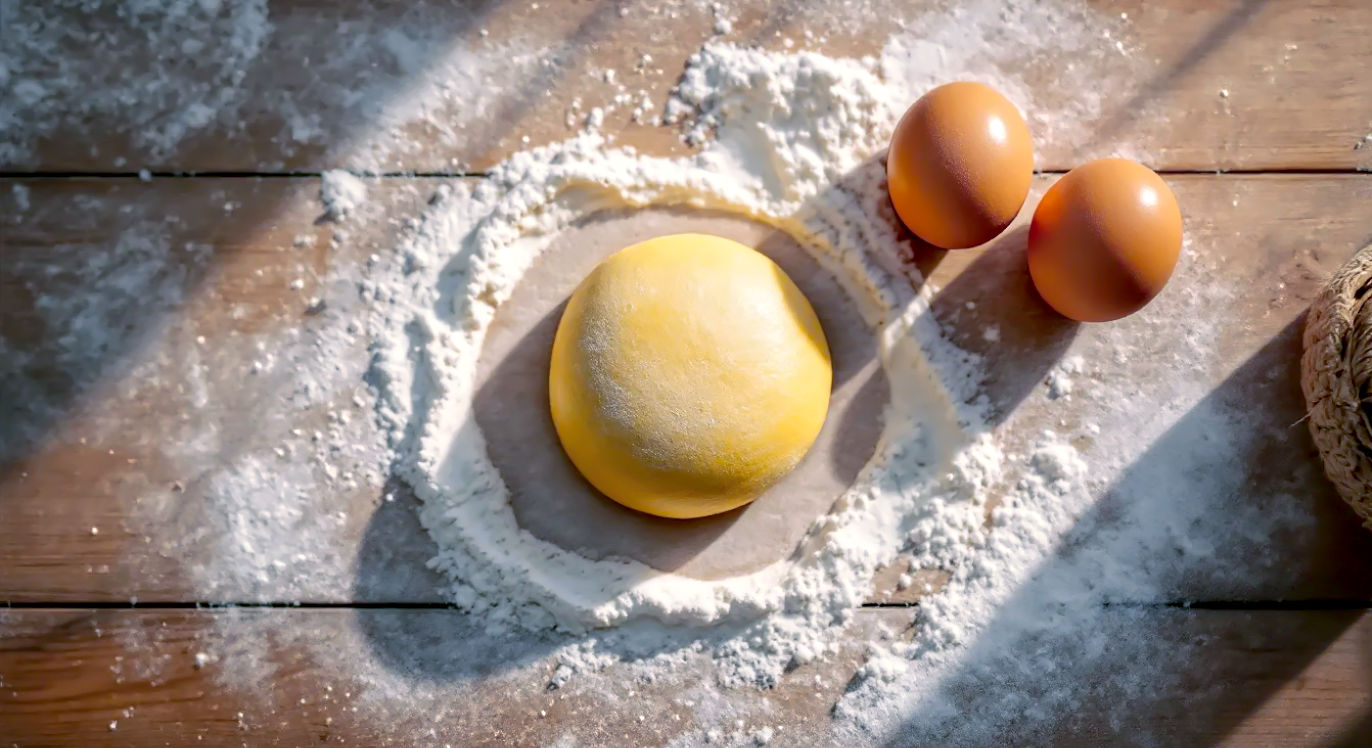
Great pasta starts with great ingredients. Luckily, you only need two or three things, so it’s worth getting the best you can. Think of them as the holy trinity of pasta: flour, eggs, and maybe a little something extra.
The Flour: More Than Just White Stuff
Walk down the baking aisle and you’ll see a dizzying array of flours. For pasta, the choice makes a real difference.
- ’00’ Flour (Tipo Doppio Zero): This is the gold standard for silky egg pasta. The ‘00’ refers to how finely the flour is milled—and this stuff is like powder. It’s a soft wheat flour that’s low in gluten, which helps create a dough that’s tender and delicate, not tough and chewy. You can find it in most big supermarkets and nearly all Italian delis. If you want pasta that feels light and luxurious, this is your best bet.
- Semolina Flour (Semola Rimacinata): This is a different beast altogether. Made from hard durum wheat, semolina is coarser, more yellow, and packed with gluten. It absorbs less water, making a firmer, more rugged dough. It’s the traditional choice for eggless pasta shapes from the south of Italy, like orecchiette, and it gives the pasta a fantastic bite. ‘Semola Rimacinata’ simply means it’s been ‘remilled’ to a finer texture, which is what you want.
- Plain Flour: What about the plain flour already in your cupboard? Honestly, it’ll work just fine. It’s the closest British equivalent to Italian all-purpose flour. Your pasta might not be quite as silky as with ‘00’, but it will still be a million times better than dried. Don’t let a lack of fancy flour stop you.
- Strong Bread Flour: It’s best to avoid this for pasta. It has a very high gluten content, which is brilliant for stretchy bread, but it can make your pasta tough and chewy.
The verdict? For your first time, grab a bag of ‘00’ flour. It’s the most forgiving and gives you that classic, restaurant-quality result.
The Eggs: The Sun in Your Dough
The humble egg does so much work here. It adds fat, flavour, and colour to the dough. Always use the best eggs you can afford—it really shows in the final dish. A rich, deep orange yolk will give you a beautiful golden pasta.
- Size Matters: The standard pasta recipe ratio is 1 large egg for every 100g of flour. A large egg in the UK weighs about 63-73g. If you only have medium eggs, you might need to add a splash of water or an extra yolk to get the dough right.
- Room Temperature is Best: Let your eggs sit out of the fridge for half an hour before you start. Cold eggs don’t mix into the flour as easily.
- Yolks for Richness: For an incredibly rich and golden dough, you can swap out some whole eggs for extra yolks. A dough made with only yolks is a truly decadent treat, perfect for a special occasion.
A Little Extra: Salt, Oil, and Water
- Salt: A pinch of fine sea salt in the dough itself helps to season it from the inside out.
- Olive Oil: Some recipes call for a teaspoon of olive oil. It can make the dough a little more supple and easier to work with, but it’s not strictly necessary for a classic egg dough.
- Water: Sometimes, your dough just needs a little more moisture. Maybe your eggs were a bit small or the air in your kitchen is dry. If your dough feels too crumbly to come together, add a tiny splash of lukewarm water—but do it a few drops at a time. It’s much easier to add water than it is to take it away.
Your Pasta-Making Toolkit: Gadgets or Hands?
You don’t need a kitchen full of expensive kit to make pasta. For centuries, all anyone needed was their hands, a rolling pin, and a flat surface.
The Bare Essentials (The Traditional Way)
- A Large Bowl or a Clean Work Surface: The traditional method is to make a “well” of flour directly on your worktop. It looks impressive and it’s very effective.
- A Fork: For whisking the eggs at the start.
- Your Hands: The most important tool you have.
- A Bench Scraper: A simple piece of metal or plastic that’s brilliant for scooping up rogue bits of flour and keeping your workspace tidy.
- A Rolling Pin: A long, thin, handle-less Italian rolling pin (mattarello) is ideal, but any old rolling pin will do. In a pinch, a clean wine bottle works too!
- Cling Film: Essential for resting the dough.
Levelling Up: The Pasta Machine
A manual pasta machine is a fantastic investment if you think you’ll make pasta regularly. It takes the hard work out of rolling and gets your dough incredibly thin and even, something that’s very tricky to do by hand.
The Marcato Atlas 150 is the classic, bomb-proof choice you’ll see in kitchens all over the world. They aren’t too expensive and will last a lifetime. You can also get pasta-rolling attachments for stand mixers like a KitchenAid, which are great if you already have the mixer.
Do you need one? No. Does it make life easier? Absolutely. For your first go, try it by hand to understand the dough. If you get the bug, treat yourself to a machine.
The Master Recipe: A Perfect, Foolproof Egg Pasta
This recipe is the foundation for almost any pasta shape you can dream of. It’s based on that simple, magic ratio. This will make enough for 2-3 people as a main course.
Yields: Approx. 350g of pasta Prep time: 25 minutes Resting time: 30 minutes
Ingredients
- 200g ‘00’ Flour (plus extra for dusting)
- 2 Large Free-Range Eggs
- A pinch of fine sea salt
Method: Step-by-Step
Step 1: Making the Dough
This is where the fun starts. You can do this in a bowl, on the worktop, or in a food processor.
The Worktop Method (The Classic Way):
- Tip the flour onto a clean, dry work surface. Add the pinch of salt. Use your fingers to shape it into a mound, like a volcano.
- Make a wide well in the centre of the mound. Make it big enough to hold the eggs without them spilling over the sides—this is important!
- Crack the eggs directly into the well.
- Start whisking. Take a fork and gently whisk the eggs, just as you would for scrambled eggs. As you whisk, slowly begin to pull in a little bit of flour from the inner walls of the volcano.
- Keep going. The egg mixture will start to thicken into a gloopy paste. Keep pulling in more flour from the sides until the mixture is too thick to whisk with the fork.
- Get your hands in. Now, using your hands or a bench scraper, push the remaining flour walls into the centre and start to bring everything together into a shaggy, messy ball of dough. Don’t worry if it looks a complete state at this point—that’s normal. Scrape up any dry bits from the work surface and incorporate them.
The Food Processor Method (The Quick Way):
- Put the flour and salt in the bowl of the food processor.
- Add the eggs.
- Pulse the machine in short bursts until the mixture looks like breadcrumbs.
- Tip the mixture out onto your worktop and bring it together with your hands into a rough ball.
Step 2: Kneading – The Most Important 10 Minutes
This is where you transform that rough ball into a smooth, silky dough. Kneading develops the gluten in the flour, which gives the pasta its structure and signature bite. Don’t skip this, and don’t cut it short.
- Start kneading. Lightly flour your work surface. Take the ball of dough and begin to push it away from you with the heel of your hand.
- Fold and turn. Fold the stretched dough back on itself, give it a quarter turn, and repeat the process. Push, fold, turn. Push, fold, turn.
- Find a rhythm. Get a good, steady rhythm going. Put on some music or a podcast. This is a brilliant way to work out the stresses of the day.
- Keep going for 8-10 minutes. At first, the dough will feel rough and a bit stiff. After a few minutes, you’ll feel it start to change. It will become smoother, softer, and more elastic.
- How to know when it’s done? Your dough is ready when it’s beautifully smooth, like a stress ball, and springs back gently when you poke it with a finger. It shouldn’t feel sticky.
Step 3: Resting – The Non-Negotiable Nap
You’ve just worked the gluten hard, now it needs to relax. Resting the dough makes it much easier to roll out.
- Wrap it up. Shape the kneaded dough into a neat ball. Wrap it tightly in cling film or pop it in a reusable sandwich bag.
- Let it rest. Leave it on the worktop at room temperature for at least 30 minutes. You can leave it for up to a couple of hours if you need to.
Rolling and Shaping: From a Ball to Beautiful Pasta
After its rest, your dough is ready for its transformation. This is where you decide what it’s going to be: long ribbons of tagliatelle, stuffed parcels of ravioli, or a simple rustic shape.
Rolling by Hand
This takes a bit of muscle but is incredibly satisfying.
- Prepare your space. Lightly flour your work surface and rolling pin.
- Flatten the dough. Unwrap your rested dough and flatten it into a disc with the heel of your hand.
- Start rolling. Begin rolling from the centre of the disc outwards. After each roll, give the dough a quarter turn to keep the shape roughly circular and to stop it from sticking.
- Keep it thin. You’re aiming for a sheet of pasta that’s almost translucent—about 1-2mm thick. You should be able to see the outline of your hand through it. This will take longer than you think, so be patient. If the dough starts to spring back, let it rest for a few minutes before continuing.
Using a Pasta Machine
This is the fast track to perfectly thin, even sheets of pasta.
- Set up your machine. Clamp it securely to the edge of your worktop.
- Prepare the dough. Cut your ball of dough into quarters. Take one piece and squash it flat with your fingers. Keep the other pieces wrapped up so they don’t dry out.
- First pass. Set the machine to its widest setting (usually marked ‘0’ or ‘1’). Feed the flattened piece of dough through the rollers while turning the handle.
- Laminate the dough. Fold the resulting strip of dough into thirds, like a letter. Turn it 90 degrees and feed it through the widest setting again. Repeat this folding and rolling process 2-3 times. This is called laminating, and it gives the final pasta a beautifully silky texture.
- Work through the settings. Now, start passing the dough through the machine, narrowing the setting one notch at a time. Don’t skip any settings. Lightly dust the sheet with flour if it feels at all sticky.
- How thin to go? For tagliatelle or fettuccine, setting 6 or 7 on a Marcato is about right (around 1.5mm thick). For stuffed pasta like ravioli, you need to go even thinner, to setting 7 or 8, as you’ll be doubling it up. The sheet of pasta will get very long—you might need to cut it in half to make it manageable.
Cutting and Shaping
For Long Pasta (Tagliatelle, Fettuccine, Pappardelle)
This is the easiest shape to start with.
- Dry the sheet. Lay your long sheet of pasta on a lightly floured work surface and let it air dry for 10-15 minutes. It should feel leathery, not sticky or brittle.
- Flour and fold. Dust the sheet generously with flour. Loosely fold it over on itself several times to create a flat, layered roll.
- Slice it up. Using a sharp knife, slice the roll into ribbons of your desired width.
- Tagliatelle: about 6-8mm wide (the width of your little finger).
- Fettuccine: slightly narrower, about 5mm.
- Pappardelle: much wider, about 2-3cm.
- Unfurl and dry. Gently shake out the cut ribbons to unfurl them. Toss them in a little more flour or semolina to stop them sticking. You can hang them on a pasta drying rack, a coat hanger, or the back of a chair, or just curl them into little nests on a floured tray.
For Stuffed Pasta (A Simple Ravioli)
- Make a filling. A classic filling is ricotta and spinach. Squeeze all the moisture out of cooked spinach, chop it finely, and mix with ricotta, grated Parmesan, a pinch of nutmeg, and salt and pepper.
- Lay out a sheet. Place one of your paper-thin pasta sheets on a lightly floured surface.
- Place the filling. Dot teaspoonfuls of your filling in rows along the sheet, leaving about 4-5cm of space between each blob.
- Seal it up. Lightly brush the pasta around the filling with a little water. Place a second sheet of pasta directly on top.
- Press out the air. Using your fingertips, carefully press down around each mound of filling, pushing out any trapped air pockets. This is crucial—trapped air can cause the ravioli to burst when cooking.
- Cut. Use a fluted pastry wheel or a sharp knife to cut between the mounds to create individual ravioli parcels.
Cooking, Saucing, and Serving: The Glorious Finish
You’ve done the hard work, now for the reward. Cooking fresh pasta is incredibly fast.
- Boil a huge pot of water. You need a lot of space for the pasta to move around.
- Salt it generously. The water should taste as salty as the sea. This is your only chance to season the pasta itself. Don’t be shy.
- Cook the pasta. Drop your fresh pasta into the rapidly boiling water. It will sink at first, then float to the surface. It will cook in just 90 seconds to 3 minutes, depending on its thickness. The only way to know for sure is to taste it. It should be soft but with a slight al dente bite.
- Save some pasta water! Just before you drain the pasta, scoop out a mugful of the starchy cooking water. This stuff is liquid gold.
- Sauce it immediately. Never, ever rinse your pasta. The starch clinging to it is what helps the sauce stick beautifully. Transfer the drained pasta directly into the pan with your chosen sauce.
- Finish in the pan. Add a splash of that reserved pasta water to the pan. The starch in the water will emulsify with the fat in the sauce, creating a creamy, glossy coating that clings to every strand. This is the secret to restaurant-quality pasta dishes.
Simple Sauce Pairings
Fresh pasta has a delicate flavour and texture, so it doesn’t need a heavy, overpowering sauce. Let the pasta be the star.
- Sage Butter: Melt butter in a pan with a few fresh sage leaves until the butter foams and turns nutty brown.
- A Simple Tomato Sauce: Good quality tinned tomatoes, garlic, a splash of olive oil, and a few fresh basil leaves.
- Cacio e Pepe: A classic Roman sauce of Pecorino Romano cheese and lots of freshly cracked black pepper, brought together with pasta water.
Troubleshooting: When Things Go a Bit Wrong
Don’t panic if your first attempt isn’t perfect. Every pasta-making session is a learning experience.
- “My dough is too dry and crumbly!”
- The Cause: Not enough moisture. Your eggs might have been small or your flour was extra thirsty.
- The Fix: Wet your hands and continue to knead. If that’s not enough, add water one drop at a time. It’s amazing how little it takes to fix it.
- “My dough is too wet and sticky!”
- The Cause: Too much moisture. Your eggs were probably extra-large.
- The Fix: Add a tiny sprinkle of flour to the dough and your work surface as you knead. Be careful not to add too much, as this can make the dough tough.
- “My pasta is tearing when I roll it.”
- The Cause: The dough is probably too dry, or you haven’t kneaded it enough to develop the gluten.
- The Fix: Unfortunately, you can’t fix this once you start rolling. Next time, knead for the full 10 minutes and make sure the dough feels supple and smooth before resting.
- “My cut pasta is sticking together into one big lump.”
- The Cause: The pasta sheets were too damp when you cut them, or you didn’t use enough flour for dusting.
- The Fix: Be generous with your dusting flour (semolina is excellent for this as it doesn’t get absorbed). Make sure your pasta sheets have had that short drying time to become leathery before you fold and cut.
Storing Your Homemade Pasta
If you’re not cooking it straight away, here’s how to store it.
- Short-Term (a few hours): You can leave the pasta to dry on a rack or in nests on a floured tray for a few hours.
- In the Fridge (up to 2 days): Dust nests of pasta well with semolina, place them in an airtight container, and store them in the fridge.
- In the Freezer (up to 3 months): This is the best way to store it long-term. Let the pasta dry for about 30 minutes, then open-freeze it on a tray. Once the strands or shapes are solid, transfer them to a freezer bag. Cook straight from frozen—it will only need an extra minute or so in the boiling water.
Final Thoughts: It’s More Than Just Dinner
Making fresh pasta is about more than just food. It’s a craft. It’s a process that connects you to the ingredients and to a tradition that’s been passed down through generations. It’s a perfect, mindful activity for a lazy Sunday afternoon.
The first time you sit down to a plate of pasta that you made entirely from scratch, you’ll understand the magic. It won’t just taste better; it will feel different. You made it. So go on, give it a try. Get your hands floury, embrace the mess, and discover the simple joy of creating something truly special in your own kitchen. You’ll never look at that box of dried spaghetti in the same way again.
Further Reading: