Mastering the Art of Woodcraft Carving: A Great British Guide
Discover the timeless British craft of wood carving. This guide covers everything a beginner needs: essential tools, native woods, and step-by-step techniques.
This post may contain affiliate links. If you make a purchase through these links, we may earn a commission at no additional cost to you.
Picture a quiet corner of an ancient British woodland. Dappled sunlight filters through the leaves of a mighty oak, the air smells of damp earth and moss, and in your hands, you hold a simple piece of wood. With a sharp knife and a bit of patience, you begin to peel away shavings, and slowly, a new shape emerges. You’re not just cutting wood; you’re taking part in a tradition that’s as old as these islands themselves. This is the magic of woodcraft carving.
For thousands of years, people in Britain have shaped wood to make tools, create art, and tell stories. You can see it in the swirling patterns carved by Celtic artisans, the fierce dragon heads on Viking longships, and the breathtakingly detailed choir stalls of our great cathedrals. It’s a craft that connects us to our landscape and our history. But it’s not something that belongs in a museum. It’s a living, breathing skill that anyone can learn.
Forget the idea that you need a huge workshop or years of training. At its heart, wood carving is beautifully simple: just you, a piece of wood, and a sharp tool. It’s a chance to slow down, switch off from the digital world, and make something real and tangible with your own hands. It’s mindful, rewarding, and deeply satisfying. This guide will walk you through everything you need to know to start your own journey, from choosing your first knife to making your very first carving. Let’s get started.
The Carver’s Toolkit: Your First Steps into a Larger World
Walking into a tool shop or looking online can be overwhelming. You’ll see walls of gleaming chisels, strange-looking gouges, and knives of every shape and size. It’s easy to think you need one of everything, but you really don’t. The best way to start is to keep it simple.
You Don’t Need a Shed Full of Tools (Yet)
To begin with, you only need a couple of good-quality tools. Think of it like learning to cook; you don’t start with a sous-vide machine, you start with a good chef’s knife. In carving, your core kit is just as straightforward.
1. A Good Carving Knife: This is your most important tool. Don’t just grab any old Stanley knife from the garage. You need a proper wood carving knife with a fixed blade. Models from brands like Morakniv (often called a Mora knife) are fantastic for beginners. They’re affordable, comfortable to hold, and the Swedish steel holds a brilliant edge. Look for a blade around 5 to 8 cm long. This is your workhorse for shaping the wood and whittling away material.
2. A Gouge: If a knife is for slicing, a gouge is for scooping. Imagine carving a spoon or a bowl; you need something to hollow out the middle. A gouge is essentially a chisel with a curved blade. They come in different sizes and ‘sweeps’ (how deep the curve is). A good starter gouge would be a #7 sweep, about 10mm wide. It’s versatile enough for hollowing and creating lovely curved textures.
3. A V-Tool: As the name suggests, this tool has a V-shaped cutting edge. It’s perfect for outlining your design, carving sharp grooves, and creating details like feathers on a bird or letters. Think of it as your pencil for drawing lines in the wood. A 6mm V-tool with a 60-degree angle is a great all-rounder to start with.
That’s it. A knife, a gouge, and a V-tool will let you tackle a huge range of projects. You can always add more specialised tools later as you figure out what you enjoy carving most.
Keeping Your Edge: The Secret to a Perfect Cut
Here’s a secret that every experienced carver knows: a sharp tool is a safe tool. A dull blade requires more force to push through the wood. When you’re straining, the tool can slip unpredictably, and that’s when accidents happen. A razor-sharp blade, on the other hand, will glide through the wood with minimal effort, giving you more control and a much cleaner finish.
You’ll need two things to keep your tools sharp:
- A Sharpening Stone: These come in various materials, from natural Japanese waterstones to diamond plates. A simple, two-sided whetstone (with a coarse grit on one side for fixing nicks and a fine grit on the other for honing the edge) is a perfect starting point. The goal is to grind the metal at a consistent angle to create a sharp ‘burr’ on the edge.
- A Leather Strop: After sharpening, the edge of your blade is sharp but microscopically ragged. Stropping polishes this edge to perfection. A strop is just a piece of leather glued to a flat piece of wood. You load it with a fine abrasive, called a honing compound (which looks like a green crayon), and pull the blade across it (always moving away from the cutting edge). Stropping regularly as you carve will keep your tools incredibly sharp and reduce how often you need to use the stone.
Learning to sharpen takes a bit of practice, but it’s a fundamental skill of woodcraft. It’s a quiet, meditative process that connects you more deeply with your tools.
Safety First: Look After Your Fingers
This is the most important section in this guide. Wood carving is a safe and enjoyable hobby, but you are working with extremely sharp tools, so you must respect them.
- Buy a Carving Glove: This is non-negotiable. Wear a cut-resistant glove on the hand that is holding the wood, not the hand holding the knife. If the knife slips, this glove is your last line of defence. They are inexpensive and could save you a trip to A&E.
- Consider a Thumb Guard: Your thumb on your knife-holding hand often acts as a pivot or a brace. A simple leather thumb guard gives you extra protection.
- Always Carve Away From Your Body: This is the golden rule. Position your hands and body so that if the tool slips, it travels away from you into empty space. Never, ever pull a knife towards your chest, lap, or the arm holding the wood.
- Take Your Time: Don’t rush. Wood carving is about patient, controlled cuts. If you feel tired or frustrated, put the tools down and come back to it later.
- Keep Your Workspace Tidy: A cluttered bench is an unsafe one. Make sure you have a clear, stable surface to work on.
Choosing Your Canvas: A Guide to British Carving Woods
Just as a painter chooses their canvas, a carver chooses their wood. Different woods have different personalities. Some are soft and cooperative, others are hard and stubborn. For a beginner, starting with the right wood makes all the difference.
What Makes a Good Carving Wood?
You’re looking for a wood with a fine, straight grain and a uniform texture. This means it will cut cleanly in any direction without tearing or splitting. Hardwoods are generally better than softwoods (like pine), which can be ‘sappy’ and have unpredictable growth rings that your knife can get stuck in.
The Beginner’s Best Friend: Lime Wood
If there is one perfect wood for a beginner, it’s Lime. In North America, it’s called Basswood, but it’s the same thing. Lime wood is the wood of choice for professional carvers like the legendary Grinling Gibbons. It’s soft enough to carve with ease, yet firm enough to hold incredibly fine detail. It has almost no visible grain, so it cuts like a firm block of butter. It’s a joy to work with and very forgiving of mistakes.
Branching Out: Other Great British Woods
Once you’re comfortable with Lime, there are plenty of other wonderful native British timbers to explore. You can often find offcuts from local tree surgeons or sawmills.
| Wood Type | Hardness | Grain | Best For | Notes for the Carver |
|---|---|---|---|---|
| Sycamore | Soft | Fine, straight | Spoons, small figures | Similar to Lime but a little tougher. A lovely pale, creamy colour. |
| Alder | Soft | Straight | General carving | Easy to work with, but can be a bit plain. Good for practising. |
| Apple/Cherry | Medium | Fine | Decorative items | Beautiful colours and grain patterns. A bit harder to carve but worth it. |
| Oak | Hard | Coarse, open | Architectural, relief | The king of British trees. Tough to carve but gives a bold, strong finish. |
| Yew | Hard | Very fine | Small, detailed work | A stunning wood with purple and cream colours. Can be tricky due to knots. |
Where to get your wood? You can buy ‘blanks’ (small, pre-cut blocks) from craft suppliers online. This is the easiest way to get started. As you get more adventurous, look for local timber yards or even sustainable forestry projects. Never take wood from a living tree without permission.
The Four Foundational Cuts: Bringing Wood to Life
With your sharp tools and a block of wood, it’s time to make the first cut. Carving is a language of different cuts, each with its own purpose. Mastering a few basics will unlock endless possibilities.
The Whittler’s Way: The Simple Charm of the Carving Knife
Whittling is carving with just a knife. It’s wonderfully portable – you can do it on your doorstep on a sunny afternoon. The three key cuts are:
- The Push Cut (or Thumb-Push Cut): Hold the wood in one hand. Hold the knife in your other hand, like you’re peeling a potato. Place the thumb of your knife hand on the back of the blade. Now, push the blade through the wood with your thumb. This is a powerful, controlled cut for removing wood quickly.
- The Pull Cut (or Paring Cut): This is a more delicate cut for shaping and smoothing. Hold the knife like a pencil. Brace the wood against your body (carefully!) or the workbench. Pull the knife towards you, using your thumb on the wood as a pivot. You’re essentially ‘paring’ away thin shavings, like sharpening a pencil with a penknife.
- The Stop Cut: This is crucial for making sharp details. First, make a straight cut down into the wood. Then, from the side, slice inwards towards the bottom of your first cut. A chip of wood will pop out, leaving a clean, defined edge. This is how you stop your cuts from running away and splitting the wood.
Chip Carving: Creating Patterns with Triangles
Chip carving is a wonderfully decorative style that looks much more complicated than it is. It’s all about removing small ‘chips’ of wood from the surface with a knife to create intricate geometric patterns. The most basic form is the three-cornered chip.
- Mark a triangle on your wood.
- Hold your knife at a 60-degree angle and push the tip down into each corner of the triangle.
- Now, place the blade along one edge of the triangle, angled down towards the centre. Push down and inwards.
- Repeat for the other two sides. If you’ve done it right, a perfect triangular chip will pop out.
By combining these simple chips, you can create stunning patterns on boxes, coasters, and decorative panels.
Relief Carving: Making Pictures in Wood
If whittling is like sketching with a knife, relief carving is like making a painting or a collage. You start with a flat panel of wood and carve a design so that it stands out from the background.
- Transfer Your Design: Draw or trace your picture onto the wood. A simple leaf or a Celtic knot is a great first project.
- Set in the Outline: Use your V-tool or a knife to carefully cut along the outline of your design. This creates a boundary.
- Clear the Background: Use a gouge to carefully remove the wood from the background, leaving your design raised. The deeper you go, the more your design will ‘pop’. This is called ‘low relief’. ‘High relief’ is when you carve very deeply, almost making the subject look 3D.
You can see incredible examples of relief carving on old church pews and pub signs all over Britain.
Carving in the Round: Sculpting in Three Dimensions
This is the next step up: creating a full 3D object, like an animal or a human figure. The process is about removing everything that doesn’t look like your subject.
- Draw Your Profiles: On your block of wood, draw the shape of your subject from the front and the side.
- Rough Out the Shape: Use a saw (a small coping saw is ideal) to cut away the big chunks of waste wood outside your profile lines. You’ll be left with a very blocky, squared-off version of your subject.
- Round Over: Now, use your knife to start rounding all the sharp corners. This is the magical stage where the block starts to look like a sculpture. Keep turning the piece in your hand, slicing off the corners, until you have a soft, rounded form.
- Add the Details: Once you have the overall shape, you can switch to smaller tools like a V-tool or a small gouge to add the details – the eyes, the mouth, the texture of fur or feathers.
A Rich Tapestry: Wood Carving Through British History
When you pick up a carving tool, you’re joining a long and noble line of British craftspeople.
Ancient Roots: Celts, Vikings, and Anglo-Saxons
The earliest carvings were practical – bowls, spoons, and tool handles. But they were often decorated with patterns that had deep meaning. The Celts carved intricate, swirling knots into wood and stone, symbols of eternity. When the Anglo-Saxons and Vikings arrived, they brought their own powerful carving traditions. They carved fearsome beasts and gods onto their ships, weapons, and jewellery to protect them and show their status.
The Age of Faith: Carving in Churches and Cathedrals
With the arrival of Christianity, wood carving reached astonishing new heights. Churches and cathedrals were filled with wooden screens, ceilings, and choir stalls, all covered in carvings telling biblical stories. Next time you’re in an old church, look under the seats in the choir stalls. You might find mischievous and funny carvings called misericords. These were carved by craftsmen to give a bit of support to the monks who had to stand for long services, and they often show cheeky scenes from everyday life – a glimpse into the medieval sense of humour. The choir stalls at Lincoln Cathedral are a spectacular example.
The Master Carver: Grinling Gibbons and His Legacy
If British wood carving has a superstar, it’s Grinling Gibbons (1648–1721). Born in Rotterdam but moving to England as a young man, his talent was almost supernatural. He carved from Lime wood, creating cascades of flowers, fruit, and animals that looked so real you felt you could pick them up. His work is incredibly delicate, with leaves as thin as paper and lace so fine it seems impossible it was carved from a solid block of wood. You can see his masterpieces in St. Paul’s Cathedral, Hampton Court Palace, and many of the great country houses of England. He set a standard for craftsmanship that has inspired wood carvers for centuries.
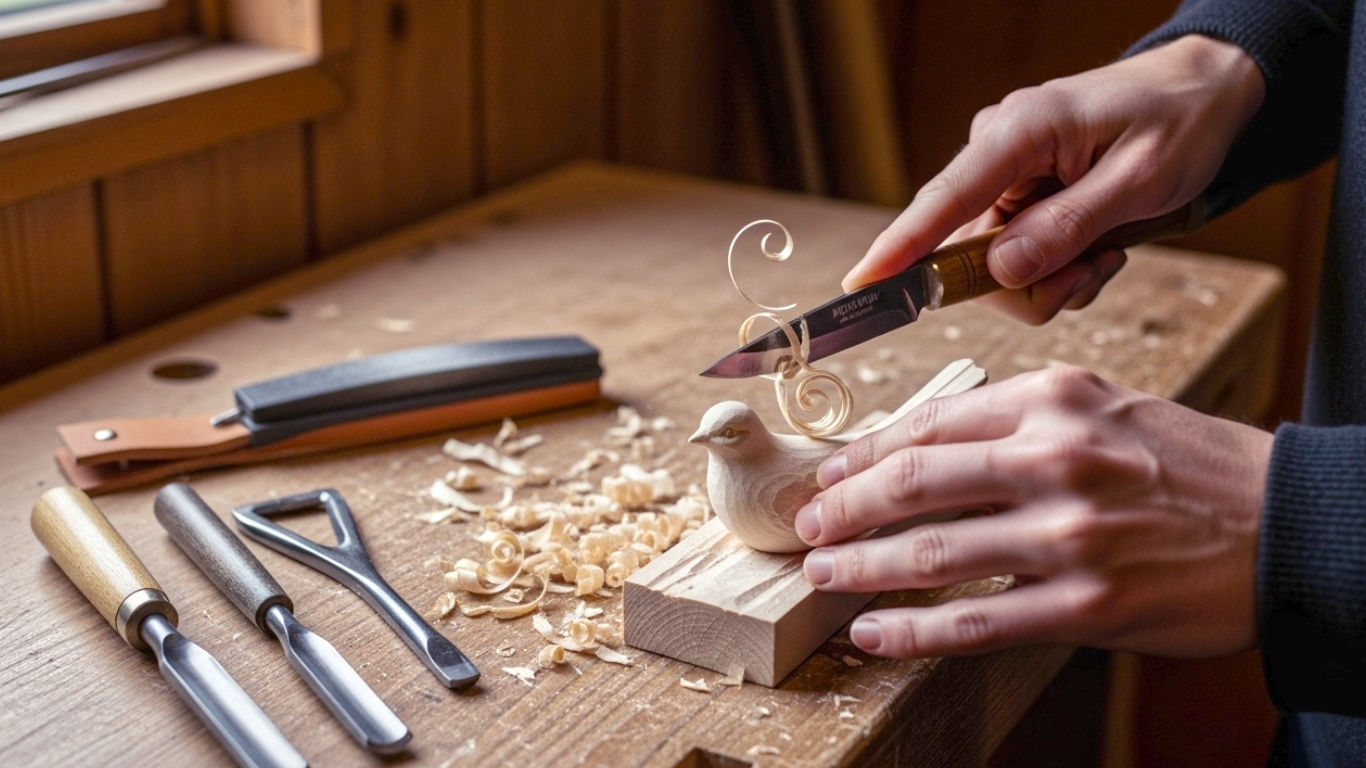
Your First Project: Carving a Simple Bird
Reading is one thing, but carving is another. The best way to learn is to do it. A ‘comfort bird’ is a perfect first project. It’s a simple, smooth bird shape with no legs or complicated details, designed to fit nicely in the palm of your hand.
You will need:
- A block of Lime or Sycamore wood, about 10cm long, 5cm high, and 3cm thick.
- A sharp carving knife.
- A pencil.
- Sandpaper.
Step 1: Draw Your Pattern On the side of the block, draw a simple bird profile – a head, a curved back, a belly, and a tail. On the top of the block, draw the shape of the bird as seen from above – wider at the body and tapering to the head and tail.
Step 2: Rough Out the Shape If you have a small saw, carefully cut away the waste wood outside your lines. If not, don’t worry. You can use your knife to whittle away the wood. Use the thumb-push cut to remove larger pieces. Keep going until you have the basic, blocky outline of your bird.
Step 3: Round the Body This is where the magic happens. Start slicing off all the sharp corners. Think about making the square body into a rounded, oval shape. Turn the piece constantly in your hand. Use long, slicing cuts. Feel the shape emerging. Keep going until you have a smooth, curved body.
Step 4: Shape the Head and Tail Refine the head, making it distinct from the neck. You can use stop cuts to define where the head meets the body. Shape the tail, making it thinner than the body. You could make it fan out slightly or keep it simple and pointed.
Step 5: Sand and Finish Once you’re happy with the shape, it’s time to sand. Start with a medium grit sandpaper (like 120 grit) to remove any tool marks, then move to a fine grit (240 grit or higher) for a silky-smooth finish. Wipe away the dust and apply a little beeswax polish or mineral oil to bring out the wood’s natural beauty and protect it.
Hold it in your hand. You made that. From a plain block of wood, you created a beautiful, tactile object. That feeling is what wood carving is all about.
The Finishing Line: Protecting and Polishing Your Work
The final stage of any carving project is the finish. A good finish protects the wood from dirt and moisture and can dramatically enhance its appearance.
Sanding: The Path to a Smooth Finish
For most carvings, you’ll want a smooth, touchable surface. The key is to sand progressively through the grits. Start with a medium paper (e.g., 120 grit) to remove the tool marks, then move to 180, then 240, and even higher for a glass-like finish. Always sand with the grain, not against it, to avoid creating tiny scratches.
Oils, Waxes, and Varnishes: Choosing Your Finish
There are three main types of finish:
- Oils (like Danish Oil or Tung Oil): These soak into the wood rather than sitting on top. They give a very natural, satin look and feel, enhancing the colour and grain of the wood. They are easy to apply with a cloth.
- Waxes (like Beeswax Polish): Waxes give a soft, warm sheen and a lovely feel. They offer some protection but aren’t as durable as oils or varnishes. They are often applied over an oil finish.
- Varnishes (like Polyurethane): These create a hard, protective film on the surface of the wood. They are very durable and come in gloss, satin, or matte finishes. They can sometimes look a bit like a plastic coating, so they are better for items that will see a lot of wear and tear.
For decorative carvings, a simple oil or wax finish is often the most beautiful. If you’ve carved a spoon or a bowl that you want to use, make sure you use a food-safe finish, like pure tung oil or a special mineral oil designed for chopping boards.
The Future of the Grain: Wood Carving in Modern Britain
In a world of fast-paced technology and mass production, you might think a slow, traditional craft like wood carving would be fading away. But the opposite is true. More and more people are discovering the joy of making things by hand.
The internet, far from killing the craft, has created a vibrant global community. Carvers from all over the UK and the world share their work, techniques, and encouragement on social media and online forums. It’s never been easier to find inspiration or get help with a tricky project.
While the traditions of Grinling Gibbons are kept alive by master craftspeople, a new generation is also pushing the boundaries, creating modern sculptures and contemporary designs. Technology has its place, too. Some carvers use computer-controlled machines (CNC) for roughing out shapes, before finishing the piece by hand, blending the best of both worlds.
Conclusion: The Journey Is Carved in the Making
Woodcraft carving is a journey, not a destination. It’s a skill that will grow with you over a lifetime. You’ll learn the personalities of different woods, the feel of a perfectly sharpened tool, and the quiet satisfaction of turning a raw material into something of beauty and purpose.
Your first carvings might not be perfect. They might be a bit wonky. But they will be yours. Each tool mark will tell the story of the time you spent creating it. In a world that often feels disposable, this craft teaches us patience, focus, and a deep appreciation for the natural world.
So find a corner, get yourself a knife, and grab a piece of wood. The ancient forests of Britain are waiting, and you have a story to carve.
Further Reading
For those ready to delve deeper, these resources are highly respected in the woodcraft community:
- The British Woodcarvers Association: A fantastic resource for connecting with local groups, finding courses, and seeing the work of professional carvers. (https://britishwoodcarversassociation.co.uk/)
- Woodland Heritage: A UK charity focused on the sustainable management of British woodlands, with great information on native timbers. (https://www.woodlandheritage.org/)
- Giles Newman’s Website: An inspirational British wood carver known for his intricate, nature-inspired work. A great example of the craft at a high level. (https://www.gilesnewman.com/)
- Classic Hand Tools: A reputable UK-based supplier for high-quality carving tools and sharpening equipment. (https://www.classichandtools.com/)