The Unpolished Truth: Your Complete Guide to Honed Granite Kitchen Worktops
Is honed granite beautiful or a high-maintenance nightmare? We explore the pros (no glare) and cons (stains, fingerprints) and give a full sealing guide.
This post may contain affiliate links. If you make a purchase through these links, we may earn a commission at no additional cost to you.
Walk into a cutting-edge British kitchen today, and you might notice something’s missing. The glare. For decades, the high-gloss, mirror-like shine of polished granite was the undisputed king of kitchen worktops. It was a sign of luxury, practically bouncing light off every surface.
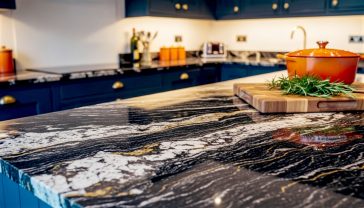
But look closer. There’s a new(ish) kid on the block, and it’s winning the hearts of designers and homeowners from a Bristol townhouse to a Glasgow new-build. It’s the soft, velvety, almost-warm feel of honed granite.
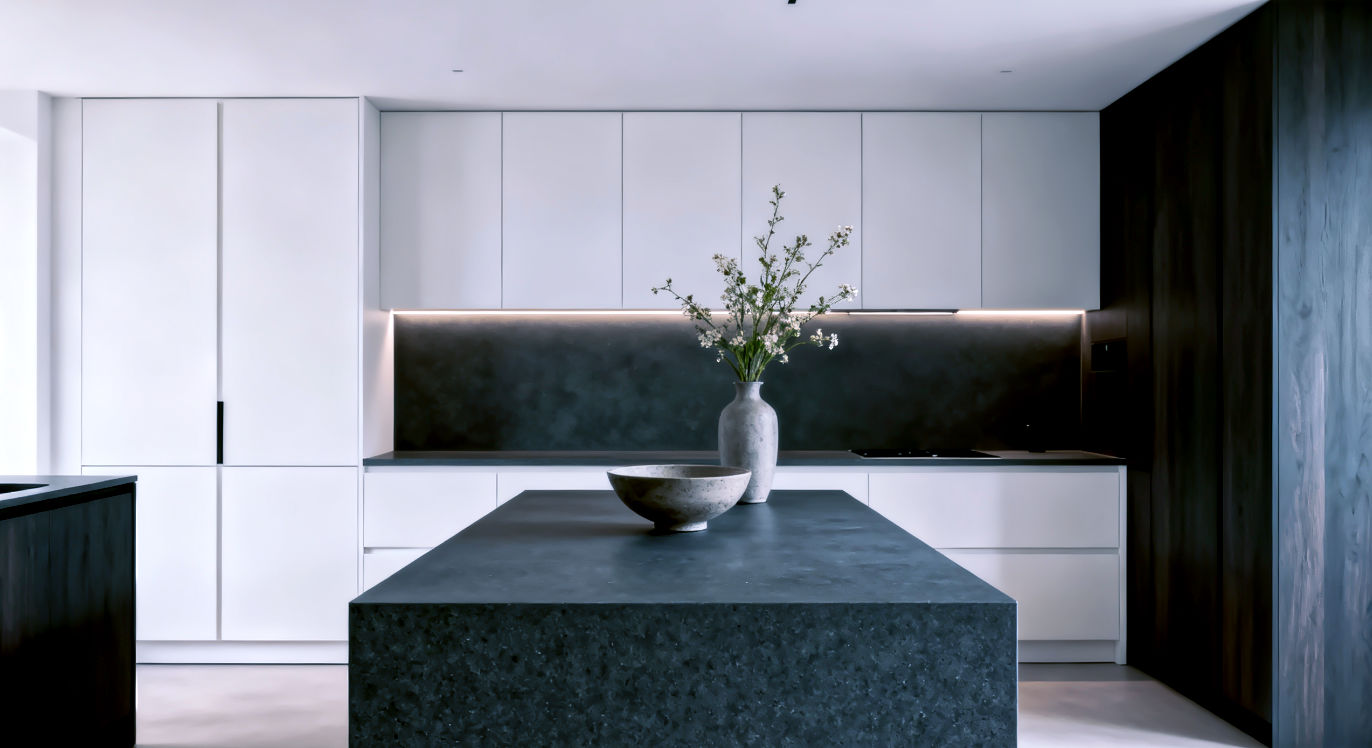
This is the matte look. It’s sophisticated, it’s subtle, and it’s everywhere. It doesn’t shout; it whispers. It feels less like a sterile slab and more like a real, natural slice of the earth.
But here’s the secret no one tells you in the glossy design magazines: this stunning, understated surface has a needy side. It’s the high-maintenance partner compared to its easy-going polished cousin.
So, what’s the real story? Is honed granite the key to your dream kitchen, or will it be a daily battle against fingerprints and spills? This is your complete guide. We’ll walk you through what honed granite really is, whether it’s right for your home (and your daily cuppa spills), and exactly how to look after it. No jargon, just the honest truth.
What Exactly Is Honed Granite? (And Why Isn’t It Shiny?)
Before we get into the pros and cons, let’s clear up what we’re actually talking about.
Granite 101: A Quick Refresher
First off, what’s granite?
- Simplified Explanation: Think of it as a slice of a mountain for your kitchen. It’s a super-hard, natural stone that’s dug right out of the earth. It’s forged from cooled magma (hot liquid rock) from deep underground.
- Detailed Explanation: It’s a type of igneous rock, made up of crystals like quartz and feldspar. These are the bits that give it its unique speckled and swirly patterns. Because it’s formed in nature, every single slab is one-of-a-kind. Its high quartz content is what makes it so incredibly tough and resistant to scratches.
The “Honing” Process: From Gloss to Matte
A slab of granite doesn’t come out of the quarry looking shiny. It has to be “finished”.
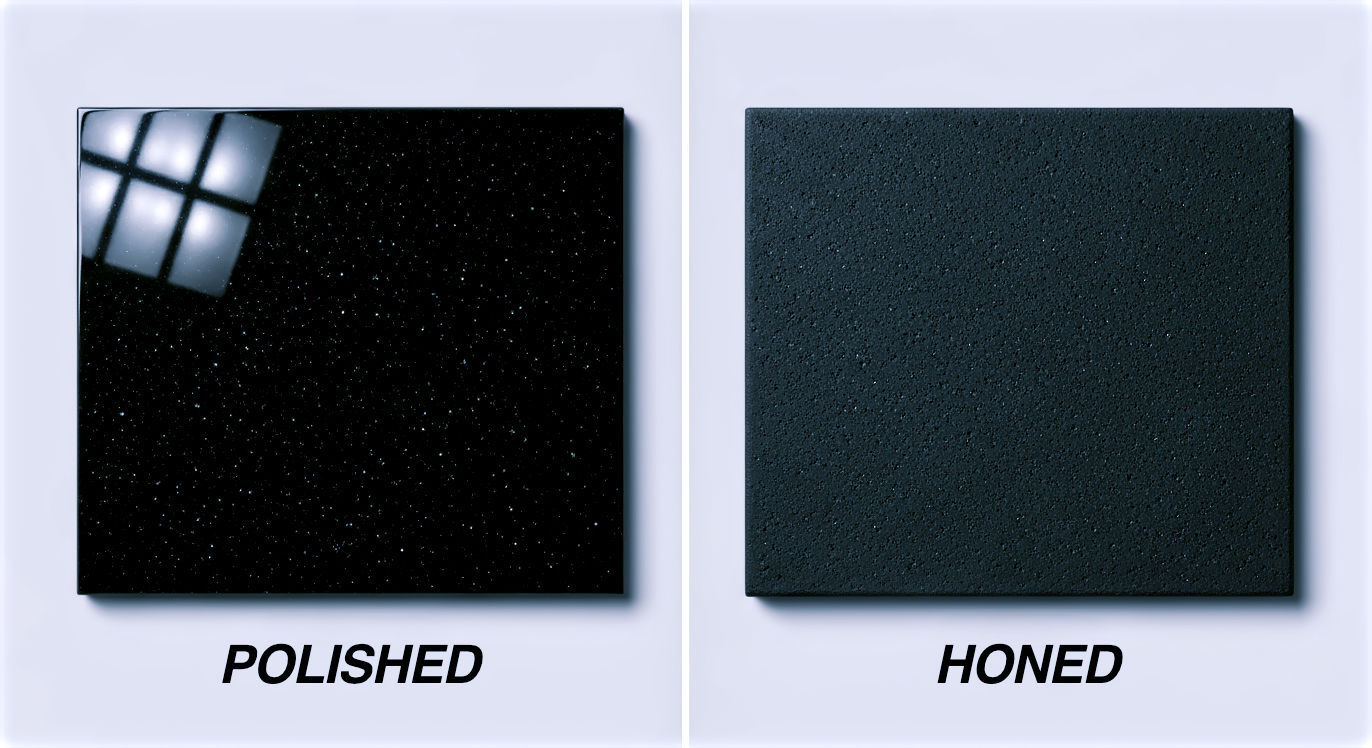
- Simplified Explanation: Imagine sanding a piece of wood. To get that classic polished look, the factory sands the stone with finer and finer pads (called grits) until it’s perfectly smooth and glassy, like a mirror. To get a honed finish, the factory simply stops that process much earlier, using rougher grits.
- Detailed Explanation: The finishing is a multi-stage grinding and buffing process. A high-gloss polished finish is buffed to an incredibly high grit, often over 3,000. This process not only makes it reflective but also tightly “closes” the natural pores of the stone. A honed finish, by contrast, might stop around the 400- or 800-grit mark. This leaves the surface perfectly flat and smooth to the touch, but with a matte or low-sheen look, like an eggshell. Its pores are left more “open”.
Honed vs. Leathered: What’s the Difference?
You’ll hear these two words used for matte finishes, and they aren’t the same.
- Honed: Smooth, flat, and matte.
- Leathered (or Brushed): Also matte, but it’s textured. The stone is brushed with diamond-tipped bristles, which gives it a bumpy, slightly ridged feel, a bit like the surface of a piece of leather. It’s great at hiding mess but is a different look entirely.
For this guide, we’re focusing purely on the smooth, flat, honed finish.
The Big Debate: Honed vs. Polished Granite
This is the main choice you’ll face at the stone yard. Let’s put them head-to-head.
Round 1: The Look (Aesthetics & Vibe)
- Polished: This is the classic. It’s “look at me” shiny. It bounces light all around the room, which can make a small or dark kitchen feel bigger and brighter. It really makes the colours, crystals, and flecks in the granite pop. The downside? In the wrong kitchen, some feel it can look a bit dated, a bit “80s hotel lobby”.
- Honed: This is the modern challenger. It’s subtle, sophisticated, and feels warmer. It absorbs light rather than reflecting it, giving a softer, more organic and natural feel. It’s the perfect partner for the “Scandi-industrial,” “modern farmhouse,” or “minimalist” looks that are so popular in the UK right now.
- The Verdict: Polished is classic glam; honed is understated chic.
Round 2: The Feel (Texture)
- Polished: Glassy-smooth and often feels very cold to the touch.
- Honed: Velvety, soft, and almost “waxy” or “soapy”. It feels more connected to the raw, natural stone, and many people find it much more tactile.
Round 3: The Daily Grind (Practicality)
Here’s where it gets interesting.
- Polished: That shiny surface is its own worst enemy. It shows every single crumb, every speck of dust, and every smear mark from wiping. The reflection highlights all of it. On the plus side, it’s a doddle to wipe clean.
- Honed: This is the “crumbs champion”. Its mottled, non-reflective surface is brilliant at hiding dust, flour, and crumbs. You could bake a full Victoria sponge and the kitchen would still look tidy… which is also a downside, as you might not see the mess you need to clean.
- The Verdict: Pick your poison. Do you hate seeing crumbs (go honed) or hate seeing fingerprints (go polished)? Which brings us to…
Round 4: The Colour
This is a crucial point that catches so many people out. Honing dulls the colour of the stone.
Think about a pebble on the beach. When it’s dry (honed), it looks pale and grey. When it’s wet (polished), its colours are deep and rich. It’s the same with granite.
- A polished ‘Absolute Black’ granite will be a deep, inky, pure black.
- A honed ‘Absolute Black’ granite will look more like a dark charcoal or slate grey.
Honing washes out the vibrancy. This can be a beautiful, soft look. But if you want that deep, rich colour and a matte finish, your only option is to use a special “colour-enhancing” sealer (we’ll get to that in the maintenance guide).
The Pros: Why You’ll Fall in Love with Honed Granite
So, why go to all this trouble? Here are the real benefits.
Pro 1: The Sophisticated, Modern Look
This is the number one reason people choose it. It’s grown-up. It’s tactile. It doesn’t scream “kitchen worktop”. It blends beautifully with other natural materials like wooden cabinets, slate floors, and linen fabrics. It has a quiet confidence that polished granite just can’t match.
Pro 2: No More Blinding Glare
If your kitchen is a lovely sun trap, or you have a lot of spotlights pointing down at your work surfaces, polished granite can be blinding. The glare is genuinely intense. Honed granite is the perfect solution. It just soaks up the light, creating a calm, gentle surface that’s much easier on the eyes. It’s also why it looks so much better in photos (if you’re an Instagram foodie).
Pro 3: It Hides Scratches and “Etching” Better
Wait, I thought granite didn’t scratch? It’s scratch-resistant, not scratch-proof. A dropped ceramic pan or a diamond ring dragged across the surface can scratch it.
- On a polished surface, a scratch is very obvious. It breaks that perfect, mirror-like reflection and stands out a mile.
- On a honed surface, which is already matte, small, fine scratches are much, much less visible.
What about “etching”?
- Simplified: Etching is when an acid (like lemon juice, vinegar, or harsh cleaners) literally eats away at the stone, leaving a dull, rough patch.
- Detailed: Now, technically, true granite (which is high in quartz) is very resistant to acid and doesn’t really “etch” like marble does. Marble is made of calcium carbonate, which is what acid loves to eat. The problem is that some stones are sold as “granite” when they’re actually marbles or other, softer stones.
- Even on true granite, a very strong acid can “stun” or discolour the surface. On a shiny polished top, this new dull spot is glaringly obvious. On a honed top (which is already dull), you’d be very hard-pressed to even see it. This is a massive, massive win.
Pro 4: It’s the “Crumbs Champion”
As we mentioned, that non-reflective, patterned surface is a master of camouflage. It’s brilliant at hiding the small bits of daily life. For busy families or people who don’t want to be chasing every single speck of dust with a cloth, this can be a huge relief.
The Cons: The Honest Truth About Honed Granite
Okay, deep breath. Nothing this beautiful comes without a catch. Here are the trade-offs.
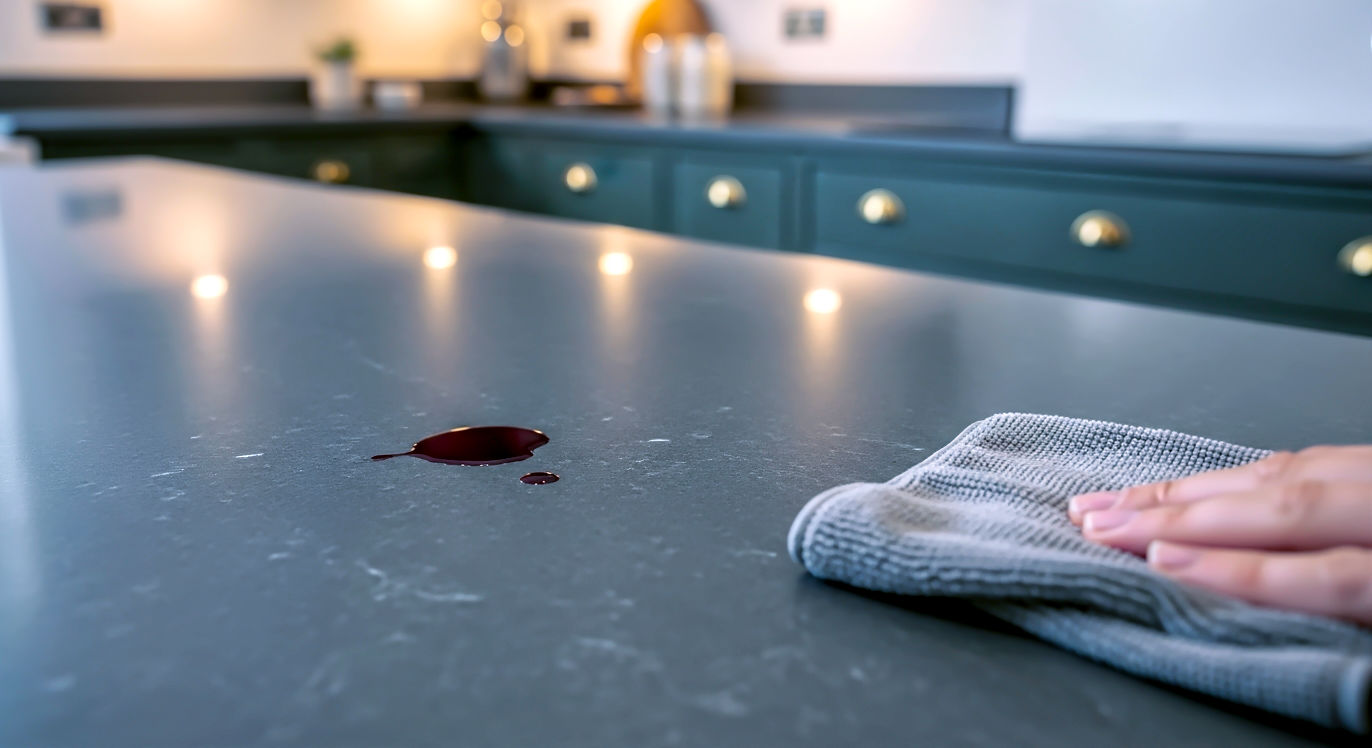
Con 1: It’s a “Thirsty” Stone (A Stain Magnet)
This is the big one. The one you must understand.
- Simplified: The honing process opens up the tiny, microscopic pores of the stone. A polished surface has its pores sealed over by the buffing. A honed surface is much more open, like a sponge.
- Detailed: Granite is naturally porous (it has tiny holes). Honing increases the surface area and leaves these pores wide open. This means anything liquid—water, red wine, cooking oil, tea, coffee—will try to soak right in.
- This makes honed granite far more prone to staining than polished granite. An oil-based stain, like a ring of olive oil from the bottle or a splash of curry, can soak in deep and be a real nightmare to get out. You have to be fast when you spill.
Con 2: The Fingerprint and Smudge Problem
This is the daily frustration. Especially on darker colours (like Absolute Black or dark grey), honed granite is notorious for showing oily fingerprints, smudges from hands, and water rings from glasses.
The natural oils on your skin transfer to the matte surface and create a ‘dark’ patch. You wipe it down with a damp cloth, and as it dries, you just see all the smudges and smears reappear. For a perfectionist, it can be maddening. Lighter, more patterned granites are much more forgiving.
Con 3: It Needs Constant Sealing
Because it’s so porous and “thirsty”, you cannot afford to skip this step. You must seal your honed granite. And you must do it often.
We’re not talking once every five years, which you might get away with on some polished granites. We’re talking at least once a year, and probably every 6 months for high-use areas, like around the sink and the hob.
This is non-negotiable. Not sealing your honed worktop is like leaving a new wooden door un-varnished in the rain and expecting it to be fine.
Con 4: The Colour is Muted
As we covered, the colours are less vibrant. They are softer, more washed-out. If you’re in the showroom and fall in love with the deep, rich, “wet-look” of a polished slab, you cannot expect to get that same colour from a honed version… unless you use a specific colour-enhancing sealer.
The Ultimate Honed Granite Maintenance Guide
Right, you’ve decided to go for it. You love the look, and you’re ready for the commitment. How do you live with it without losing your mind?
This is your new bible.
Part 1: Sealing – Your New Best Friend
Think of sealer as a raincoat for your worktop. It’s not a plastic sheet on top; it’s a special liquid (an ‘impregnator’) that soaks into the open pores and chemically bonds with the stone.
It doesn’t make it stain-proof. Nothing does. It makes it stain-resistant. It buys you time. That splash of red wine will “bead” on the surface for a few minutes, giving you time to grab a cloth, instead of vanishing into the stone instantly.
How to Tell if it Needs Sealing (The Water Test)
This is the only test you need.
- Drip a small puddle of water (about the size of a 50p coin) onto the stone in a few different places (especially near the sink).
- Set a timer for 15 minutes.
- Wipe the water away with a dry cloth.
- Look closely. Has the stone underneath the puddle gone dark?
- If YES (it’s dark): Your sealer has worn off. The stone is absorbing the water. It’s time to reseal, sharpish.
- If NO (it’s the same colour): Your sealer is working. The stone is protected. You’re all good for now.
DIY Sealing: A Step-by-Step Guide
You can absolutely do this yourself. It just takes an hour on a Saturday.
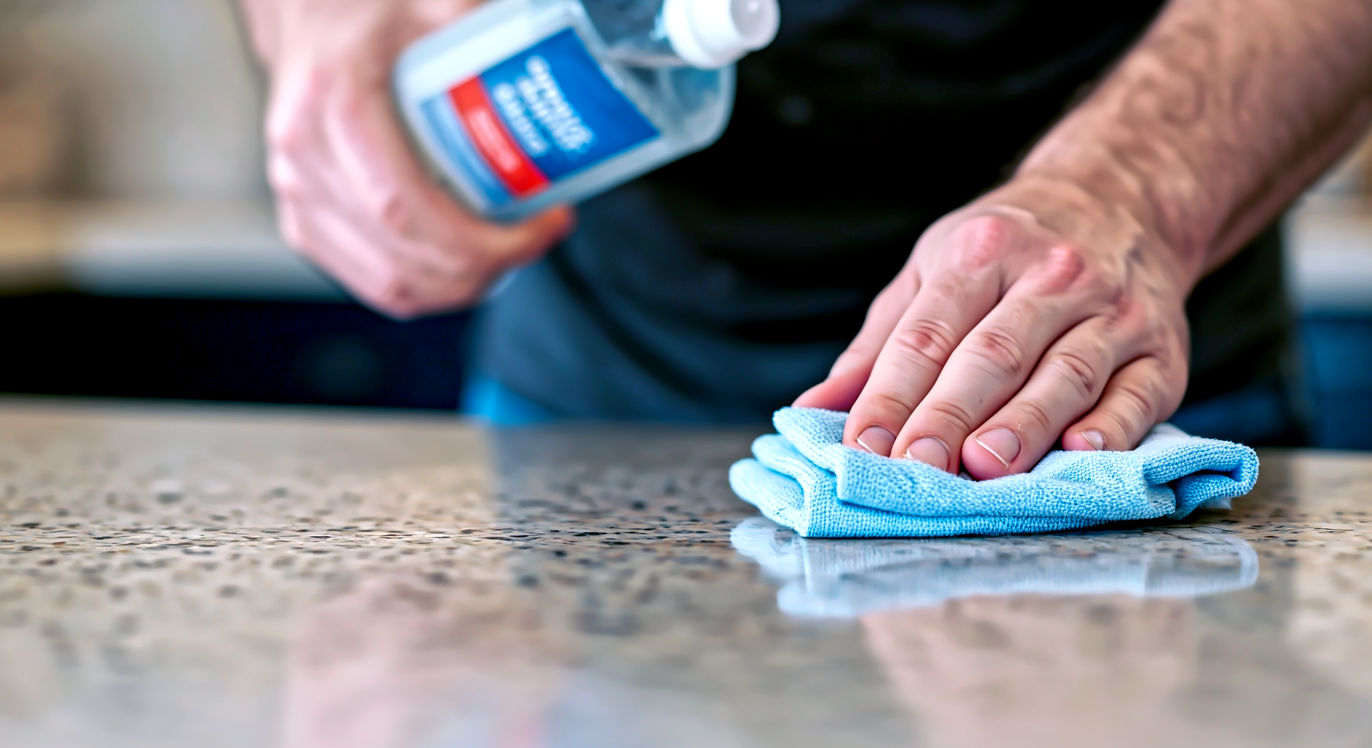
- Choose Your Sealer: Don’t grab any old bottle from a DIY shed. Go to a proper stone specialist (online or a good tile shop) or ask your kitchen installer for a recommendation. You need a high-quality impregnating (or ‘penetrating’) sealer for natural stone.
- The “Colour-Enhancing” Option: If you have a dark granite (like black or dark grey) and you want that rich, “wet” look, you must buy a colour-enhancing sealer. This will darken the stone and make the colours pop, as well as sealing it. IMPORTANT: Test this on a hidden spot first (like the underside or a spare off-cut) to make sure you love the look. It’s permanent.
- Clean: Clean the worktop thoroughly with a proper pH-neutral stone cleaner (see below) to remove all grease and crumbs. Any dirt you seal in is there for good.
- Dry: Let the worktop dry completely. Give it at least a few hours, or even 24 hours, to be safe.
- Ventilate: Open every window and door. This stuff is strong-smelling.
- Apply: Pour the sealer onto a clean, lint-free cloth (a microfibre cloth is perfect). Wipe it onto the granite in a thin, even coat. Work in small, manageable sections. Don’t let it “puddle”.
- Wait: Check the instructions on the bottle. It will usually say to let the sealer soak in for 5-20 minutes. You might even see it “drink up” the sealer.
- Wipe OFF (The Most Important Step): After the waiting time, you must wipe off every last bit of excess sealer from the surface. Use a new, clean, dry microfibre cloth. If you let the excess sealer dry on the surface, it will leave a sticky, hazy, streaky residue that is a complete nightmare to remove. Buff the surface until it’s totally dry.
- Cure: That’s it. Now, just let it “cure” (fully harden). Don’t put anything wet or oily on it for at least 24-48 hours (check the bottle).
Professional Sealing
If this all sounds terrifying, just pay a professional. A local stone mason or kitchen installer will often offer a “deep clean and reseal” service. It might cost £150-£250, but it gives you perfect peace of mind for another year.
Part 2: Daily Cleaning
This is what you’ll be doing every day. Get this right, and the rest is easy.
The “Dos”
- DO use a simple solution of warm water and a tiny drop of washing-up liquid.
- DO buy a dedicated, pH-neutral “natural stone cleaner”. (You can find these online or in good supermarkets. Method’s Daily Granite cleaner is a popular, easy-to-find one).
- DO use a soft microfibre cloth. Have two: one damp for wiping, one dry for buffing.
- DO “buff dry” after cleaning. This is the secret. Wiping a honed surface and letting it “air dry” is what causes all the streaky water marks and smudges. A quick wipe-over with a dry, clean cloth after cleaning is the key to a streak-free finish.
The “Don’ts” (The Big No-Nos)
This is the list to print out and stick inside a cupboard. Using these will strip your expensive sealer and leave your stone vulnerable.
- DON’T use any “all-purpose” kitchen sprays (like Flash, Dettol, or supermarket own-brands). They are almost always too acidic or too alkaline (bleach-based).
- DON’T use vinegar. Ever.
- DON’T use lemon juice or any citrus-based cleaner.
- DON’T use bleach (or any cleaner containing bleach).
- DON’T use Cif Cream or any abrasive, gritty cleaner. These will dull and scratch the surface over time.
- DON’T use a green scouring pad or wire wool. (Microfibre cloths only!).
Part 3: Tackling Stains (The “Oh, Crumbs” Moment)
Rule 1: SPEED. You see a spill, you wipe it. Immediately. Don’t leave that ring of tea or splash of curry until “after dinner”. That’s how stains happen. Blot, don’t wipe, to stop it from spreading.
For General Stains (e.g., Wine, Juice, Tea):
- Blot the spill.
- Clean the area with your pH-neutral cleaner.
- If a mark is left, it’s time for a ‘poultice’.
The Magic ‘Poultice’ (For Stubborn Stains):
- Simplified: A poultice is a thick paste that you put on the stain to “pull” it out of the stone.
- How-To:
- Get some baking soda (bicarbonate of soda) and mix it with a tiny bit of water to make a thick paste (like toothpaste).
- Slap the paste on the stain. Be generous.
- Cover the paste with a bit of cling film and tape down the edges with masking tape. This keeps it moist.
- Leave it alone for 24 hours. Let it do its magic.
- The next day, take off the cling film, let the paste dry out, and then scrape it off.
- Clean the area with your stone cleaner. The stain should be gone, or at least much lighter. You might need to repeat it for a really tough stain.
For Oil Stains (The Worst Culprit): Oil is the real enemy because it spreads under the surface. A bicarb poultice might not be enough. You may need a specific “oil stain remover” for stone, which is a chemical poultice you can buy from a stone care website.
Part 4: The Fingerprint Foe
How do you stop those annoying oily smudges on dark granite?
- You can’t, really. Not completely. It’s just the nature of a dark, matte surface.
- But you can manage them. Your best weapon is the daily “damp wipe, dry buff” routine with a microfibre cloth and a pH-neutral cleaner. This removes the oils.
- Some people find that using a specialist “stone clean and polish” spray (not a wax polish, just a finishing spray) helps. It leaves a slight barrier that can help repel oils.
What About Cost? Does Honed Mean More Money?
This is a common question.
The Slabs Themselves
Not really. The cost of the raw granite slab is the same whether it’s honed or polished.
- Sometimes, honed can be slightly cheaper because it takes less time and fewer materials for the fabricator to finish (they’re skipping the final polishing steps).
- However, because it’s “on-trend” and seen as a premium, designer finish, some suppliers might charge a small premium for it.
In the grand scheme of a new kitchen, the price difference for the finish is tiny. The type of granite you choose (a rare blue granite vs. a common grey) will affect the price far more. Expect to pay anywhere from £300 to £700 per square metre for a quality granite worktop, supplied and fitted.
The “Lifetime” Cost
This is the hidden cost. Honed granite has a higher lifetime cost.
Why? You will be spending money every year that a polished granite owner won’t.
- You’ll get through more bottles of specialist pH-neutral cleaner.
- You’ll have to buy an expensive bottle of high-quality sealer every 6-12 months.
- Or, you’ll be paying £200-ish for a professional to come and reseal it for you.
Polished granite is the “fit and forget” option. Honed granite is the “high-maintenance” partner. It’s an ongoing investment.
Is Honed Granite Right for Your Kitchen? (The Final Verdict)
Let’s tie this all together. It’s a simple choice, as long as you’re honest with yourself.
Honed Granite is PERFECT for you if…
You should probably AVOID Honed Granite if…
Conclusion: The Honest Choice
Honed granite is, without a doubt, beautiful. It’s warm, it’s tactile, and it feels more “real” and “grounded” than its shiny, loud cousin. It has the power to be the calming, sophisticated heart of a modern, stylish British kitchen.
But it’s not a simple, “fit-and-forget” purchase. It’s a relationship.
It’s a surface that demands a little more from you. It needs care, it needs attention, and it needs the right products. Unlike polished granite, which is all tough-love and shrugs off most of what you throw at it, honed granite is the sensitive soul of the kitchen.
Now you know the full story: the good (the look, the lack of glare, the feel), the bad (the staining, the fingerprints), and the essential (the sealing).
The choice, as they say, is yours.
Further Reading
For more in-depth technical information and to see ranges of stone, you might find these resources helpful:
- The Natural Stone Institute: The leading international trade body for natural stone. While US-based, its technical bulletins on sealing and cleaning are the industry standard.
- Stone Federation Great Britain (SFGB): The official trade association for the stone industry in the UK. A great resource for finding accredited suppliers and installers.
- Leading UK Kitchen Magazines (Online): Websites for Livingetc, Ideal Home, and Elle Decoration UK frequently feature kitchens with honed surfaces and provide design inspiration.