From Slab to Fab: My Journey Crafting a Unique Oak Furniture Piece
Follow my personal story of crafting a stunning oak slab coffee table, from choosing the timber to the final oil finish. Perfect for UK makers.

This post may contain affiliate links. If you make a purchase through these links, we may earn a commission at no additional cost to you.
There’s a special kind of magic in wood. It’s not the hocus-pocus sort, but something quieter, more honest. It’s the story held within the grain, the memory of seasons passed, and the potential for a new life. I’d always been drawn to that magic, the idea of taking something raw and shaping it into something beautiful and useful. For years, I’d pottered about in my shed, knocking together shelves and fixing wobbly chairs. But I yearned for a proper project, a legacy piece, something that would start as a rough, hefty slab of timber and end up as the heart of a room.
This is the story of that journey. It’s about how I turned a massive, gnarled slab of English oak into a coffee table that my family will hopefully treasure for generations. It wasn’t always easy – there were moments of sheer panic and sawdust-fuelled frustration. But if you’ve ever looked at a beautiful piece of wooden furniture and thought, “I wish I could make that,” then come along. This is for you. It’s a tale of sweat, splinters, and the deep, quiet satisfaction of making something with your own two hands.
The Dream and the Drawing Board
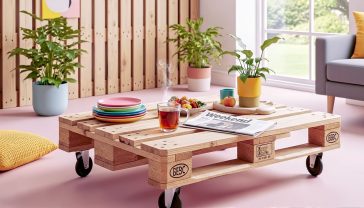
Every project starts with an idea. Mine began with a problem: our living room was a bit of a void. We had the sofa, the telly, the usual bits and bobs, but nothing to tie it all together. What we needed was a coffee table, but not just any coffee table. I didn’t want something flat-packed and anonymous. I wanted something with character, a piece that felt like it had grown right there in the room. I pictured a “live edge” table, where the natural, wavy edge of the tree is left just as it is. It’s a style that feels both rustic and modern, a little slice of the forest brought indoors.
Finding the Perfect Slab: A Trip to the Timber Yard
You can’t just pop down to B&Q for a 200-year-old piece of oak. Finding the right slab is an adventure in itself. I spent a few weekends exploring local timber yards, places that smell wonderfully of damp earth and freshly cut wood. These yards are treasure troves for woodworkers, stacked high with planks and slabs of every shape and size.
I was looking for English oak, a classic for a reason. It’s strong, beautiful, and feels deeply British. I wanted a piece with “character” – that’s wood-nerd talk for interesting knots, swirling grain, and maybe even a few cracks or imperfections. These aren’t flaws; they’re the wood’s backstory. After much searching, I found it. A single, magnificent slab of pippy oak, about two metres long and half a metre wide. “Pippy” oak is dotted with little clusters of tiny knots, like little constellations, caused by dormant buds in the tree’s life. It was perfect. And heavy. Seriously, I nearly put my back out just getting it into the van.
Top Tip: When choosing a slab, look for one that has been properly kiln-dried or air-dried for several years. Freshly cut wood is full of moisture and will warp, crack, and generally misbehave as it dries. A good timber merchant will tell you the moisture content. You’re looking for something below 12% for furniture that will live indoors.
The Design: Keeping it Simple
With the slab safely back in my workshop (okay, my garage), it was time for the design. I’m not an artist, so my sketches were more scribbles than masterpieces. My plan was simple: let the wood do the talking. The top would be the main event, so the base needed to be strong but understated. I decided on simple, sturdy steel legs. This contrast between the rustic, natural wood and the sleek, industrial metal is a classic look.
I measured the slab carefully, marking out the final dimensions with a chalk line. This was the point of no return. The first cut is always the scariest. It feels like making the first mark on a blank canvas. You take a deep breath, trust your measurements, and go for it.
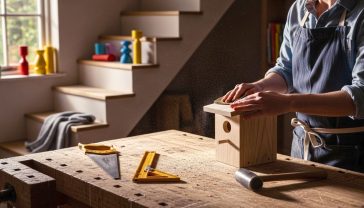
Gearing Up: The Tools for the Job
You don’t need a workshop worthy of a television show to get started, but a few key tools make all the difference. My setup is pretty modest, built up over years of birthdays and Christmases.
The Must-Haves
- A good saw: For trimming the slab to size, a circular saw with a guide rail is brilliant. It gives you a perfectly straight cut. For finer work, a hand saw is essential.
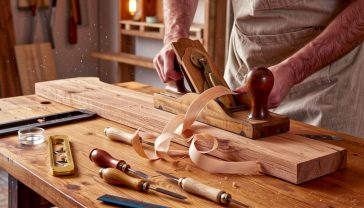
- A router: This is probably the most versatile tool in my workshop. For this project, I used it to flatten the slab. It’s a bit like a high-tech plane, shaving off tiny layers of wood to create a perfectly level surface.
- A sander: You will be doing a lot of sanding. A random orbit sander is your best friend here. It’s powerful enough to smooth out rough patches but gentle enough not to leave ugly swirl marks.
- Clamps, clamps, and more clamps: You can never have too many clamps. They are like an extra set of very strong hands, holding everything securely while you work.
Safety First: No Excuses
Working with wood is fantastic fun, but it needs respect. Sawdust gets everywhere, especially in your eyes and lungs. Power tools are powerful. It’s simple, really:
- Eye protection: Always. A stray splinter can do serious damage.
- Dust mask: You don’t want to be breathing in fine wood dust.
- Ear defenders: Routers and saws are loud. Protect your hearing.
It’s not about being soft; it’s about being sensible so you can carry on woodworking for years to come.
The Hard Graft: From Rough Slab to Smooth Surface
This is where the real work begins. The slab, as beautiful as it was, was far from flat. Trees aren’t made of perfectly level planks, and as wood dries, it can twist and cup. Getting it perfectly flat and smooth is the most crucial, and probably the most laborious, part of the whole process.
Flattening the Beast: My Router Sled
Professional workshops have enormous machines called thicknessers to flatten big slabs. I don’t have the space (or the budget) for one of those. So, I built a router sled.
It sounds complicated, but it’s not. Imagine a little bridge that your router can slide across. You build two perfectly level rails on either side of your slab, and the bridge runs along them. By sliding the router back and forth across the bridge, and moving the bridge down the length of the slab, you can slowly mill the entire surface down to a consistent, flat level.
It’s a slow, messy process. It took me an entire weekend. The garage was covered in a mountain of oak shavings, and my arms ached. But the moment you run your hand over the newly flattened surface, smooth as glass, it’s all worth it. I did this for both sides, of course.
Sanding, and Then More Sanding
Once the slab was flat, it was time to make it smooth. Sanding is one of those jobs that separates the enthusiasts from the professionals. It’s tempting to cut corners, but a patient approach pays off. The key is to work your way through the grits.
- I started with a coarse 80-grit sandpaper to remove the marks left by the router.
- Then I moved to 120-grit to smooth things out further.
- Followed by 180-grit.
- And finally, a very fine 240-grit.
After each stage of machine sanding, I sanded by hand, going with the grain of the wood. This removes any tiny scratches the power sander might have left. By the end, the surface felt like silk. You can’t help but stroke it.
The Details: Bringing the Wood to Life
With the main surface prepared, it was time to focus on the details that would turn this plank into a piece of furniture.
Taming the Live Edge
The “live edge” was one of the reasons I chose the slab, but it needed cleaning up. It was covered in brittle bark and loose fibres. I used a wire brush to gently remove the worst of it, being careful not to damage the beautiful, undulating shape of the wood beneath. Then, I hand-sanded the edge, softening any sharp points but keeping its natural, organic feel.
Dealing with Imperfections: The Art of Epoxy
My slab had a few cracks and a couple of deep knot holes. Some people might see these as flaws, but I saw them as opportunities. I decided to fill them with black epoxy resin.
Epoxy is a two-part liquid that, when mixed, sets rock hard. By adding a black pigment, I could create a striking contrast with the warm honey colour of the oak. It stabilises the cracks, stopping them from getting bigger, and turns them into a design feature.
The process is nerve-wracking. You have to build a little dam around the hole with tape to stop the resin from leaking everywhere. Then you pour it in, carefully popping any air bubbles with a heat gun. You have to overfill it slightly, because after it has cured (which takes about 24 hours), you then have to sand it all back down so it’s perfectly flush with the wood. The first time you see that seamless, glossy black against the natural grain is a real ‘wow’ moment.
The Finishing Line: Protecting the Wood
Choosing a finish is a big decision. It’s the final step that protects the wood and really makes the grain pop. There are lots of options – varnish, lacquer, wax, oil.
Varnishes and lacquers create a film on top of the wood. They are very durable but can sometimes look and feel a bit plasticky. I wanted something that would feel like wood, not a coating on top of wood. So, I went for a hardwax oil.
Hardwax oil is brilliant. It’s made from a blend of natural oils and waxes. It soaks into the wood fibres, protecting them from within, rather than sitting on the surface. It’s easy to apply and gives a beautiful, natural-looking satin sheen that is wonderfully tactile.
I applied it with a clean cloth, rubbing it into the grain. The effect is instant. The moment the oil hits the wood, the colours deepen, and the patterns in the grain jump out at you. It’s like the wood suddenly wakes up. I applied three coats, leaving 24 hours between each one and giving it a very light sand with super-fine paper before the final coat.
Putting It All Together: The Final Assembly
The top was finished. It was gleaming. Now all it needed were its legs. I had ordered a set of black, trapezium-shaped steel legs online.
Attaching them was straightforward but required precision. I laid the tabletop upside down on a soft blanket to protect the finish. I measured exactly where the legs needed to go to ensure the table would be stable and look balanced. Then, I drilled pilot holes for the screws.
A word of warning: Wood moves. It expands and contracts with changes in temperature and humidity. If you just screw the legs directly into a solid wood top, the wood can crack as it tries to move. The solution is to use threaded inserts and bolts, and to drill slightly oversized holes in the leg brackets. This gives the wood a little wiggle room.
With the legs securely bolted on, there was only one thing left to do. With the help of my wife (it was still incredibly heavy), we flipped it over. And there it was. A coffee table. My coffee table.
The Reveal: More Than Just a Table
It stood in the middle of our living room, looking even better than I had imagined. The light from the window caught the swirling grain of the oak, and the black epoxy rivers flowed through it. The live edge gave it a sense of movement, of life. It wasn’t just a piece of furniture; it was a piece of our home’s story, and a piece of mine.
Every time I look at it, I see more than just a table. I see the rainy Saturday I spent at the timber yard. I see the mountain of sawdust in the garage. I remember the frustration of getting the router sled perfectly level and the quiet joy of watching the grain come alive under the oil.
Crafting something from a raw slab of wood is a slow, deliberate process in a world that’s all about speed and convenience. It teaches you patience. It connects you to a material in a profound way. And at the end of it all, you have something that is utterly, uniquely yours. Something that will be there for family gatherings, for countless cups of tea, for homework and board games and quiet moments. It’s a keeper.
So, if you’ve got a little spark of an idea, a desire to make something real and lasting, I say go for it. Start small, be patient, and enjoy the journey. You’ll make mistakes, you’ll get covered in sawdust, but you’ll also create something wonderful. And that’s a special kind of magic.
Further Reading
For those looking to start their own journey, here are some fantastic UK-based resources:
- UK Workshop: A great online forum for advice and community support.
- The Woodsmith’s Store: A brilliant source for high-quality tools and finishes.
- Local Timber Yards: Search for timber merchants in your area. Nothing beats seeing and feeling the wood for yourself.