The Secret World at Your Fingertips: A Complete Guide to Macro Photography
Discover the stunning world of macro photography. This complete guide explains the gear, techniques, and secrets to capturing incredible close-up images.
This post may contain affiliate links. If you make a purchase through these links, we may earn a commission at no additional cost to you.
Have you ever stopped to really look at a dewdrop clinging to a spider’s web? Or the intricate, almost alien-like patterns on a butterfly’s wing? There’s a secret world all around us, a miniature universe bustling with incredible detail that’s usually too small for our eyes to see. But what if you could not only see it but capture it in a photograph?
That’s the magic of macro photography. It’s like having a superpower that lets you shrink down and explore the tiny landscapes on flowers, insects, and everyday objects. It’s not just about taking close-up pictures; it’s about revealing the astonishing beauty hidden in plain sight.
This guide is your key to unlocking that world. We’re going to journey into the heart of macro photography, from its surprising history to the gear you’ll need to get started. We’ll cover the simple techniques that make a huge difference and explore how you can turn a bumblebee in your back garden into a stunning work of art. You don’t need to be a professional photographer or have a van full of expensive kit. All you need is a little curiosity and a desire to see the world differently. So, let’s get ready to zoom in and discover the incredible, unseen universe right under our noses.
What Exactly Is Macro Photography?
Let’s get one thing straight from the start: taking a close-up photo isn’t always macro photography. Pointing your phone at your lunch might give you a detailed shot, but it doesn’t automatically make it ‘macro’. The term has a specific technical meaning that’s all about size and scale.
The Magic Number: True 1:1 Magnification
At its heart, true macro photography is about capturing a subject at a 1:1 magnification ratio (or greater). But what on earth does that mean?
Imagine you’re taking a picture of a 10p coin. The camera’s sensor is the digital ‘film’ that captures the image. If the image of that 10p coin projected onto the sensor is the exact same size as the coin in real life, you’ve achieved 1:1 magnification. You’ve created a life-sized photograph of your subject right there inside your camera.
- Simplified Explanation: Think of it like a photocopier. If you copy a stamp and the copy comes out the exact same size as the original, that’s a 1:1 ratio. Macro photography does this, but with a camera lens.
- Detailed Explanation: The magnification ratio describes the relationship between the size of the subject in reality and the size of its image projected onto the camera sensor. A ratio of 1:1 means the image on the sensor is life-sized. A ratio of 1:2 (or 0.5x) means it’s half-sized, which is just a ‘close-up’. A ratio of 2:1 (or 2x) means the image on the sensor is twice the size of the subject—this is where you get into extreme macro territory.
This ability to capture subjects at life-size is what allows macro photographers to reveal those mind-blowing details. When you blow that life-sized image up on a computer screen or print it, every tiny hair on a fly’s leg or every microscopic pollen grain on a flower’s stamen becomes visible.
Macro vs. Close-Up Photography: What’s the Difference?
This is a common point of confusion, and many camera and phone manufacturers don’t help when they label a ‘close-up’ mode as a ‘macro’ mode.
| Feature | Macro Photography | Close-Up Photography |
|---|---|---|
| Magnification | Achieves a 1:1 (life-size) or greater ratio. | Less than 1:1 ratio (e.g., 1:2, 1:4). |
| Primary Goal | To reveal details invisible to the naked eye. | To get nearer to a subject and fill the frame with it. |
| Equipment | Often requires specialised gear like a dedicated macro lens. | Can be done with most standard lenses or even a phone. |
| Example | Photographing the individual facets of a fly’s eye. | Taking a picture of a whole flower head, filling the frame. |
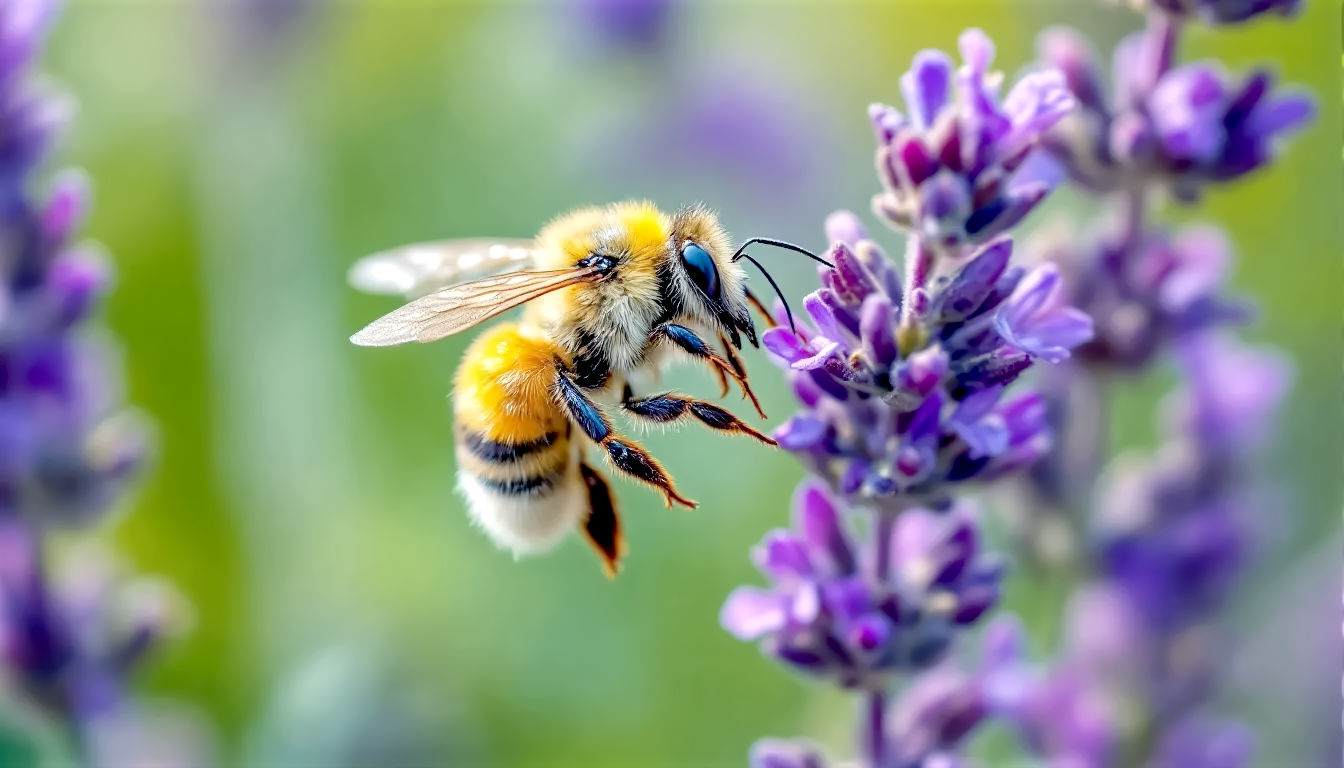
Think of it this way: a close-up photo shows you a subject near, but a macro photo shows you a subject magnified. It’s a subtle but crucial difference. A close-up of a bee on a flower is a lovely picture. A macro shot of that same bee could show you the tiny grains of pollen stuck to the hairs on its legs. One is a portrait; the other is a scientific investigation.
A Brief History of the Small World: How Macro Began
The desire to see the world in miniature didn’t start with photography. It began with the invention of the first microscopes in the 17th century, when scientists like Robert Hooke and Antonie van Leeuwenhoek first glimpsed the hidden world of “animalcules” and the cellular structure of cork. But it took a while for photography to catch up.
The journey into macro photography truly began in the late 19th century. One of the earliest pioneers was a British scientist named Richard Leach Maddox, who, while trying to find a healthier alternative to the messy ‘wet plate’ photography process, invented the lightweight gelatin dry plate in 1871. This made photography much more portable and practical.
However, the real breakthrough for seeing the small came from a man named Percy Smith (1880-1945). A clerk for the British Board of Education, Smith was an amateur naturalist who became a cinematic pioneer. In 1910, his film The Acrobatic Fly stunned audiences by showing a housefly juggling a tiny ball of paper. He built his own incredible camera setups in his home in North London, using a blend of microscope optics and camera parts to film the secret lives of insects and the slow-motion blooming of flowers. He was essentially inventing micro-cinematography, the moving-picture version of what we now call macro photography.
For still photography, the early 20th century was a period of experimentation. Photographers would attach camera bodies to microscopes or use complex arrangements of bellows and lenses to get the magnification they needed. It was a highly technical, often frustrating process reserved for dedicated scientists and wealthy hobbyists.
The game changed in the 1950s and 60s. The release of the first mass-produced macro lens, the Kilfitt-Makro-Kilar in 1955, made high-magnification photography accessible to more people. Then, as 35mm SLR cameras became the standard, major manufacturers like Nikon and Canon started producing their own dedicated macro lenses. These lenses were optically designed to be sharp at very close distances, making the whole process simpler and more reliable.
From these specialist beginnings, macro photography has blossomed. It’s now a hugely popular genre, practised by artists, scientists, and hobbyists alike. The rise of digital photography has made it even more accessible. Being able to take hundreds of shots without worrying about film costs and getting instant feedback on an LCD screen has allowed a new generation of photographers to explore the miniature world in their own back gardens.
Gearing Up: The Essential Kit for Macro Photography
While you can dip your toes into close-up photography with almost any camera, true macro photography benefits hugely from some specialist kit. But don’t worry, you don’t need to spend a fortune to get started. There are options for every budget.
The Heart of the Matter: Choosing a Lens
The single most important piece of gear for macro photography is the lens. It’s what delivers that crucial 1:1 magnification.
Dedicated Macro Lenses: The Best Option
A dedicated macro lens is specifically designed for close-up work and is the easiest and highest-quality way to get into the genre. These are ‘prime’ lenses, meaning they have a fixed focal length (they don’t zoom).
- How they work: They can focus much closer to a subject than a standard lens, and their internal optics are engineered to produce incredibly sharp images at these short distances. They are also designed to have a ‘flat field’, meaning the sharpness is even from the centre of the image right to the corners.
- Focal Lengths Explained:
- Short (35mm-60mm): These are lightweight and often cheaper. They’re great for casual use and subjects you can get very close to (like products or flowers). However, you have to be so close that you might cast a shadow on your subject or scare away timid insects.
- Medium (90mm-105mm): This is the sweet spot for many photographers and the most popular choice. It offers a good balance between working distance and portability. You can be far enough away not to spook a dragonfly, but the lens isn’t too heavy to carry around all day.
- Long (150mm-200mm): These lenses give you the most working distance, which is ideal for very shy subjects like butterflies or lizards. They are, however, bigger, heavier, and more expensive. They also make it harder to hold the camera steady.
Working distance is a key concept here. It’s the distance from the front of your lens to the subject. A longer focal length gives you more working distance, which is a massive advantage when photographing living creatures.
Budget-Friendly Alternatives to a Macro Lens
A dedicated macro lens is fantastic, but it’s a big investment. Luckily, there are several cheaper ways to get started.
Extension Tubes
These are simple, hollow tubes that fit between your camera body and your existing lens.
- Simplified Explanation: Think of them as spacers. By moving the lens further away from the camera’s sensor, they allow it to focus much closer than it normally could, increasing its magnification.
- Detailed Explanation: Extension tubes contain no glass, so they don’t affect the optical quality of your lens. They simply alter the minimum focusing distance. They come in different lengths (e.g., 12mm, 20mm, 36mm), and you can stack them together for even more magnification. Cheaper tubes are just hollow rings, but it’s worth paying a little more for ones that have electronic contacts. This means your camera can still talk to the lens, so autofocus and aperture control will work.
- Pros: Relatively cheap, lightweight, high quality (as they use your existing lens’s optics).
- Cons: You lose some light, meaning you’ll need slower shutter speeds or a higher ISO. They also stop you from being able to focus on distant objects.
Close-Up Filters (or Diopters)
These look just like a normal filter and simply screw onto the front of your lens.
- Simplified Explanation: They are essentially magnifying glasses for your camera lens.
- Detailed Explanation: Close-up filters are rated by their strength, measured in ‘diopters’ (+1, +2, +4, etc.). The higher the number, the more magnification you’ll get. Like extension tubes, you can stack them.
- Pros: Very cheap, easy to use, don’t reduce the amount of light reaching the sensor.
- Cons: Cheaper ones can seriously reduce image quality, causing softness and colour fringing, especially around the edges of the photo. High-quality ones are better but can be nearly as expensive as a set of extension tubes.
Reversing Rings
This is a clever, if slightly odd, solution. A reversing ring is a small adapter that lets you mount your lens on your camera backwards.
- Simplified Explanation: Lenses are designed to take a large scene and make it small to fit on a sensor. By turning one around, you reverse that effect, taking a small subject and making it appear large.
- Detailed Explanation: This technique works best with prime lenses (especially a 50mm ‘nifty fifty’). When reversed, the lens acts like a powerful magnifier.
- Pros: Extremely cheap, can provide very high magnification.
- Cons: You lose all electronic control of the lens (no autofocus or aperture control from the camera). The delicate rear element of the lens is exposed to the elements. It’s a very manual and fiddly process.
Essential Accessories for Sharp Macro Shots
Getting a magnified image is only half the battle. Keeping it sharp is the other half. When you’re working at such high magnifications, the tiniest camera shake is exaggerated and will ruin your shot.
- A Sturdy Tripod: This is non-negotiable for static subjects like flowers, fungi, or product shots. It holds your camera perfectly still, allowing you to use long shutter speeds to capture all the light you need without any blur. Look for one that can get very low to the ground.
- Remote Shutter Release or Self-Timer: Even pressing the shutter button can cause a tiny vibration. A remote release (either a cable or a wireless one) lets you fire the camera without touching it. Alternatively, setting a 2-second self-timer does the same job for free.
- Lighting (Flash and Diffusers): Macro photography often requires a lot of light, and the built-in pop-up flash on your camera is not your friend—it creates harsh, ugly shadows.
- Twin-Lite or Ring Flash: These are specialist flashes that mount to the front of the lens, providing even, direct light. A Ring Flash gives a flat, shadowless look often used for scientific or medical photos. A Twin-Lite has two small, adjustable flash heads, giving you more control to create shadows and texture.
- Off-Camera Flash and a Diffuser: A cheaper and often more creative option is to use a standard flashgun mounted off-camera. You can then soften and spread its light using a diffuser (a small softbox or even just a piece of white plastic). This creates a much more natural-looking light.
- Reflectors: A simple piece of white card or foil can be a powerful tool. Use it to bounce natural light back into the shadowy areas of your subject.
The Photographer’s Craft: Core Macro Techniques
Once you have your gear, it’s time to learn the techniques that will take your images from simple close-ups to stunning macro photographs. It all boils down to controlling three things: focus, light, and depth of field.
Mastering Focus: The Art of Precision
At macro magnifications, your depth of field (the amount of the image that is in sharp focus) becomes incredibly shallow. We’re talking millimetres, or even less. This makes focusing absolutely critical.
- Manual Focus is Your Best Friend: While modern cameras have amazing autofocus systems, they can struggle at macro distances. They often ‘hunt’ back and forth, trying to lock on, and might focus on the wrong part of the subject (like a fly’s wing instead of its eye). Switching to manual focus gives you total control.
- Use Live View and Focus Peaking: The best way to use manual focus is to switch your camera to ‘Live View’ mode, so the image appears on the rear screen. You can then use the magnify button to zoom in on the exact spot you want to be sharp. Many modern cameras also have a feature called focus peaking, which highlights the sharpest parts of the image on the screen with a bright colour. This is a game-changer for nailing focus.
- The Rocking Technique: For handheld shots of insects, it’s often easier to set your focus on the lens and then gently and slowly rock your whole body forwards and backwards until your subject comes into perfect focus in the viewfinder. When it’s sharp, take the shot.
Controlling Depth of Field (DoF)
Depth of field is probably the biggest creative and technical challenge in macro photography. Because it’s so shallow, you have to decide exactly what you want to be in focus.
- Aperture and DoF: Your aperture setting (the f-number, like f/2.8, f/8, f/16) controls the depth of field.
- A wide aperture (a small f-number like f/2.8) gives you a very shallow DoF. This is great for creative shots where you want to isolate one tiny detail—like the tip of a petal—and let the background blur into a dreamy wash of colour.
- A narrow aperture (a large f-number like f/16) gives you a much deeper DoF. This is what you need when you want to get more of your subject sharp, for example, getting an entire insect’s head in focus.
- The Problem: Diffraction: You might think, “Great, I’ll just use the narrowest aperture possible, like f/22 or f/32, to get everything sharp!” Unfortunately, it’s not that simple. At very narrow apertures, a phenomenon called diffraction kicks in. This is where light waves bend as they pass through the tiny opening, which actually makes the whole image slightly softer. For most lenses, the sharpest results are found somewhere in the middle, around f/8 to f/11.
The Ultimate Solution: Focus Stacking
So, how do the pros get those incredible photos where a tiny insect is perfectly sharp from its antennae all the way to its back legs? The answer is a powerful technique called focus stacking.
- Simplified Explanation: You take lots of photos of the same subject, but you slightly change the focus point in each shot. Then, you use special software to blend all the sharpest bits from each photo into one super-sharp final image.
- Detailed Explanation:
- Capture: Mount your camera on a tripod and set up your shot. Take your first photo, focusing on the very front of the subject.
- Adjust: Without moving the camera, slightly adjust the focus to be a tiny bit further back and take another shot.
- Repeat: Keep doing this, taking dozens or even hundreds of pictures, until you have captured a sharp slice of every part of your subject.
- Combine: Load all the images into software like Adobe Photoshop, Helicon Focus, or Affinity Photo. The software analyses each picture, finds the sharpest pixels, and stitches them together automatically.
Focus stacking is a complex technique that requires patience and a completely still subject, but it’s the key to achieving ultimate sharpness and depth in macro photography.
Lighting Your Miniature World
Good lighting is what separates a snapshot from a masterpiece. In macro, it defines texture, shape, and mood.
- Natural Light: On an overcast day, the soft, diffused light is perfect for macro. It wraps gently around your subject, revealing colour and detail without creating harsh shadows. Direct, bright sunlight is often too harsh, creating distracting bright spots and deep black shadows. Early morning or late afternoon light (the ‘golden hour’) is also beautiful, casting a warm, soft glow.
- Using Flash: When natural light isn’t enough, you need to add your own. As mentioned before, a dedicated macro flash (Twin-Lite or Ring Flash) gives you great control. But even a single off-camera flash can work wonders. The key is to diffuse the light. Never use a bare, direct flash. Soften it with a mini-softbox or even a piece of translucent plastic to mimic that gentle, overcast daylight.
- Shaping the Light: Think about the direction of your light.
- Front lighting is flat and reveals detail, but can be a bit boring.
- Side lighting is fantastic for revealing texture. It creates small shadows that show every bump and groove on a leaf or an insect’s exoskeleton.
- Backlighting can be magical. By placing your light source behind the subject, you can make petals or insect wings glow as the light shines through them.
Composition: Arranging Your Tiny Scene
The rules of composition that apply to landscape or portrait photography are just as important in the macro world.
- Rule of Thirds: Imagine a noughts and crosses grid over your image. Try placing your main point of interest (like an insect’s eye or the centre of a flower) on one of the points where the lines intersect. This creates a more balanced and dynamic image than just sticking your subject in the dead centre.
- Leading Lines: Use lines within the image—like the stem of a flower or the edge of a leaf—to draw the viewer’s eye towards your subject.
- Mind the Background: The background is just as important as the subject. A messy, distracting background will ruin your shot. Move around your subject to find a clean, simple background. Using a wide aperture (like f/2.8) will help blur the background into a beautiful, creamy wash of colour, making your subject pop.
- Find Your Angle: Don’t just shoot everything from above. Get down low, to your subject’s level. Photographing an ant from its own eye level makes for a much more intimate and engaging portrait than looking down on it.
Finding Subjects: Your Garden is a Jungle
You don’t need to travel to the Amazon rainforest to find amazing macro subjects. Your local park, your back garden, or even your house is teeming with possibilities.
- Insects and Spiders: These are classic macro subjects for a reason. Their bodies are full of incredible textures, patterns, and colours. Look for bees on flowers, ladybirds on leaves, or spiders in their webs (especially after a morning dew). The key is patience. Move slowly and avoid sudden movements.
- Flowers and Plants: Every plant is a miniature landscape. Explore the intricate structures inside a flower, the delicate veins on a leaf, or the fuzzy texture of a moss patch. Water droplets, either from rain or a small spray bottle, can add a magical, jewel-like quality.
- Fungi and Lichen: In autumn, British woodlands are a treasure trove of fungi. Their shapes and textures are wonderfully alien and make for fantastic macro subjects.
- Everyday Objects: The macro world isn’t just about nature. You can find abstract beauty in the most mundane household items. Try photographing the bubbles in washing-up liquid, the texture of a woolly jumper, the nib of a fountain pen, or the head of a matchstick. It’s a great way to practise your skills when the weather is bad.
- Food and Drink: The texture of a strawberry, the fizz of a fizzy drink, or the intricate crystals of sugar or salt can all make for compelling abstract images.
The Future of Seeing Small
Macro photography is constantly evolving. The latest camera technology is making it more accessible than ever. Features like in-body image stabilisation help to counteract camera shake for handheld shots, and the electronic viewfinders on mirrorless cameras give a bright, clear preview of exactly what your final image will look like.
Computational photography, the kind seen in our smartphones, is also starting to play a bigger role. Some phones now have ‘macro’ modes that use AI and image stacking to create detailed close-up shots that would have been impossible a few years ago.
But beyond the technology, the spirit of macro photography remains the same. It’s about slowing down, looking closer, and appreciating the incredible complexity and beauty of the world we so often overlook. It’s a reminder that there is wonder everywhere, you just have to know how to look for it. So grab a camera, head into the garden, and see what tiny secrets you can uncover.
Further Reading & Resources
To continue your journey into the world of macro photography, here are some highly respected resources:
- Royal Photographic Society (RPS): The UK’s leading photography organisation offers workshops, exhibitions, and a wealth of knowledge. Their Nature group is particularly relevant.
- Kew Gardens: Not just a beautiful place to visit, but an endless source of inspiration and subjects for macro photographers. Their website often has stunning botanical imagery.
- The Natural History Museum, London: Explore their digital collections for inspiration on insect and plant life, and learn about the scientific application of macro imaging.
- Close-up Photographer of the Year (CUPOTY): An annual competition that showcases the very best macro, close-up, and micro-photography from around the world. A fantastic source of inspiration.
- DPReview: A highly authoritative website for in-depth reviews of cameras and lenses, including all the latest macro gear.