The Guide to Hot Composting: Get Rich, Crumbly Compost in Record Time
The guide to hot composting in the UK. Learn the science, the methods, and the secrets to making incredible compost in a fraction of the time.
This post may contain affiliate links. If you make a purchase through these links, we may earn a commission at no additional cost to you.
Right then, let’s talk about that heap at the bottom of the garden. You know the one. It’s a bit sad, a bit smelly, and every year you hopefully chuck your grass clippings and potato peelings onto it, wondering if it’ll ever turn into the beautiful, dark compost you see on Gardeners’ World. Mostly, it just sits there, slowly slumping into a slimy pile.
This is cold composting. It works, eventually. But what if you could fast-forward the process? What if you could turn your garden and kitchen waste into nutrient-rich ‘black gold’ in as little as a month?
Welcome to the world of hot composting. It’s the pressure cooker of the gardening world, and it’s a game-changer. It’s a bit more effort, yes, but the rewards are huge. You get better compost, you get it faster, and you can compost things you wouldn’t dare put in a normal heap. So, if you’re ready to supercharge your soil and become the envy of the allotment, let’s get stuck in.
What Exactly Is Hot Composting? The Pressure Cooker of the Garden
At its heart, composting is just nature’s way of recycling. Tiny living things, like bacteria and fungi, break down organic stuff—leaves, vegetable scraps, grass—into a simple, soil-like material called humus.
- Cold Composting is the slow and steady approach. You build a heap over time, and the microbes that work at normal outdoor temperatures (psychrophiles and mesophiles, if you want to get technical) slowly munch their way through it. It can take a year or more to get usable compost.
- Hot Composting is all about creating the perfect party for a special type of microbe. These are thermophilic (heat-loving) bacteria. When you give them the perfect mix of air, water, and food, they go into a frenzy. Their activity generates an incredible amount of heat, which makes the whole process go into overdrive.
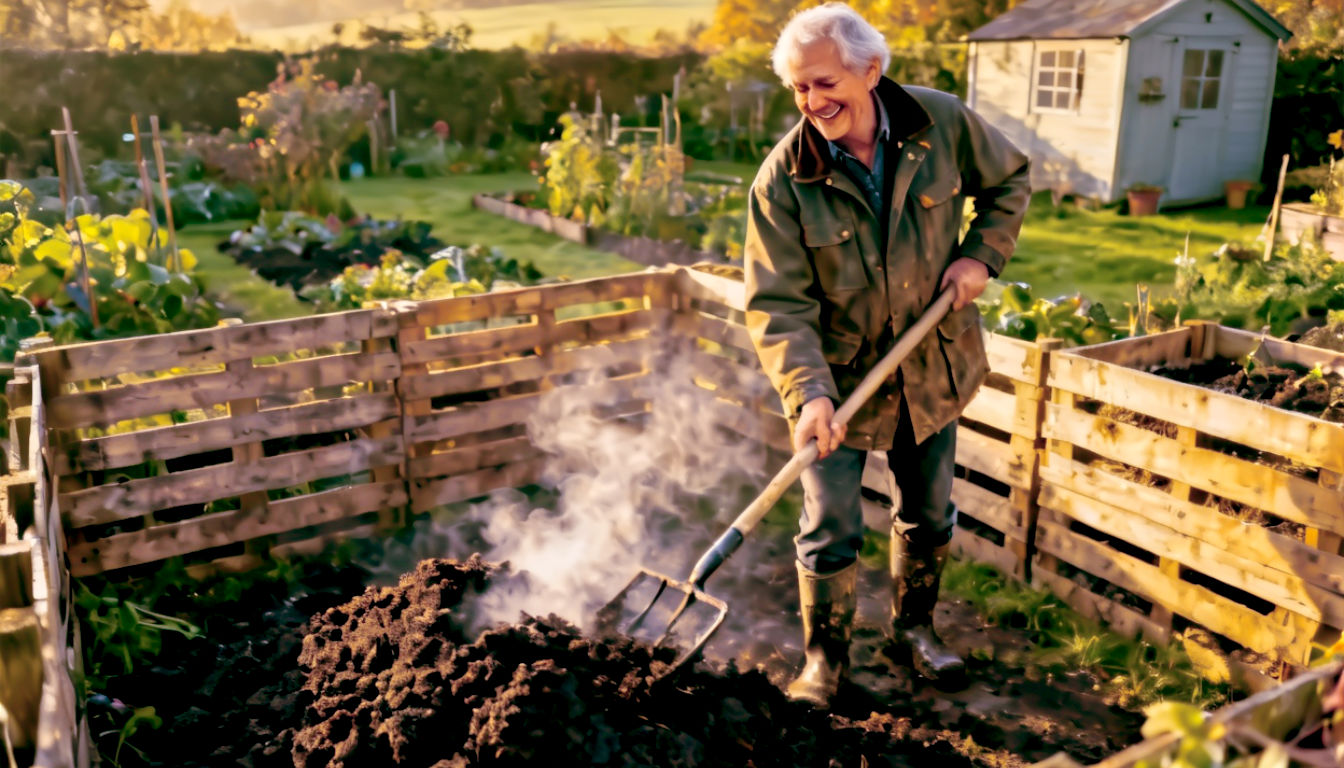
A successful hot compost pile will reach temperatures of 55–75°C (130–165°F). That’s hotter than a cup of tea you’ve left for a few minutes! This intense heat is the secret to its success. It speeds everything up, turning waste into compost in four to six weeks, sometimes even less.
The Science Bit, Made Simple: How Does It Get So Hot?
You don’t need a degree in biology to master hot composting, but understanding the basics will help you troubleshoot any problems. It all boils down to giving your microbial workforce exactly what they need to thrive.
Meet the Microbes: Your Tiny, Heat-Generating Helpers
Imagine your compost pile is a microscopic city. When you first build it, the everyday microbes start working, gently raising the temperature. Once it hits about 40°C, the elite team arrives—the thermophilic bacteria. These are the power workers. They eat, reproduce, and work so hard that they generate immense heat. This heat is what defines hot composting. It’s a sign that your pile is alive and kicking. The more food, water, and air they have, the hotter it gets and the faster they work.
The Magic Recipe: Understanding the Carbon-to-Nitrogen (C:N) Ratio
This is the single most important concept in hot composting. Get this right, and you’re 90% of the way there. Just like us, microbes need a balanced diet. They need two main things:
- Carbon (The “Browns”): This is their energy food. It’s the fuel that keeps them going. Think of it as carbohydrates for microbes.
- Nitrogen (The “Greens”): This is for growth and reproduction. It’s the protein that helps them build more microbes.
The perfect diet for these heat-loving microbes is a ratio of roughly 25 to 30 parts carbon for every 1 part nitrogen (30:1 C:N).
Don’t panic! You don’t need to do complex maths. A simple rule of thumb for us gardeners is to aim for two parts brown material to one part green material by volume. So, for every bucket of grass clippings you add, you’ll want to add about two buckets of shredded cardboard or dry leaves. It’s more of an art than a science, and you’ll get a feel for it over time.
The Big Benefits: Why Bother with the Extra Effort?
So, it’s a bit more work than just chucking stuff on a heap. Why should you bother?
- Speed is the number one reason. Instead of waiting a year or more, you can have beautiful, usable compost in a matter of weeks. This is fantastic for keen gardeners who always need more compost for their pots and borders.
- It kills the baddies. The high temperatures (above 55°C) will kill off weed seeds, pesky slugs and their eggs, and nasty plant diseases like blight and rusts. With cold composting, you often end up spreading these problems back around your garden.
- You can compost more stuff. A hot pile can handle things a cold heap can’t, like cooked food scraps, bread, dairy, and even some meat (in small amounts and with care). This means less food waste going in your council bin.
- It produces top-quality compost. The finished product from a hot compost system is often finer, more consistent, and packed with a fantastic range of beneficial microbes that will do wonders for your garden soil.
- It’s a year-round process. A well-managed hot compost bin will keep working even through a chilly British winter, whereas a cold heap just goes to sleep until spring.
Choosing Your Weapon: Hot Composting Bins and Systems
You need a system that can hold a decent amount of material together to build up that all-important heat. A small, loose pile just won’t get hot enough.
The DIY Approach: Pallet Bins and Open Piles
If you’ve got the space—especially on an allotment or in a larger garden—a DIY system is cheap and effective. The most common method is the Berkeley Method, which uses a simple open pile or a series of bays.
- Pallet Bins: A true icon of British allotments. Simply screw three or four old wooden pallets together to create a bay. It’s best to have two or three bays side-by-side: one for the active pile, one to turn it into, and one for maturing compost. To work well, a bay needs to be at least 1 cubic metre (1m x 1m x 1m). This size is critical for the pile to self-insulate and get hot.
- Open Piles: The simplest method of all, but you need the space. You just build a freestanding pile, again aiming for that minimum 1 cubic metre size.
The Contained Solution: Specialised Hot Bins
For smaller, urban, or tidier gardens, a specialised, insulated compost bin is a brilliant option. These are often called ‘hotbins’. They are more expensive but are designed to make hot composting as easy as possible.
- How they work: They are made from thick, insulating plastic (like expanded polypropylene) that traps the heat generated by the microbes. This means you can get a smaller volume of material hot and keep it hot, even in winter.
- Popular UK Brands: You’ll see names like Hotbin, Green Johanna, and Aerobin. They often have features like aeration vents and a hatch at the bottom to get the finished compost out. They are a great ‘plug-and-play’ option if you don’t fancy building your own system.
The Gardener’s Pantry: What to Feed Your Hot Compost Pile
Getting your mix of ‘greens’ and ‘browns’ right is the key to success. It’s a great idea to stockpile your materials for a week or two so you can build your pile all in one go.
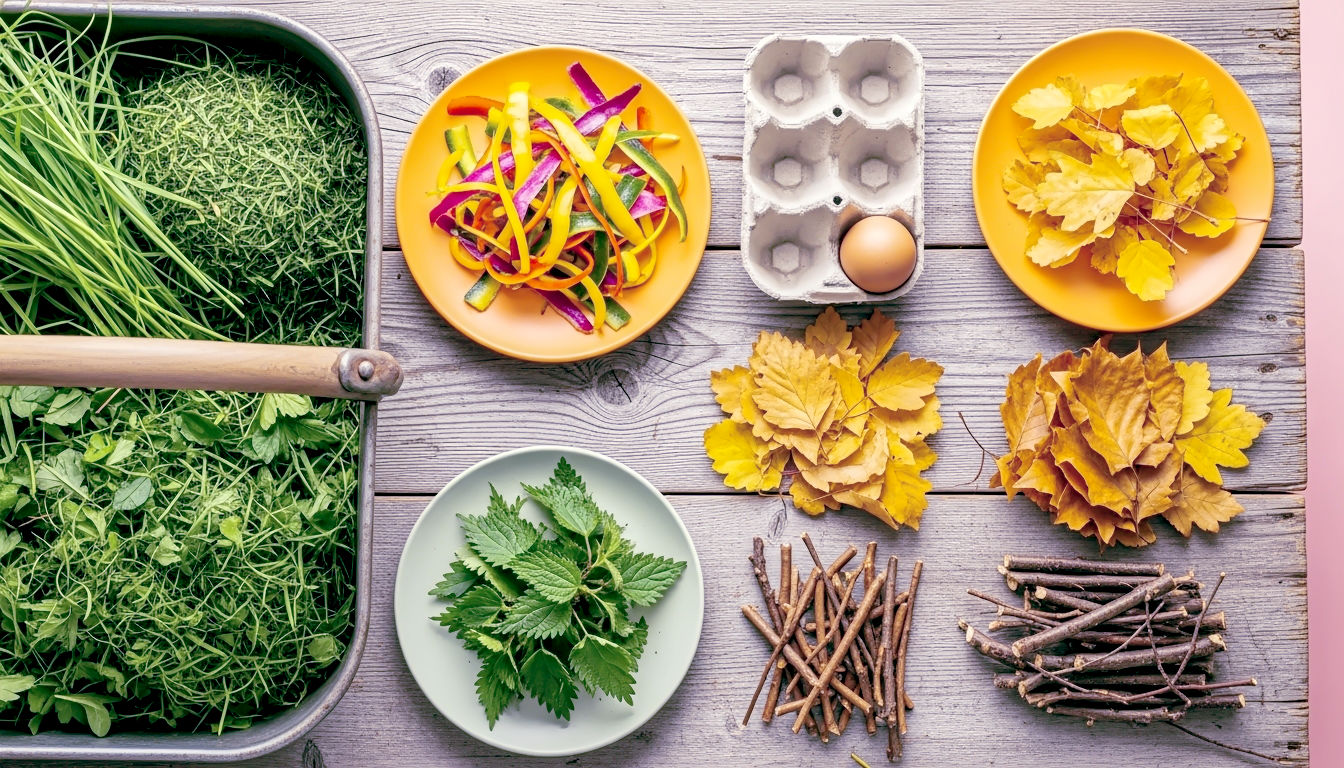
“Greens” – The Nitrogen Power-Ups (Aim for 1 part)
These are materials that are fresh, moist, and full of life.
- Grass Clippings: The ultimate activator. But be careful—too much on its own will turn into a slimy, smelly mess. Always mix it well with browns.
- Kitchen Scraps: Uncooked vegetable peelings, apple cores, salad leaves, fruit waste.
- Tea Bags and Coffee Grounds: A fantastic source of nitrogen. A very British ingredient!
- Manure: From herbivores like chickens, horses, or rabbits. It’s a brilliant accelerator.
- Fresh Green Cuttings: Weeds (before they set seed!), hedge trimmings, nettles, comfrey leaves.
“Browns” – The Carbon Fuel (Aim for 2 parts)
These are materials that are dry, tough, and woody.
- Cardboard and Paper: Egg boxes, toilet roll tubes, and Amazon delivery boxes are perfect. Tear them up into small pieces to help them break down. Avoid glossy, coloured magazines.
- Fallen Leaves: An excellent source of carbon, especially in the autumn.
- Wood Chippings and Sawdust: Use sparingly as they take longer to break down, but great in a mix.
- Straw or Hay: A brilliant ‘bulking’ agent that adds structure and traps air.
- Tough, dead plant stems: Old sunflower stalks or the woody ends of brassicas, chopped up.
What to Leave Out: The No-Go List
Even with a hot pile, there are some things you should avoid.
- Meat, Bones, and Fish: While a hot pile can break them down, they can attract rats and other pests. Best avoided unless you have a very secure, pest-proof bin.
- Dairy and Oily Foods: Same reason as above—they can attract unwanted visitors and cause foul odours.
- Diseased Plants: While a hot pile should kill pathogens, it’s not guaranteed. If you have a serious disease like clubroot in your brassicas, it’s safer not to compost it.
- Persistent Weeds: Things like bindweed, couch grass, or docks. They are so tough they might survive even the heat.
- Dog and Cat Poo: These can contain harmful parasites and bacteria that aren’t safe to put back on your vegetable patch.
Your Step-by-Step Guide to Building and Managing a Hot Compost Pile
Right, you’ve chosen your bin and gathered your ingredients. Here’s how to put it all together. The key is to build the whole pile in one go, rather than adding a little bit each day.
Step 1: Location, Location, Location
Choose a spot on bare soil if possible. This allows worms and other helpful creatures to get into the pile. It should be level and have good access so you can get a wheelbarrow to it and have room to turn it.
Step 2: Stockpile Your Ingredients
This is the most important prep step. For a week or two, gather your greens and browns in separate piles or bags. You need enough to fill your bin or create a 1-cubic-metre pile all at once. Remember that 2:1 ratio of browns to greens.
Step 3: Building the Pile – It’s All About a Good Mix
Start with a base layer of twiggy material or scrunched-up cardboard. This helps air get in from the bottom.
Now, you can either build in layers (a bit like making a lasagne: a layer of browns, then a layer of greens, repeat) or, even better, mix it all up beforehand in a wheelbarrow or on a tarpaulin. A good mix is crucial for getting the pile to heat up evenly.
As you build, add a bit of water with each layer. The goal is for the pile to be as moist as a wrung-out sponge—damp to the touch, but not dripping wet. If your greens (like grass clippings) are already very wet, you might not need to add any extra water.
Step 4: Monitoring the Temperature – Are We Hot Yet?
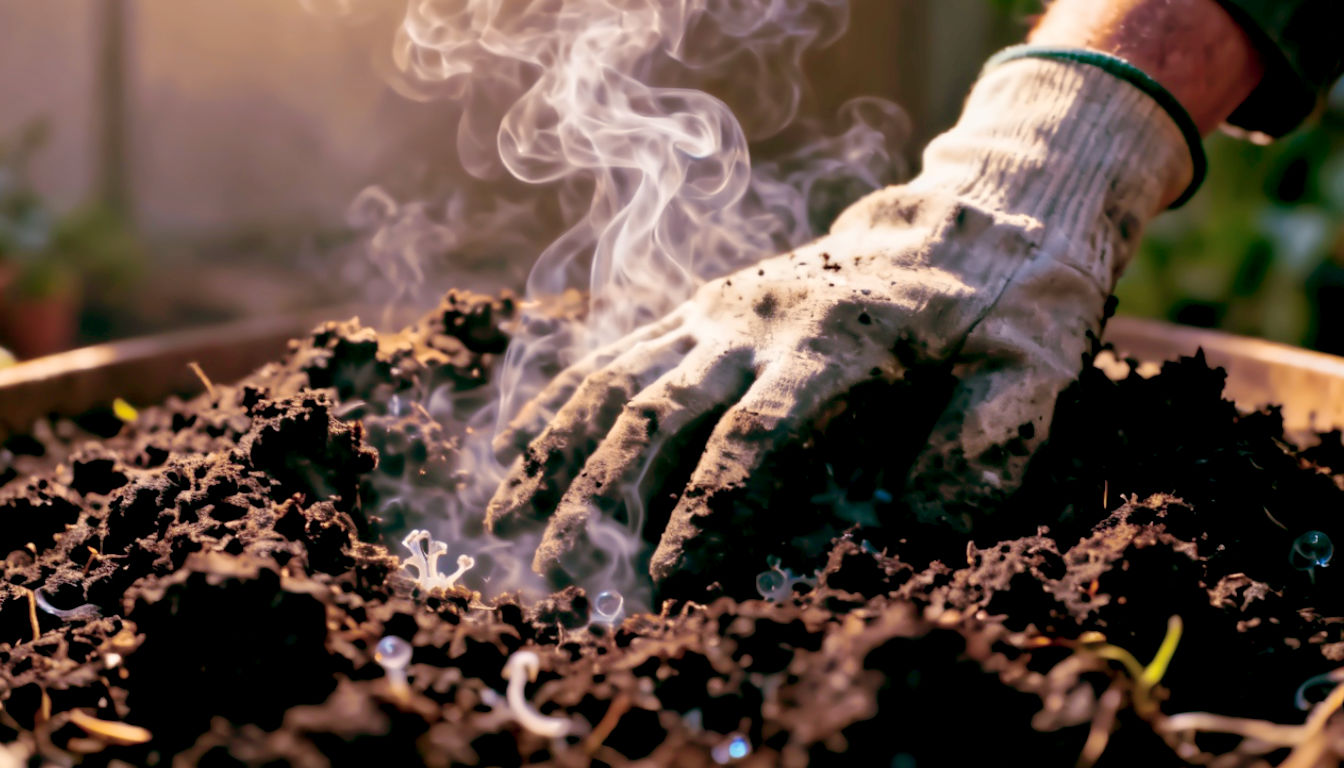
This is the fun part! After a day or two, the pile should start to heat up. You can feel it by plunging your hand into the centre (be careful!), but a long-stemmed compost thermometer is a fantastic investment.
- Days 1-3: The temperature should climb rapidly, heading towards 55–65°C.
- Days 4-7: It will likely stay hot for a few days. You might see steam rising from it on a cool morning—a very satisfying sight!
- After that: The temperature will start to drop. This is your signal to act.
Step 5: Turning the Pile – The Gardener’s Workout
When the temperature starts to fall, it means the microbes in the middle have used up all the food and air. It’s time to turn the pile. The goal is to move the cooler material from the outside into the hot middle, and move the partly-composted middle to the outside.
- How often? A common schedule for the Berkeley method is: Turn after 4 days, then every 2 days after that. With insulated bins, you may only need to turn it once or twice.
- How to do it: Use a garden fork to move the entire pile into an empty bay next to it, or empty the contents of your bin onto a tarp and then put it all back in, making sure to mix it thoroughly.
- What happens next? After each turn, the pile should heat up again as you’ve given the microbes a new supply of food and air. This cycle of heating up, cooling down, and turning is what drives the process.
Step 6: Keeping It Moist, Not Soggy
Check the moisture levels every time you turn the pile. Grab a handful and give it a squeeze. If a few drops of water come out, it’s perfect. If it’s dry, add some water as you turn it. If it’s soggy and smelly, you need to add more dry, brown material to soak up the excess moisture.
Step 7: Knowing When It’s Done (And Letting It Cure)
After a few turns over a couple of weeks, you’ll notice that the pile no longer heats up after you turn it. The original ingredients will be unrecognisable. It will have shrunk to about a third of its original size and will look dark brown and crumbly.
The hot phase is over, but it’s not quite ready yet. It now needs to cure, or mature, for another month or so. Just leave the pile to sit. During this time, fungi and worms will move in and finish the job, creating a stable, nutrient-rich compost.
Troubleshooting Your Hot Compost: What to Do When Things Go Wrong
Don’t worry if it doesn’t work perfectly the first time. Every pile is different. Here are some common problems and how to fix them.
| Problem | Likely Cause(s) | How to Fix It |
|---|---|---|
| It’s not heating up. | 1. Pile is too small. 2. Pile is too dry. 3. Not enough nitrogen (“greens”). | 1. Add more material to reach critical mass. 2. Turn the pile and add water. 3. Turn it and mix in more greens like grass clippings or manure. |
| It smells bad (like ammonia or rotten eggs). | 1. Pile is too wet. 2. Not enough carbon (“browns”). 3. Not enough air (it’s compacted). | 1. Turn the pile to aerate it. 2. Mix in lots of dry, brown material like shredded cardboard, sawdust, or straw. 3. Turn it and add bulky browns to create air pockets. |
| It’s attracting rats or flies. | 1. You’ve added unsuitable food waste (meat, oils). 2. Your bin isn’t pest-proof. | 1. Stop adding this type of waste. Always bury any kitchen scraps deep in the centre of the pile. 2. Make sure your bin has a secure lid and no large gaps. |
| It’s slimy and sludgy. | Definitely too many greens (especially grass clippings) and not enough browns. | This is a common one! Turn the pile and mix in a large amount of torn-up cardboard or straw to balance the mix and add structure. |
Using Your Black Gold: How to Supercharge Your British Garden
Congratulations! You’ve made fantastic compost. Now for the best bit—using it.
- As a soil improver: Dig it into your vegetable beds or flower borders before planting. It improves soil structure (breaking up heavy clay and helping sandy soil hold water) and adds vital nutrients.
- As a mulch: Spread a 5cm (2-inch) layer around your roses, shrubs, and perennial plants. This feeds the plants, suppresses weeds, and helps keep moisture in the soil.
- In potting mixes: Sieve it to get a fine material and mix it with leaf mould and sharp sand or perlite to create your own high-quality potting compost for seeds and young plants.
- As a lawn feed: Sieve it finely and rake it thinly over your lawn in spring to give it a gentle, natural feed.
Conclusion: Is Hot Composting Right for You?
Hot composting isn’t for the gardener who wants a zero-effort solution. It takes a bit of planning, a bit of muscle for turning, and a little bit of attention.
But if you’re a passionate gardener who wants a regular supply of the best possible compost, it’s absolutely brilliant. You’re not just recycling your waste; you’re actively creating a powerful resource that will make your garden healthier, more productive, and more resilient. You’ll reduce your food miles, save money on fertilisers and soil improvers, and you’ll get an immense sense of satisfaction from seeing that pile steam on a cold winter morning. Give it a go—your garden will thank you for it.
Further Reading
For more in-depth advice from trusted sources, check out these excellent resources:
- Royal Horticultural Society (RHS): Composting Advice
- Garden Organic: Composting
- Gardeners’ World Magazine: Soil and Composting Section