Pallet Wood Perfection: The UK Guide to 6 Creative & Thrifty DIY Projects
Your complete guide to the world of pallet wood DIY. Learn where to find free pallets in the UK, how to work with them safely, and follow our creative ideas.
This post may contain affiliate links. If you make a purchase through these links, we may earn a commission at no additional cost to you.
It’s lying there, propped against a skip behind your local garden centre. It’s stacked high in an industrial estate, looking forgotten and unloved. The humble wooden pallet. To most people, it’s just scrap, a clunky bit of packaging destined for the chipper. But to a growing number of us, that pile of rough-sawn planks is a treasure chest of creative potential. It’s the key to a rustic coffee table, a beautiful garden planter, or a stunning feature wall—all for the price of a bit of elbow grease.
Welcome to the wonderful world of pallet wood DIY. It’s a trend that’s taken the UK by storm, and for good reason. It’s brilliantly thrifty, wonderfully sustainable, and gives you a chance to create something truly unique for your home. Forget flat-pack furniture that everyone else has; this is about making something with character, a story, and a bit of your own soul hammered into it.
This isn’t just a quick blog post. This is your definitive guide. We’ll cover everything you need to know to go from pallet-sceptic to pallet-pro. We’ll show you where to find them, how to check they’re safe (this bit is crucial), the best ways to take them apart without wanting to throw your hammer through a window, and then walk you through six fantastic projects that will transform your living space. So, grab a brew, and let’s get started.
What on Earth is Pallet Wood, and Why Should You Care?
Before we get our hands dirty, let’s quickly get to know our material. Understanding what you’re working with is the first step to creating something brilliant.
The Unsung Hero of Shipping
At its core, a pallet (or skid) is a simple, flat structure used to support goods while they’re being lifted by a forklift, a pallet jack, or another lifting device. They are the backbone of global logistics, ensuring that everything from your weekly shop to a new washing machine gets from A to B in one piece.
They’re typically made from fast-growing, inexpensive wood. In the UK, this is often pine, but you can sometimes find tougher hardwoods like oak or birch. They’re designed to be tough and take a beating, not to be pretty. That’s where we come in. The dings, dents, nail holes, and rough grain are what give this wood its unique, rustic character. It has lived a life before it even gets to your workshop.
The Triple Threat: Cheap, Green, and Gorgeous
So, why has this rough, industrial timber become so incredibly popular with DIYers? It comes down to three irresistible qualities.
- It’s Unbelievably Cheap (Often Free!): Let’s be honest, timber isn’t cheap. A trip to B&Q or Wickes for a few planks can quickly add up. Pallets, on the other hand, are often seen as a waste product by businesses. A polite request is often all it takes to be allowed to take them away for free. You are saving them money on disposal and getting free raw materials. It’s a win-win.
- It’s a Big Tick for Sustainability: In a world where we’re all trying to be a bit greener, using reclaimed materials is a fantastic choice. Every pallet you upcycle is one less pallet going to landfill or being chipped for fuel. You’re giving that wood a second, more beautiful life. It’s recycling in its most creative form.
- It Has Instant Rustic Charm: You simply can’t buy the character that comes with pallet wood. The weathered look, the slight imperfections, and the industrial history all contribute to a warm, rustic aesthetic that’s hugely popular in modern interior design. Whether you’re going for a “shabby chic,” “industrial,” or “farmhouse” vibe, pallet wood fits in perfectly.
The Most Important Bit: Is Pallet Wood Safe?
Okay, let’s pause for a very important public service announcement. Before you even think about picking up a pallet, you must know how to check if it’s safe for your project. Not all pallets are created equal, and some can be treated with nasty chemicals that you definitely don’t want in your home or garden.
Pallets used for international shipping are treated to prevent the spread of pests and diseases. It’s this treatment that we need to pay attention to.
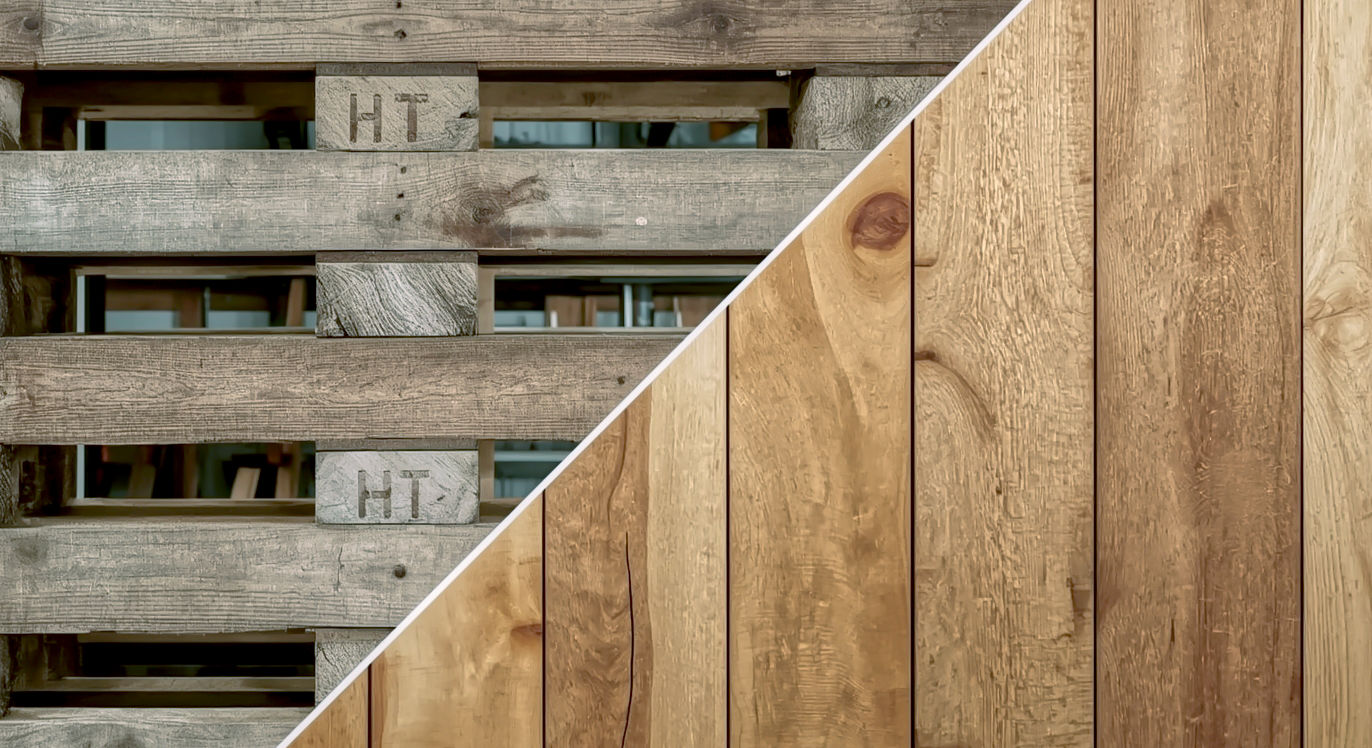
Cracking the Code: Understanding Pallet Stamps
Most reputable pallets will have a stamp on one of the wooden blocks, which looks a bit like a wheat sheaf symbol. This is the IPPC (International Plant Protection Convention) logo, and it tells you everything you need to know.
Here’s how to read it:
- HT (Heat Treated): This is the one you want. It means the wood was heated to a minimum core temperature of 56°C for at least 30 minutes. This process kills any bugs or larvae without using any chemicals. HT pallets are safe for any and all DIY projects, including indoor furniture, kids’ toys, and garden planters for growing veggies.
- MB (Methyl Bromide): This is the villain. Avoid it like the plague. Methyl Bromide is a highly toxic pesticide used to fumigate the wood. While it has been largely phased out and is banned for use in the UK and EU, you might still find older pallets or ones from other parts of the world that have been treated with it. This chemical is nasty stuff, and you don’t want it anywhere near you, your family, or your pets. If you see “MB” on a pallet, do not take it.
- DB (Debarked): This simply means the bark was removed before the wood was treated. You’ll often see this alongside the HT stamp. It’s a good sign.
- KD (Kiln-Dried): This is another heat treatment method to reduce moisture content. Like HT, it’s a safe, chemical-free process. If you see KD, you’re good to go.
What about unstamped or coloured pallets?
Use your common sense here. If a pallet has no stamp at all, it’s impossible to know its history. It was likely used for domestic shipping only and is probably untreated and safe, but it’s a small gamble.
More importantly, be wary of coloured pallets. The bright blue ones often belong to a company called CHEP, and the red ones to LPR. These pallets are rented by companies and remain the property of CHEP or LPR. Taking them is technically theft, so it’s best to leave them be.
Spotting the Other Danger Signs
Beyond the stamps, use your eyes and nose. Does the pallet have any obvious spills or strange stains? Has it been used to transport oily machine parts or leaky chemical containers? Does it have a weird, chemical smell?
The golden rule of pallet hunting is: if in doubt, leave it out. There are plenty of good, clean, safe pallets out there. It’s simply not worth the risk to take a dodgy one home.
The Great Pallet Hunt: Where to Find Your Treasure in the UK
Now for the fun part: the treasure hunt! Sourcing good pallets is easier than you might think, as long as you know where to look.
Ask and You Shall Receive
The best approach is often the direct one. Small, independent businesses are your best bet as they are less likely to have formal return agreements with pallet suppliers. Think about businesses that receive large, bulky deliveries.
- Garden Centres
- Motorcycle or Small Machinery Shops
- Pet Food Suppliers
- Hardware and DIY Stores
- Building Merchants
- Farms
Just pop in and ask politely if they have any spare pallets they need to get rid of. The worst they can say is no! Go in person rather than phoning – a friendly face makes all the difference.
Your Digital Digging Grounds
If you’d rather hunt from your sofa, the internet is your friend.
- Facebook Marketplace: A fantastic resource. Search for “free pallets” or “firewood” (pallets are often given away for this). Be quick, as they get snapped up fast.
- Gumtree: Similar to Facebook, check the “Freebies” section regularly.
- Freegle / Freecycle: These sites are all about connecting people who have things to give away with those who can use them. Post a “WANTED” ad for pallets, and you might get lucky.
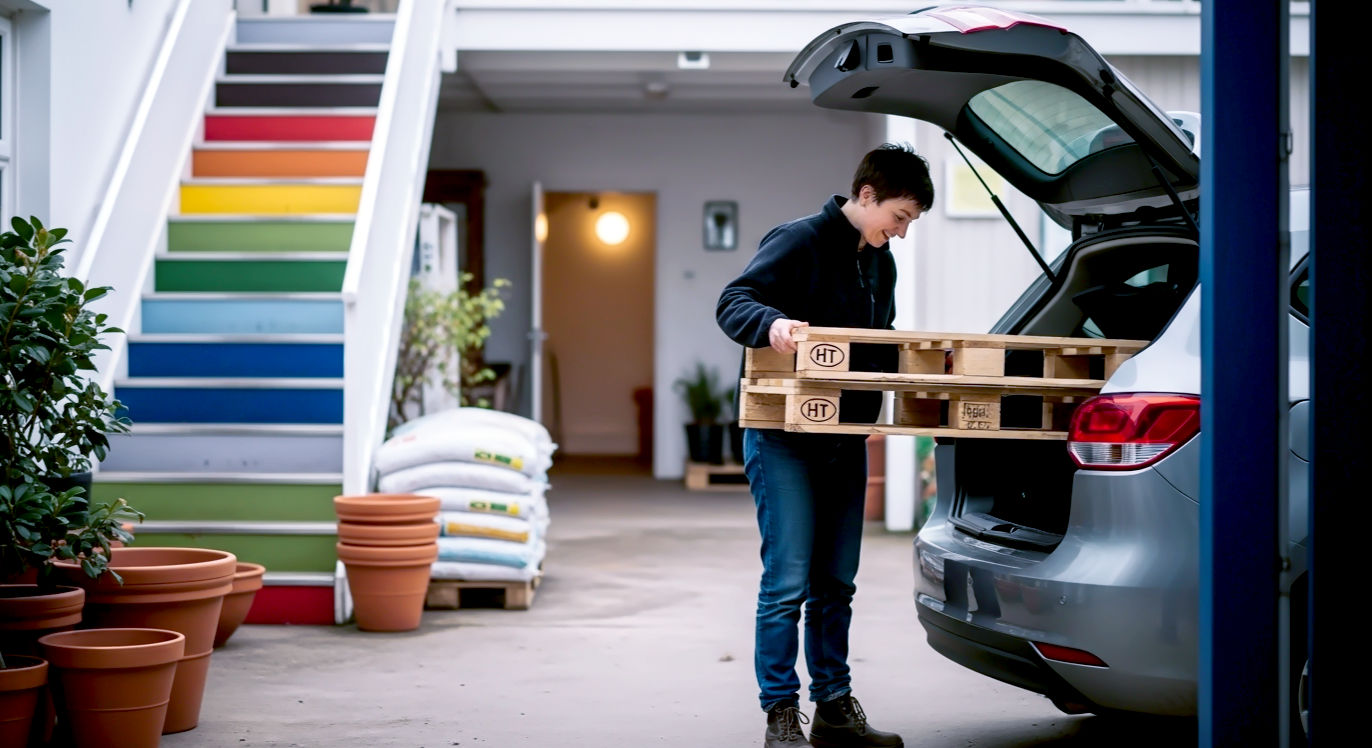
When you find a source, inspect the pallets carefully for those all-important stamps before you load them into your car.
Gearing Up: Your Pallet-Busting Toolkit
You’ve found your pallets, checked they’re safe, and brought them home. Now you need to turn them from a clunky crate into a neat stack of usable timber. Having the right tools makes this job infinitely easier and safer.
The Essentials (You Probably Have Most of These)
- Good Quality Gloves: Splinters are a certainty. Protect your hands.
- Safety Goggles: Essential. Nails, wood chips, and grit can fly everywhere.
- Claw Hammer: For prying and knocking things about.
- Pry Bar / Crowbar: Gives you the leverage you need to separate the planks.
- A Saw: A basic hand saw will do the job, but a circular saw or jigsaw will make life much easier.
- Power Drill/Driver: For putting your new project together.
- Sander: You can sand by hand, but an electric orbital sander will save you hours and give a much better finish.
The “Makes Life Easier” Extras
- Pallet Buster Tool: A specially designed tool that looks like a giant fork. It gives you amazing leverage and is the best way to get planks off with minimal splitting. A worthy investment if you plan on doing a few projects.
- Reciprocating Saw: Fitted with a blade that can cut through metal, this is the pro’s choice. It allows you to slice right through the nails, freeing the planks without any prying at all.
Dismantling a Pallet: The Art of Deconstruction
This is often the most challenging part of the whole process. Pallets are built to stay together, with tough, spiral-grooved nails that refuse to let go. Patience is key. Rushing will only lead to a pile of split, unusable wood.
Method 1: The Brute Force Pry
This method uses the most basic tools: a hammer and a pry bar.
- Use the hammer to knock a block of wood under one end of the pallet to lift it slightly.
- Wedge your pry bar into the gap between the plank and the supporting block.
- Pry upwards gently. Don’t try to force the plank off in one go.
- Move to the next block on the same plank and pry a little there.
- Keep working your way along the plank, prying a little at each point, until it starts to loosen and come free.
- Pros: You only need simple tools.
- Cons: It’s slow, hard work, and has the highest risk of splitting the planks.
Method 2: The Surgical Saw
If you care more about the long planks than the chunky blocks, this is a great option.
- Identify the main planks you want to save.
- Use a circular saw or a jigsaw to cut through the planks, right next to the supporting blocks on either side.
- This will free the main section of the plank, leaving the nailed ends still attached to the blocks.
- Pros: It’s very fast and guarantees you get clean, undamaged planks.
- Cons: You lose a few inches of length from each end of the plank.
Method 3: The Pro’s Choice (Reciprocating Saw)
This is by far the quickest and most effective method if you have the right tool.
- Get a reciprocating saw (sometimes called a Sabre saw) and fit it with a blade designed for cutting both wood and metal.
- Simply slide the blade into the gap between the plank and the block.
- Power it up and slice straight through the nails holding the plank in place.
- Repeat for all the nails. The plank will lift right off.
- Pros: Super-fast, and it saves the entire length of the plank with no damage.
- Cons: You need to own or borrow a specific power tool.
Prepping Your Planks: From Grimy to Gorgeous
Once you have a nice pile of dismantled wood, it’s time for a bit of a makeover. This stage turns rough, dirty planks into clean, smooth timber that’s ready to be made into something beautiful. Don’t skip it!
Step 1: The Big Clean-Up
Your pallet has been on a journey. It’s likely been sitting outside and is covered in dirt, moss, or bird poo.
- Give every piece a thorough scrub with a stiff brush and a bucket of hot, soapy water. A bit of household bleach in the water can help kill any mould or mildew.
- If you have a pressure washer, this is the perfect job for it. It will blast away grime in seconds. Just be careful not to hold it too close, as the high pressure can damage the wood surface.
- Once clean, stack the wood somewhere with good air circulation and let it dry completely. This can take a day or two, especially in British weather!
Step 2: Smooth Operator – Sanding
This is the step that transforms the wood from “splinter-central” to something you’d actually want in your house.
- Start with a coarse sandpaper, something like a 60 or 80-grit. This will do the heavy lifting, removing the rough surface, splinters, and any stamps you don’t want to see. An orbital sander is your best friend here.
- Once the worst of the roughness is gone, switch to a medium 120-grit paper. This will smooth out the scratches left by the coarse paper.
- For surfaces that need to be really smooth (like a coffee table top), finish with a fine 220-grit paper. This will leave the wood feeling silky to the touch.
- Always pay extra attention to the edges and corners to make them soft and rounded.
Now, your wood is ready. You have a stack of clean, smooth, character-filled timber. Let the making begin!
6 Creative Pallet Wood Projects to Transform Your Home and Garden
Here are six tried-and-tested projects, ranging from super-simple to slightly more ambitious. Each one is a fantastic way to get started with pallet wood.
Project 1: The Instant Garden Planter
This is one of the easiest and most satisfying pallet projects out there. It’s perfect for creating a vertical garden in a small space, ideal for herbs, strawberries, or colourful bedding plants.
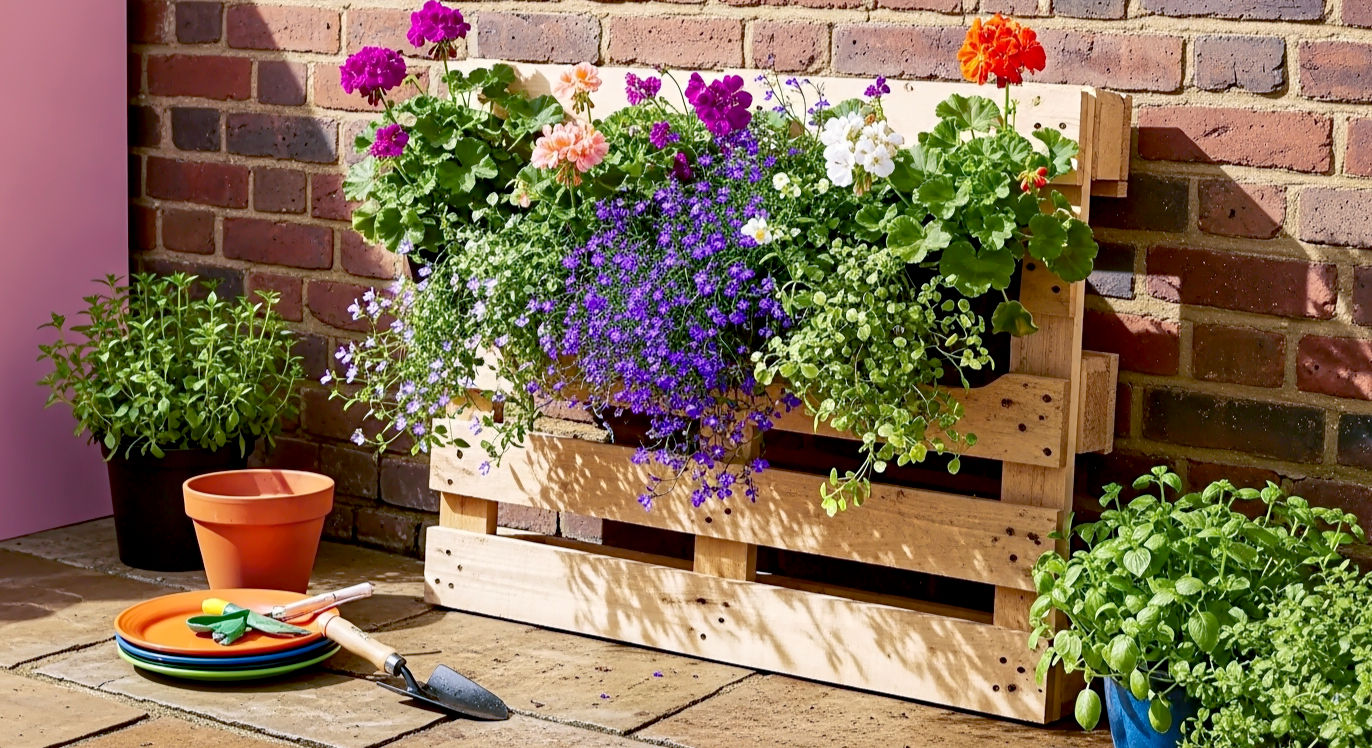
- Difficulty: Beginner
- The Idea: You simply stand a pallet on its end, close up the bottom and back, and turn the gaps between the slats into planting troughs.
- How to Make It:
- First, pick your best-looking pallet. You won’t be dismantling this one much.
- You need to create a bottom for each planting trough. You can do this by using spare planks from another pallet, cutting them to size and nailing them to the bottom of each opening you intend to use.
- Next, turn the pallet over. You need to create a back for it. Again, use spare planks or, for a quicker job, get a roll of heavy-duty weed control fabric. Use a staple gun to staple the fabric tightly across the entire back and bottom of the pallet. This will hold the soil in.
- Stand your planter up in its final position. Fill the troughs with good quality compost.
- Now the fun part: get planting! Pop in your chosen herbs, flowers, or strawberry plants. Water them in well, and you’re done.
- Top Tip: If you want to add a splash of colour, give the planter a lick of outdoor-friendly paint before you add the soil. A bright blue or a soft sage green can look fantastic against the green foliage.
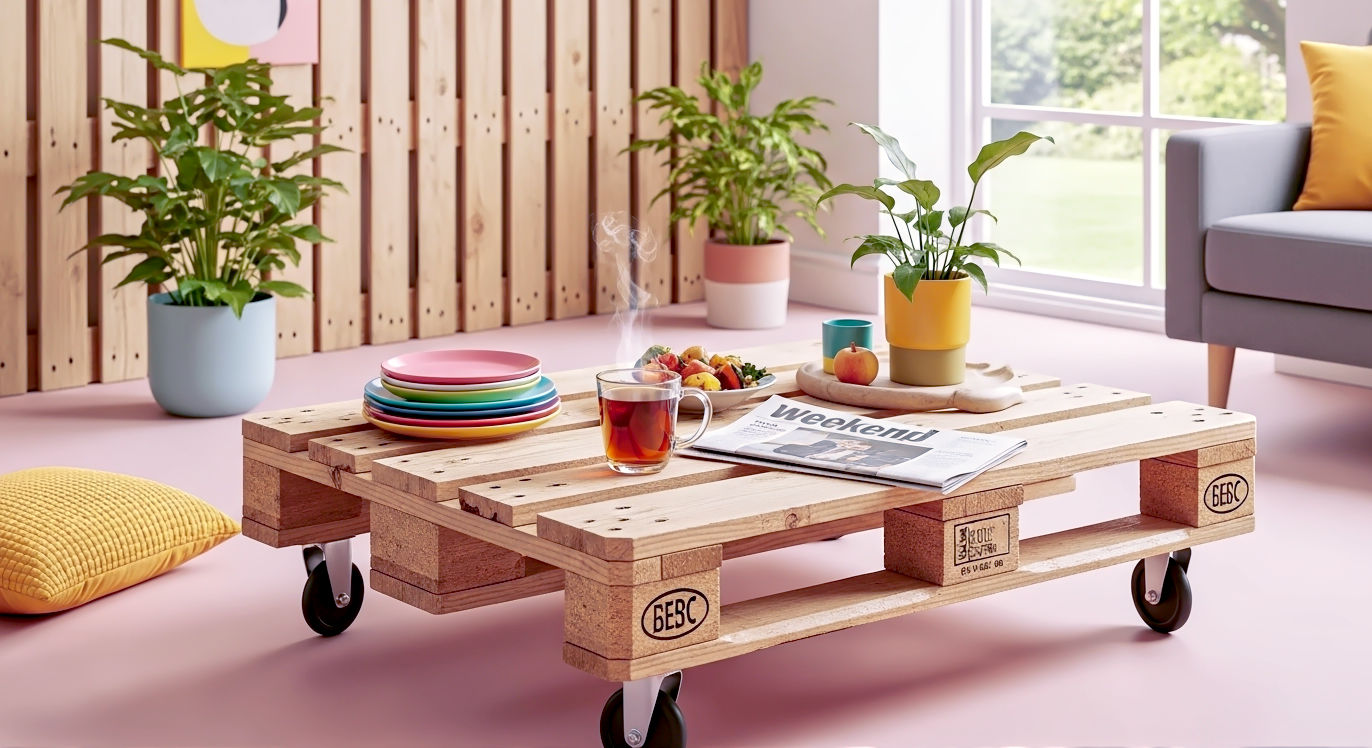
Project 2: The Rustic Coffee Table
This is the quintessential pallet project. It’s a classic for a reason: it’s relatively easy, looks amazing, and is incredibly useful.
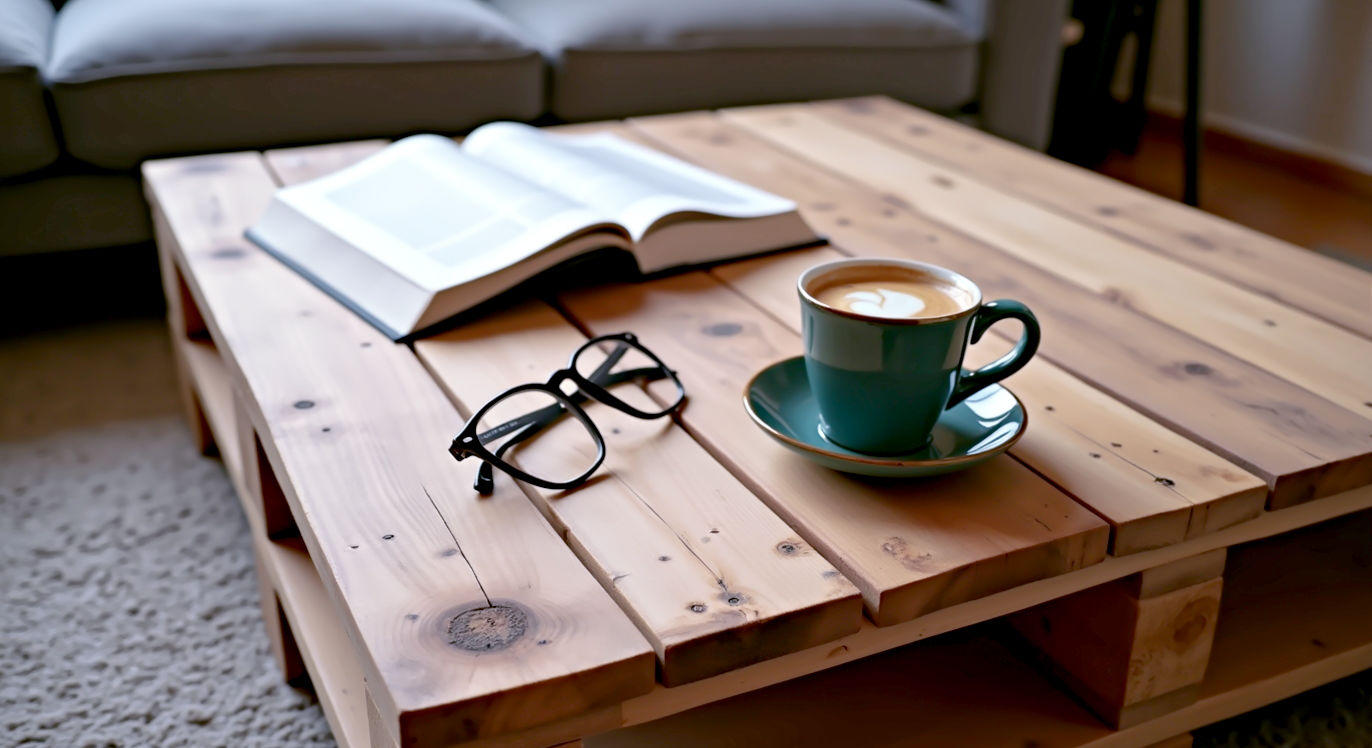
- Difficulty: Beginner / Intermediate
- The Idea: Use a section of a pallet as the tabletop, add some legs, and you have a stylish, industrial-chic coffee table.
- How to Make It:
- Find a pallet that is clean and has nicely spaced top planks. You’ll need a saw to cut the pallet down to your desired coffee table size. A good size is often two-thirds of a standard pallet.
- Once you’ve cut your section, you may want to add some extra planks to the top to fill in any large gaps. Use wood from the leftover third of the pallet for this.
- Now for the most important part: sanding. Because this is a surface you’ll be touching and placing things on, you need to make it really smooth. Sand the top and sides meticulously, working your way up through the sandpaper grits (80 -> 120 -> 220).
- Attach the legs. There are loads of options here. For a classic industrial look, hairpin legs are perfect and can be bought cheaply online. Alternatively, you can use the chunky blocks from a dismantled pallet as short, rustic feet. For a table you can move around, attach four castor wheels.
- Finally, apply a finish to protect the wood. A few coats of clear matt or satin varnish will protect it from spills while letting the natural character shine through.
- Top Tip: The space between the top and bottom planks is a perfect, ready-made shelf for magazines, remote controls, or books.
Project 3: A Dreamy Statement Headboard
Fed up with your boring bed? A pallet wood headboard adds an incredible amount of warmth, texture, and character to a bedroom for next to nothing.
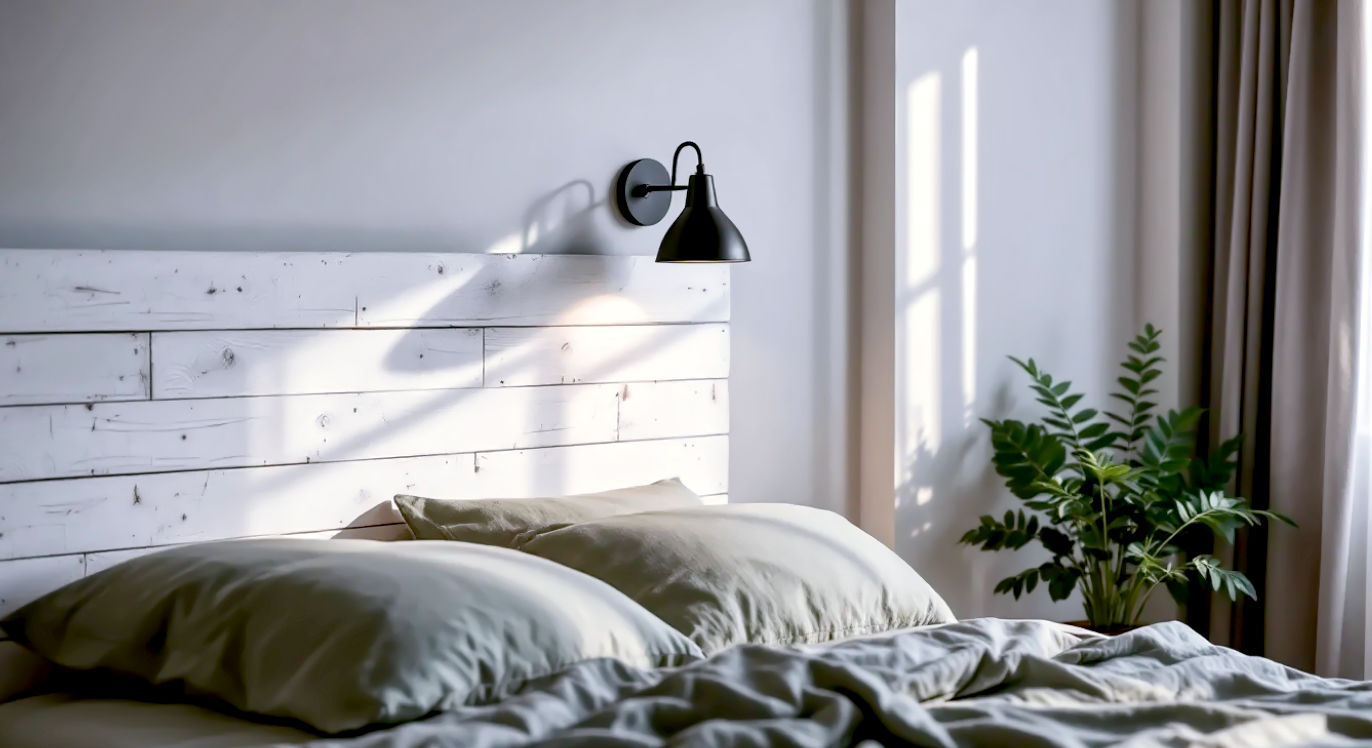
- Difficulty: Intermediate
- The Idea: Create a panel of pallet planks, mounted on the wall behind your bed, to act as a stunning, rustic headboard.
- How to Make It:
- First, measure the width of your bed. You want your headboard to be at least the same width, or slightly wider for a more dramatic look. Decide on the height you want.
- Dismantle enough pallets to give you the planks you need. For the best look, choose planks with varied colours and textures.
- Prepare the planks: clean them thoroughly and give them a good sanding. You don’t need them to be perfectly smooth, just free of splinters.
- The easiest way to assemble the headboard is to fix the planks to a backing board, like a thin sheet of plywood or MDF. Cut the backing board to your desired final size.
- Arrange your pallet planks on the board. You can lay them horizontally for a simple look or get creative with a herringbone or chevron pattern. Stagger the joints for a more natural feel.
- Fix the planks to the board using a combination of strong wood glue and short screws or nails from the back.
- Once assembled, you can mount the whole panel to the wall behind your bed using heavy-duty wall fixings. Make sure it’s secure!
- Top Tip: For a soft, coastal, or Scandinavian feel, try a “whitewash” finish. Mix some white paint with water (about a 50/50 ratio) and paint it on, wiping off the excess with a rag. It highlights the wood grain beautifully.
Project 4: The Ultimate Garden Sofa
Create a comfy, stylish seating area for those long summer evenings and family BBQs. This project looks impressive but is surprisingly simple to put together.
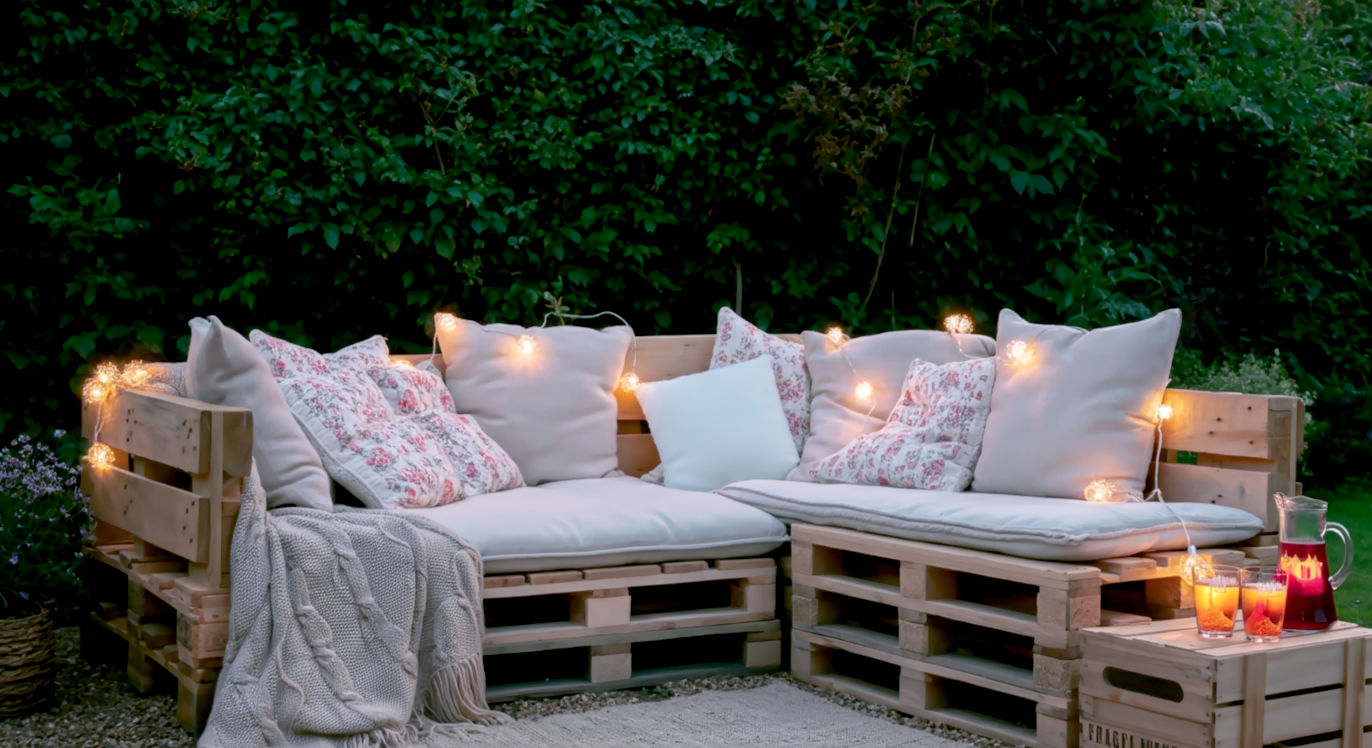
- Difficulty: Intermediate
- The Idea: Stack whole pallets to create a solid base and backrest for a modular outdoor sofa.
- How to Make It:
- You’ll need a few whole pallets for this – at least three for a simple chair, or six to eight for a decent-sized L-shaped sofa. Make sure they are all the same size!
- For the base, stack two pallets on top of each other. This brings the seat up to a comfortable height. Stack a second pair next to the first to create a longer sofa.
- For the backrest, stand another pallet on its long edge behind the base.
- Now you need to secure everything together. Use long screws or connecting plates to firmly join the two base pallets to each other, and then securely screw the backrest pallet into the base. You want it to be rock solid.
- Give the whole structure a good sand, paying special attention to any areas you might touch, like the front edge and armrests (if you add them).
- Protect the wood from the British weather with a few coats of good quality exterior wood paint or varnish.
- Finish it off with some comfy cushions. You can buy ready-made outdoor bench cushions online, or if you’re feeling crafty, make your own from foam blocks and waterproof fabric.
- Top Tip: Use the gaps in the base pallets as handy storage cubbies for garden magazines or flip-flops!
Project 5: The Cosy Feature Wall
Want to make a big impact in your living room or bedroom? A feature wall made from pallet wood (often called shiplap) is a guaranteed showstopper.
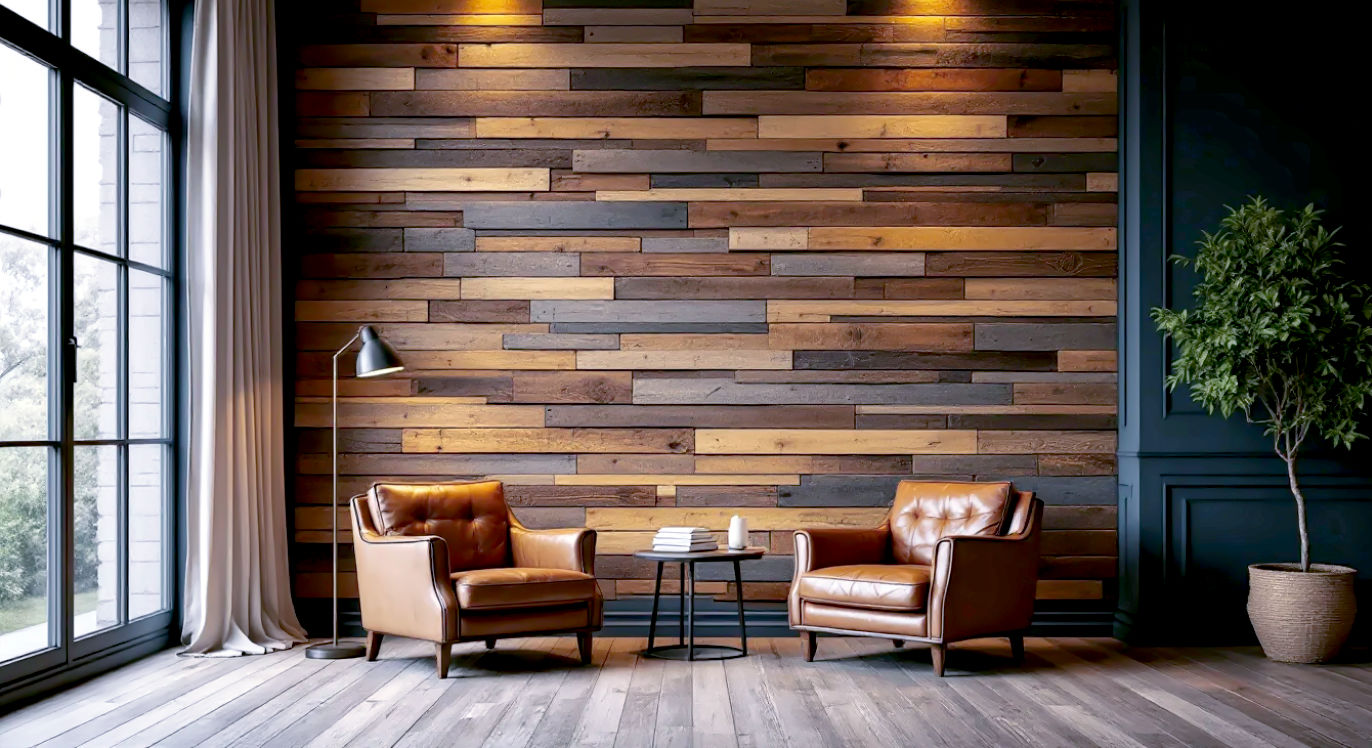
- Difficulty: Intermediate
- The Idea: Clad an entire wall with prepared pallet planks to create a warm, textured, and rustic focal point.
- How to Make It:
- This project requires a lot of wood, so you’ll need to dismantle quite a few pallets. The beauty of it is that you can use planks of different widths and colours to create a really interesting mosaic effect.
- Prepare every single plank. Clean them, and then sand them. How much you sand depends on the look you want – from very rustic to fairly smooth.
- It’s a good idea to paint the wall a dark colour (like black or dark grey) before you start. This will hide any small gaps that might appear between the planks.
- Start at the bottom of the wall. Apply a strong “grab” adhesive to the back of your first plank and press it firmly against the wall. Use a spirit level to make sure it’s perfectly straight.
- To make it extra secure, fire a few nails through the plank into the wall with a nail gun (or hammer them in carefully).
- Work your way up the wall, row by row. Stagger the joins between planks on different rows, just like brickwork. You’ll need a saw to cut the last plank of each row to size.
- When you get to things like light switches or sockets, you’ll need to carefully measure and cut notches in the planks with a jigsaw. Always turn the electricity off at the fuse box before working around sockets.
- Top Tip: Before you fix any planks, lay them out on the floor in the pattern you want. This lets you play with the arrangement of different coloured and textured planks to get a look you love.
Project 6: The Perfect Little Wine Rack
A simple, quick, and very satisfying project that makes a great gift. It’s a stylish and practical way to store a few of your favourite bottles.

- Difficulty: Beginner
- The Idea: Use a small, sawn-off section of a pallet to create a wall-mounted rack that holds wine bottles and glasses.
- How to Make It:
- You only need a small section of one pallet for this. Look at your pallet – you want a section with a top plank, a bottom plank, and the chunky support blocks in between. Use a saw to cut this section away from the rest of the pallet.
- You should now have a piece that looks like a small, deep shelf. The gap between the top and bottom planks is where the wine bottles will lie.
- To create the holder for wine glasses, take the bottom plank and carefully cut some notches into it. You’ll need a wide channel with a narrower opening, so the base of the wine glass can slide in and hang securely. A jigsaw is the best tool for this.
- Give the whole piece a really good sand to make it smooth and smart.
- You can leave it natural or apply a dark wood stain or wax for a more polished finish.
- Mount it to your kitchen or dining room wall using strong wall plugs and screws. Make sure you screw through the chunky blocks for a secure fixing. Stock it with wine, and admire your handiwork!
- Top Tip: Measure the base of your own wine glasses before you cut the notches to ensure you get a perfect, snug fit.
The Finishing Touches: Protecting and Perfecting Your Project
You’ve built your masterpiece. Now it’s time to apply a finish. This not only makes it look great but also protects the wood and makes it last longer.
- Staining: Wood stains soak into the wood to change its colour while letting the natural grain and texture show through. From a light oak to a dark walnut, it’s a great way to match your project to your existing furniture.
- Painting: Perfect for garden furniture or if you want to add a pop of colour. Always use a primer first and choose a paint that’s suitable for the job (e.g., durable exterior paint for your garden sofa).
- Varnishing: Varnish provides a tough, protective clear coat. It’s essential for things that will see a lot of wear and tear, like a coffee table, or for anything that will live outside. It comes in matt, satin, or gloss finishes.
- Waxing or Oiling: For indoor pieces where you want a very natural, soft-sheen finish, a good quality furniture wax or Danish oil is perfect. It soaks into the wood and really brings out its character and depth.
Conclusion: More Than Just Wood
So there you have it. That humble, overlooked pallet, transformed. From a piece of industrial scrap to a beautiful, functional, and personal part of your home. Working with pallet wood is about more than just saving money; it’s about creativity, sustainability, and the immense satisfaction of making something with your own two hands.
It proves that with a little imagination and effort, you can create something amazing from the most ordinary of beginnings. So next time you see a pile of discarded pallets, hopefully, you won’t see rubbish. You’ll see a future coffee table, a beautiful headboard, or a garden bursting with life. Now, what will you build first?
Further Reading
For more inspiration, tips, and technical advice, check out these excellent UK-based resources:
- Instructables (DIY Pallet Projects Section): A huge community of makers sharing their creations, with lots of pallet projects.
- Real Homes (Upcycling Section): Often features stylish and achievable upcycling ideas, including pallet furniture.
- The UK Men’s Sheds Association: A fantastic community resource for advice, support, and shared workshop space for all kinds of making.