Ceramic Crack Repair Kits: Your Definitive Guide to Flawless Restoration
Don’t let ceramic damage ruin your home’s aesthetic. This comprehensive guide explores specialized ceramic crack repair kits, offering step-by-step instructions and expert tips for achieving seamless, durable repairs on tiles, sinks, and bathtubs.

This post may contain affiliate links. If you make a purchase through these links, we may earn a commission at no additional cost to you.
Introduction: The Unsung Heroes of Home Restoration
Imagine a pristine bathroom or a gleaming kitchen, only for your eyes to land on a noticeable crack marring a ceramic tile or a chip in your beloved porcelain sink. It’s a common scenario, and one that can feel disheartening. For many years, such damage often meant costly replacements or living with the imperfection. However, the landscape of home repair has changed dramatically. We’re now in an era where specialised ceramic crack repair kits offer a powerful, accessible solution for homeowners across the UK. These aren’t just simple glues; they are sophisticated systems designed to restore damaged ceramic and porcelain surfaces to their former glory.


Why Ceramic Cracks are More Than Just Cosmetic
While a crack might seem like a small visual flaw, it can signify much more. A hairline fracture in a tile, for instance, isn’t just unsightly; it can be a weak point. Over time, water can seep into these cracks, especially in areas like bathrooms or kitchens. This moisture ingress can lead to bigger problems, such as mould growth, structural damage to the substrate beneath the ceramic, or even further cracking and spalling of the ceramic itself. In high-traffic areas, a small chip can quickly expand into a larger, more significant crack under repeated stress. Repairing these issues promptly isn’t just about aesthetics; it’s about maintaining the integrity and longevity of your home’s surfaces. Ignoring them can lead to more extensive and expensive repairs down the line.
The Rise of DIY Ceramic Repair Kits
Gone are the days when only professional tradespeople could tackle ceramic damage. Thanks to advancements in material science, a new generation of DIY ceramic repair kits has emerged. These kits put the power of restoration directly into your hands. They’re designed to be user-friendly, allowing you to achieve professional-looking results without needing extensive experience or specialised tools. From minor chips on a kitchen worktop to more substantial cracks in a bathtub, there’s likely a kit available that can help. This accessibility means you can save money on professional services and enjoy the satisfaction of a successful home improvement project. These kits typically contain everything you need: the repair compound, applicators, mixing tools, and often, colour pigments to ensure a seamless match.
Understanding Ceramic Materials: A Foundation for Repair
Before diving into the specifics of repair, it’s crucial to understand the materials you’re working with. Ceramic, in its broadest sense, refers to a wide range of inorganic, non-metallic materials that are hardened by heat. This category includes everything from traditional pottery to advanced technical ceramics used in aerospace. In the context of home repairs, we’re primarily talking about ceramic tiles, porcelain fixtures, and sometimes even natural stone surfaces that share similar repair characteristics. Knowing the material helps you choose the right repair kit and understand how it will interact with the surface.

What is Ceramic? Exploring the Basics
At its core, ceramic is created by shaping clay and other natural raw materials, then firing them at very high temperatures. This firing process, known as sintering, transforms the raw materials into a dense, hard, and often brittle material. The exact composition and firing temperature determine the final properties of the ceramic, including its hardness, porosity, and resistance to heat and chemicals. For instance, common ceramic tiles often have a porous bisque body covered with a glazed, protective layer. This glaze provides the colour, shine, and water resistance we associate with ceramic surfaces. When this glaze is chipped or cracked, the underlying porous body can become exposed, making it vulnerable to moisture and staining.
Porcelain vs. Ceramic: Key Differences for Repair
While often used interchangeably, porcelain and ceramic have distinct differences that impact their repair. Porcelain is a type of ceramic, but it’s made from a finer, denser clay and fired at much higher temperatures than standard ceramic. This process results in a material that is significantly less porous, more durable, and more water-resistant. Think of porcelain as the premium version of ceramic for many applications.
- Ceramic Tiles: Typically made from red or white clay, they are fired at lower temperatures. They tend to be more porous and are often glazed. The glaze is what gives them their colour and protective surface. When a ceramic tile cracks, you’re often dealing with a break through both the glaze and the porous body.
- Porcelain Tiles and Fixtures: Made from denser clays (like kaolin) and fired at extremely high temperatures (1200∘C to 1400∘C). This high-temperature firing creates a vitrified (glass-like) body that is very dense, non-porous (water absorption rate of less than 0.5%), and highly resistant to stains and wear. When porcelain cracks, it’s usually a clean break through a very hard, uniform material.
These differences mean that while many kits are “multi-surface,” a kit specifically designed for porcelain might offer superior adhesion and durability for those ultra-dense surfaces, whereas a general ceramic kit might be perfectly adequate for standard ceramic tiles.
Common Causes of Ceramic Damage
Understanding how ceramic gets damaged helps in both prevention and effective repair. Most damage falls into a few key categories.
Impact Damage and Chips
This is perhaps the most common type of ceramic damage. Dropping a heavy object, like a saucepan in the kitchen or a glass bottle in the bathroom, can easily cause a chip or a star-shaped crack. The impact creates a concentrated force that exceeds the ceramic’s tensile strength, leading to a fracture. Chips often involve the loss of a small piece of the ceramic, exposing the underlying body. The severity of impact damage can range from a tiny, almost unnoticeable chip to a large, crater-like hole.
Stress Cracks and Hairline Fractures
Unlike impact damage, stress cracks often appear without a direct impact. These can be caused by:
- Thermal Shock: Rapid changes in temperature, such as pouring hot water into a cold sink or a sudden cold draught hitting a hot tile, can cause the ceramic to expand and contract unevenly, leading to stress and cracking.
- Substrate Movement: If the surface beneath the ceramic (the substrate) shifts or settles, it can put immense pressure on the rigid ceramic, causing it to crack. This is common in floors or walls where foundations might settle or wooden joists flex.
- Improper Installation: Tiles laid on an uneven surface or without adequate expansion joints can develop stress cracks over time as the building settles or temperatures fluctuate. These often appear as long, thin “hairline” cracks.
Wear and Tear: Scratches and Fading
While not strictly cracks, scratches and fading are also forms of ceramic damage that repair kits can sometimes address. Scratches occur when abrasive materials are dragged across the glazed surface, leaving visible lines. Fading, particularly in older tiles, can happen due to prolonged exposure to sunlight or harsh cleaning chemicals, dulling the original colour. While a repair kit might not restore faded colour perfectly, some kits can fill and smooth deep scratches, making them less noticeable and restoring some of the surface’s original lustre.
The Science Behind Specialist Ceramic Repair Kits
The effectiveness of modern ceramic repair kits isn’t magic; it’s a testament to advanced material science. These kits rely on sophisticated chemical formulations that allow for strong adhesion, durability, and often, seamless integration with the original material.

How Do They Work? Adhesion and Bonding
At their core, ceramic repair kits work by creating a strong, durable bond with the existing ceramic surface. This process involves filling the damaged area with a new material that then hardens, effectively becoming part of the original structure. The key to this is the chemical reaction that occurs when the components of the kit are mixed.
Polymers and Resins: The Core Components
Most specialised ceramic repair kits utilise a two-part system, typically involving a resin and a hardener. These are usually synthetic polymers.
- Resin: This is the main body of the repair compound. It’s often an epoxy resin or an acrylic resin. Resins are complex organic compounds that, when mixed with a hardener, undergo a chemical reaction called polymerisation. This reaction causes the liquid or paste-like resin to solidify into a tough, durable plastic.
- Hardener (or Curing Agent): This component initiates the polymerisation process. It reacts with the resin molecules, forming a cross-linked network that gives the cured material its strength and rigidity. The ratio of resin to hardener is critical; incorrect mixing can lead to a repair that doesn’t cure properly, remains sticky, or lacks durability.
The resulting cured polymer fills the crack or chip, providing structural integrity and a smooth surface. The quality of the resin and hardener directly impacts the final strength, water resistance, and longevity of the repair.
Colour Matching Technology: Blending Seamlessly
One of the most impressive aspects of modern ceramic repair kits is their ability to achieve near-invisible repairs through advanced colour matching. This is achieved in a few ways:
- Pigment Packs: Many kits include a range of concentrated colour pigments (often in small tubes or pots). These pigments are added to the mixed resin in tiny increments, allowing the user to custom-blend a colour that closely matches the original ceramic. This requires patience and careful mixing, often testing on a hidden area first.
- Pre-Mixed Shades: Some kits, particularly those for common bathtub or sink colours (like white, off-white, or biscuit), come with pre-mixed compounds. While convenient, these offer less flexibility for unique shades.
- Translucent Resins: For glazed surfaces, some resins cure to a translucent finish, allowing the underlying ceramic’s colour to show through, which can help in blending, especially for minor chips where the base colour is still visible.
The goal is to create a repair that fills the physical void and blends visually with the surrounding surface, making the damage virtually undetectable.
Types of Repair Kits: Tailored Solutions
The market offers various types of ceramic repair kits, each with its strengths and ideal applications. Choosing the right type depends on the specific material, the nature of the damage, and the desired finish.
Resin-Based Repair Kits
Epoxy resins are renowned for their exceptional strength, adhesion, and chemical resistance. They are typically two-part systems (resin and hardener) that, when mixed, create a very hard and durable bond.
- Pros: Excellent bonding strength, highly durable, water-resistant, good chemical resistance, suitable for structural repairs and high-traffic areas.
- Cons: Longer curing times, can be harder to work with due to stickiness, less flexible once cured, can yellow slightly over time if exposed to UV light (though modern formulations minimise this).
- Ideal For: Deep cracks, large chips, structural repairs in bathtubs, sinks, tiles, and even some stone surfaces. Their robust nature makes them a go-to for permanent fixes.
Acrylic-Based Repair Kits
Acrylic resins are often single-component or two-part systems that offer good adhesion and a faster curing time compared to epoxies. They are generally easier to work with and can be more flexible.
- Pros: Faster curing, easier to clean up, good colour stability (less yellowing), more flexible than epoxy, often come in pre-mixed colours.
- Cons: Generally less strong and durable than epoxy for very heavy-duty applications, may not be as resistant to harsh chemicals or extreme heat.
- Ideal For: Smaller chips, hairline cracks, surface scratches, and cosmetic repairs on ceramic tiles, porcelain sinks, and acrylic bathtubs. They are a good choice for quick, easy fixes.
Wax-Based Repair Kits

These kits are unique in that they don’t involve a chemical curing process. Instead, they use a special hard wax that is melted and filled into the damaged area.
- Pros: Very easy to use, excellent for colour matching (often come with multiple wax sticks for blending), quick application, no curing time needed, can be easily removed or re-applied if mistakes are made.
- Cons: Not as durable or permanent as epoxy or acrylic, not water-resistant for prolonged exposure, susceptible to heat, not suitable for structural repairs or high-traffic areas.
- Ideal For: Small chips and scratches on furniture, decorative items, or areas not exposed to water or high heat. They are more of a cosmetic touch-up solution.
All-in-One Multi-Surface Kits
Many popular kits on the market are designed to be versatile, working across various ceramic, porcelain, and sometimes even stone surfaces. These often combine the benefits of epoxy or acrylic formulations with comprehensive colour matching systems.
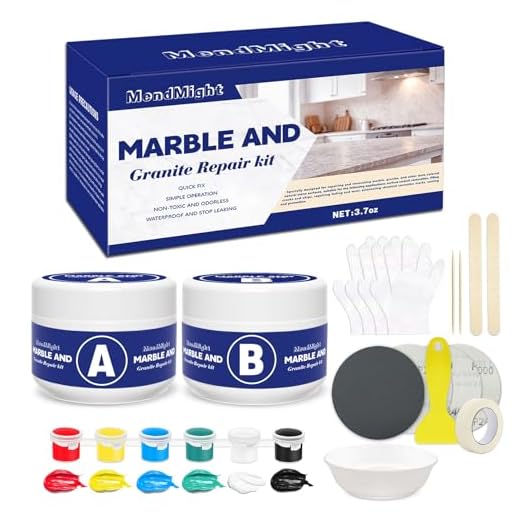
A prime example is the MendMight Tile, Granite, and Marble Repair Kit. This kit is specifically marketed as a “Multi-Surface Repair Kit” and highlights its suitability for “Marble, Granite & Porcelain.” It uses an “epoxy resin formula” for a “durable, waterproof bond within 12 hours” and boasts a “non-toxic formula.” This type of kit aims to provide a broad solution for common household ceramic and stone repairs, making it a popular choice for DIY enthusiasts. Its inclusion of colour pigments allows for “colour match” to achieve seamless results, which is a critical feature for any visible repair.
Choosing the Right Specialized Ceramic Crack Repair Kit
Selecting the appropriate repair kit is the first critical step towards a successful restoration. It’s not a one-size-fits-all situation; what works for a hairline crack on a wall tile might not be suitable for a deep chip in a bathtub.

Assessing the Damage: Size, Depth, and Location
The nature of the damage dictates the type of kit you’ll need. Take a moment to thoroughly inspect the crack or chip.
Hairline Cracks vs. Deep Fractures
- Hairline Cracks: These are thin, surface-level cracks that don’t typically compromise the structural integrity of the ceramic. For these, a thinner, more fluid repair compound (often acrylic-based) that can penetrate the narrow gap is ideal. Colour matching is paramount here, as the crack will still be visible if the colour isn’t perfect.
- Deep Fractures: These cracks extend deeper into the ceramic body, potentially compromising its strength. They might even go all the way through the material. For such damage, a stronger, more viscous epoxy-based filler is necessary. This type of compound provides the structural reinforcement needed to prevent the crack from spreading further.
Chips and Holes: Different Approaches
- Chips: These involve the loss of a small piece of ceramic, leaving a shallow depression. The key here is to fill the void and then smooth the surface. Both epoxy and acrylic kits can work, with epoxy offering greater durability for larger or high-impact chips.
- Holes: If a piece of ceramic is entirely missing, leaving a hole, the repair becomes more complex. You’ll need a compound that can be built up in layers and provide significant structural support. Epoxy putties or very thick epoxy resins are often recommended, sometimes with the addition of a backing material if the hole is through-and-through.
Material Compatibility: Ensuring a Lasting Fix
The type of ceramic or stone you’re repairing is paramount. While many kits claim “multi-surface” compatibility, understanding the nuances can lead to a more durable and aesthetically pleasing repair.
For Porcelain Fixtures (Toilets, Sinks, Bathtubs)
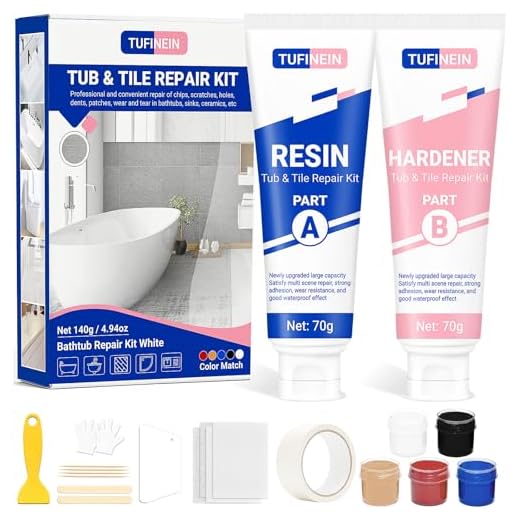
Porcelain, being very dense and non-porous, requires a repair compound with excellent adhesion properties. Epoxy-based kits are generally preferred for porcelain due to their superior bonding strength to such a hard, smooth surface. They create a very strong, waterproof seal crucial for fixtures constantly exposed to water. The Tufnein Bathtub Repair Kit is a prime example. It’s specifically designed for “Porcelain, Fiberglass, Enamel, Ceramic, Acrylic Repair” and highlights its “strong adhesion, with easy application.” This kit’s focus on bathtubs and sinks suggests its formulation is optimised for the wet, high-use environment of bathroom fixtures.
For Ceramic Tiles (Floors, Walls)
Standard ceramic tiles, with their often porous bisque body and glazed surface, can be repaired with both epoxy and acrylic kits. For floor tiles, where durability and resistance to foot traffic are important, an epoxy-based kit offers the best long-term solution. For wall tiles, particularly in less trafficked areas, an acrylic kit might suffice for smaller cosmetic repairs due to its ease of use and faster curing.
For Stone and Marble Surfaces
Natural stone like granite and marble have different porosity and chemical compositions compared to manufactured ceramics. Kits specifically formulated for stone often contain resins that bond well with the crystalline structure of these materials. The MendMight kit, as mentioned earlier, explicitly lists “Granite, and Marble” as compatible surfaces, indicating its resin system is suitable for these materials. Similarly, the Markinchus Stone Repair Kit is designed for “Stone Repair, Tile Repair, Furniture Scratch Repair.” Its use of a “wax block” system, while less permanent, offers a specific solution for cosmetic repairs on these diverse surfaces, including furniture.
Colour Matching: Achieving Invisible Repairs
This is often the most challenging, yet most rewarding, aspect of ceramic repair. An otherwise perfect repair will stand out if the colour doesn’t match.
Pre-Mixed Colours vs. Custom Blending
- Pre-Mixed Colours: Convenient for common shades like white, off-white, or black. They save time but offer limited flexibility. If your ceramic isn’t an exact match, the repair will be noticeable.
- Custom Blending: Kits with separate colour pigments allow you to mix and match to achieve a near-perfect shade. This requires patience and a good eye. You’ll typically start with the base colour of the repair compound and add tiny amounts of pigment until the desired hue is achieved.
The Importance of Light and Testing
Always mix and test your colour match in the same lighting conditions where the ceramic item is located. Natural daylight is usually best. Apply a small amount of the mixed compound to an inconspicuous area (e.g., the underside of a sink rim, a spare tile) and let it dry. The colour can change slightly as it cures. Compare it carefully to the surrounding ceramic. It’s often better to start with a slightly lighter shade and gradually add more pigment until you reach the desired depth. Remember, you can always add more pigment, but you can’t easily remove it.
Featured Product Deep Dive: MendMight Tile, Granite, and Marble Repair Kit
The MendMight Tile, Granite, and Marble Repair Kit stands out as a versatile option for a range of hard surface repairs. This kit is designed to tackle chips, cracks, scratches, and holes across various materials commonly found in homes.
Tile, Granite and Marble Repair Kit(Color Match), Tub and Fiberglass Shower Repair Kit with Strong Adhesion,…
-
Versatile Multi-Surface Repair: Ideal for fixing chips, cracks, holes, and scratches on a wide range of materials including marble, granite, porcelain, quartz, ceramic, and acrylic.
-
Waterproof & Durable Epoxy: The easy 1:1 mixing ratio creates a waterproof seal that cures to a rock-hard finish within 12 hours, ensuring it won’t leak, yellow, or peel over time.
-
Long-Lasting Performance: Creates a smooth, non-porous layer with powerful adhesion that stands up to heavy use, heat, water, and stains, making repaired surfaces easy to clean and maintain.
-
Family-Friendly Formula: This non-toxic and odor-free epoxy is safe for use in kitchens, bathrooms, and other areas in homes with children and pets.
-
Beginner-Friendly with Support: The kit includes straightforward guides for easy application, and dedicated customer support is available to assist with any questions.
Overview and Key Features
This kit is a two-part epoxy resin system, known for its robust bonding capabilities. Its primary features include:
- Multi-Surface Compatibility: Explicitly designed for tile, granite, marble, and porcelain. This broad application makes it a go-to for different areas of the home, from kitchen worktops to bathroom floors.
- Durable, Waterproof Bond: The epoxy resin formula creates a strong, lasting bond that is waterproof once cured. This is crucial for areas exposed to moisture, preventing water ingress and further damage. The manufacturer states a 12-hour cure time for a durable bond.
- Non-Toxic Formula: A significant advantage is its non-toxic formulation, which means no harsh odours. This makes it safer for use in home environments, particularly in kitchens and bathrooms where food preparation or prolonged exposure might occur.
- Colour Matching System: The kit includes various colour pigments, allowing users to custom-blend a shade that seamlessly matches their existing surface. This is vital for achieving an invisible repair.
- Beginner-Friendly: Despite its technical capabilities, the kit is marketed as easy to use, even for those new to DIY repairs. It comes with clear instructions to guide the user through the process.
Ideal Use Cases
The MendMight kit is particularly well-suited for:
- Kitchen Surfaces: Repairing chips or cracks in granite or marble worktops, ceramic splashbacks, or porcelain sinks.
- Bathroom Fixtures: Addressing damage on porcelain tiles, vanity tops, or even minor chips in ceramic sinks.
- Flooring: Fixing cracks or chips in ceramic or porcelain floor tiles in high-traffic areas where a durable, waterproof repair is essential.
- Fireplaces: Repairing chips or cracks in ceramic or stone fireplace surrounds.
Application Tips for Optimal Results
To get the best out of the MendMight kit:
- Clean Thoroughly: Ensure the damaged area is meticulously clean and dry. Any dust, grease, or debris will compromise the bond.
- Precise Mixing: Follow the resin-to-hardener ratio exactly as instructed. Use the provided mixing stick and surface. Inaccurate ratios can lead to improper curing or a weaker bond.
- Gradual Colour Blending: When mixing colours, add pigments in tiny increments. It’s easier to darken a colour than to lighten it. Test the mixed colour on a hidden spot or scrap material and allow it to dry to see the true cured shade.
- Thin Layers for Deep Damage: For deeper chips or holes, apply the compound in thin layers, allowing each layer to partially cure before adding the next. This helps prevent sagging and ensures a stronger repair.
- Smooth Finish: Use a plastic spreader or a clean, damp cloth to smooth the applied compound before it fully cures. This minimises the need for extensive sanding later.
Pros and Cons
Pros:
Cons:
Step-by-Step Guide: How to Use a Ceramic Crack Repair Kit Effectively
Successfully repairing ceramic damage isn’t just about having the right kit; it’s about following the correct process. Precision and patience are your best tools.
Preparation is Key: Cleaning and Drying the Area
This is arguably the most crucial step. A repair compound won’t bond properly to a dirty, greasy, or wet surface.
Removing Debris and Loose Fragments
Start by carefully removing any loose chips, dust, or debris from within and around the crack or chip. Use a small brush, a vacuum cleaner nozzle, or even a toothpick to get into tight spaces. For larger cracks, you might need to gently scrape away any crumbling material. The goal is to create a clean, stable surface for the repair material to adhere to.
Degreasing and Priming
Once debris is removed, clean the area thoroughly. Use a mild detergent and water, then rinse completely. For stubborn grease or residue, a degreasing agent like rubbing alcohol (isopropyl alcohol) or acetone can be highly effective. Apply it with a clean cloth, ensuring no residue is left behind. Allow the area to dry completely. Any moisture trapped in the crack will prevent the repair compound from bonding correctly and can lead to future failure. Some kits may include a primer; if so, apply it as per the instructions, as it can significantly improve adhesion.
Mixing the Components: Precision Matters
Most specialised kits are two-part systems, requiring careful mixing.
Resin and Hardener Ratios
Always follow the manufacturer’s specific instructions for the resin-to-hardener ratio. This is usually given as a volume ratio (e.g., 1:1, 2:1). Use the mixing cups or syringes provided, or precise measuring tools if none are included. Mixing too much hardener can make the compound cure too quickly and become brittle, while too little can prevent it from curing fully, leaving a sticky mess. Mix thoroughly but gently to avoid introducing air bubbles, which can weaken the repair and create an unsightly finish.
Adding Colour Pigments
If your kit includes colour pigments for custom blending, start with a small amount of the base repair compound. Add tiny drops or pin-prick amounts of pigment at a time, mixing well after each addition. Compare the colour to the ceramic surface under good lighting. Remember, it’s easier to add more pigment than to lighten a colour. Take your time with this step; it’s essential for a seamless repair.
Application Techniques: Filling, Smoothing, and Curing
Once mixed, the compound has a limited working time before it starts to set. Work efficiently but carefully.

For Hairline Cracks: Fine Application
For very thin cracks, you’ll need a precise applicator. A fine-tipped brush, a toothpick, or the edge of a plastic spreader can work. Apply a small bead of the mixed compound directly into the crack, allowing it to flow in. Use a clean, damp cloth or a plastic scraper to immediately wipe away any excess from the surrounding surface before it cures. You want the compound to fill the crack without creating a raised bump.
For Chips and Holes: Layering and Building Up
For chips and holes, you’ll need to fill the void. Apply the compound in small amounts, pressing it firmly into the damaged area to ensure good contact and to push out any trapped air bubbles. For deeper holes, it’s often best to apply the compound in thin layers, allowing each layer to partially cure (become tacky but not fully hard) before adding the next. This prevents sagging and ensures a stronger, more uniform repair. Build up the compound slightly higher than the surrounding surface, as it may shrink slightly as it cures.
Curing Times and Methods (UV Light, Air Dry)
Pay close attention to the manufacturer’s stated curing times.
- Air Dry: Most epoxy and acrylic kits cure by air drying over several hours (e.g., 12-24 hours for full hardness). During this time, protect the repair from dust, moisture, and any disturbances.
- UV Light: Some specialised kits, particularly those for small, quick repairs, use UV light to cure rapidly. These kits will include a small UV lamp. This method offers very fast curing, often in minutes, but is typically limited to surface-level repairs.
Do not touch or disturb the repair until it has fully cured. Rushing this step can ruin the repair and necessitate starting over.
Finishing Touches: Sanding, Polishing, and Sealing
Once the repair is fully cured, the final steps involve refining the surface for a seamless finish.
Achieving a Smooth, Seamless Finish
If you’ve built up the compound slightly proud of the surface, you’ll need to sand it down. Start with a fine-grit sandpaper (e.g., 600-grit) and wet-sand gently. Gradually move to finer grits (e.g., 1000-grit, 2000-grit) to achieve a smooth finish that matches the surrounding ceramic. Always wet-sand to prevent scratching and to keep dust down. Be careful not to sand the original ceramic surface excessively. For very small repairs, gentle buffing with a soft cloth might be enough.
Protecting the Repair for Longevity
Some kits may recommend applying a clear sealant over the repair, especially for high-wear areas or those exposed to water. This sealant adds an extra layer of protection against moisture, stains, and abrasion, further extending the lifespan of your repair. Follow the kit’s instructions for any recommended sealing steps.
Featured Product Deep Dive: Tufnein Bathtub Repair Kit
The Tufnein Bathtub Repair Kit is a highly targeted solution designed specifically for the unique challenges of repairing bathtubs, sinks, and shower trays. These fixtures are subjected to constant water exposure, temperature fluctuations, and cleaning chemicals, demanding a robust and waterproof repair.
Bathtub Repair Kit 140g (Color Match), TUFINEIN Ceramic Repair Kit for Porcelain, Fiberglass, Enamel, Ceramic,…
-
Simple 1:1 Mixing System: The upgraded large-capacity tubes feature a flip-cap design that makes dispensing and mixing a precise 1:1 ratio effortless, ensuring a perfect application even for beginners.
-
Customizable Color Matching: Includes 5 different color pastes, allowing you to blend and tint the formula to accurately match the specific shade of your fixture for a seamless repair.
-
Versatile Multi-Surface Formula: Ideal for a wide variety of materials, including enamel, fiberglass, acrylic, ceramic, porcelain, and cast iron. Use it to repair tubs, sinks, shower trays, tiles, and countertops.
-
Durable & Professional Finish: Creates a high-adhesion bond that permanently fixes chips, cracks, holes, and dents. After a 24-hour cure time, the repaired area becomes a wear-resistant, smooth surface with a solid, high-gloss finish.
-
Economical All-in-One Kit: This multi-functional kit provides a low-cost, high-coverage solution to restore damaged surfaces, saving you the expense of professional repairs or full replacements.
Overview and Key Features
This kit is an acrylic-based polymer liquid system, formulated for durability and a smooth finish. Its key features include:
- Wide Material Compatibility: Explicitly states compatibility with “Porcelain, Fiberglass, Enamel, Ceramic, Acrylic Repair.” This makes it suitable for the vast majority of bathroom fixtures.
- Strong Adhesion and Waterproof Bond: Designed to create a lasting, waterproof repair that can withstand the wet environment of a bathroom. The strong adhesion ensures the repair won’t lift or peel over time.
- Colour Matching System: The kit includes five pre-mixed colour pastes (white, off-white, biscuit, almond, black) that can be blended to match a wide range of common bathroom fixture colours. This is a significant advantage for users looking to achieve a seamless blend without complex custom mixing.
- Smooth, Glossy Finish: The acrylic formula is designed to cure to a “fine glossy finish,” which helps it blend aesthetically with the typically shiny surfaces of bathtubs and sinks.
- Easy Application: The kit is designed for ease of use, making it accessible for DIY enthusiasts.
Ideal Use Cases (Bathtubs, Sinks, Showers)
The Tufnein kit is specifically formulated for:
- Bathtub Chips and Cracks: Ideal for repairing damage to enamel, acrylic, or porcelain bathtubs, restoring their smooth, waterproof surface.
- Sink Repairs: Addressing chips, scratches, or small cracks in ceramic or porcelain sinks.
- Shower Tray Damage: Fixing imperfections in shower trays, ensuring they remain watertight and hygienic.
- Tile Repairs in Wet Areas: Suitable for ceramic or porcelain tiles within shower enclosures or around bathtubs where a waterproof repair is crucial.
Application Tips for Large Surface Repairs
When working on larger fixtures like bathtubs, specific considerations apply:
- Ventilation: Ensure the bathroom is well-ventilated during application and curing, as the acrylic liquid may have some fumes.
- Masking: Use painter’s tape to mask off areas around the repair that you don’t want the compound to touch. This protects the surrounding surface and makes cleanup easier.
- Even Spreading: For larger chips or areas, use a plastic spreader or a flexible spatula to apply the compound evenly and smoothly. Work quickly but carefully to avoid streaks.
- Multiple Thin Coats: If the damage is deep, apply the compound in several thin coats rather than one thick layer. This promotes better curing and reduces the risk of sagging or bubbling.
- Allow Full Cure: Given the constant water exposure, allow the repair to cure for the maximum recommended time before using the fixture. This ensures the repair achieves its full strength and waterproof properties.
Pros and Cons
Pros:
Cons:
Advanced Techniques and Troubleshooting for Ceramic Repairs
While most ceramic repairs are straightforward with the right kit, some situations might require a bit more finesse or a different approach. Knowing when to apply advanced techniques or when to seek professional help is key.
Dealing with Large Cracks and Structural Damage
For very large cracks, especially those that compromise the structural integrity of the ceramic (e.g., a crack running across a large floor tile, or a substantial fracture in a sink), a simple filler might not be enough.
Reinforcement Methods
In such cases, reinforcement can significantly improve the longevity of the repair. This might involve:
- Fibre Mesh: For through-and-through cracks, applying a fine fibreglass mesh or similar reinforcing material to the underside of the ceramic (if accessible) before applying the repair compound can add considerable strength. The resin saturates the mesh, creating a composite material that resists further propagation of the crack.
- Epoxy Putty: For large holes or missing pieces, a thick epoxy putty can be sculpted to fill the void, providing a solid base. This putty can then be sanded and topped with a thinner, colour-matched resin for the final finish.
When to Call a Professional
There are times when DIY repair might not be the best solution:
- Extensive Structural Damage: If a ceramic fixture is severely cracked and losing its structural integrity (e.g., a toilet bowl with a large, leaking crack), replacement is often safer and more practical than repair.
- Historical or Valuable Items: For antique ceramics, valuable pottery, or intricately designed tiles, a professional restorer with specialised knowledge and tools can achieve a much higher quality, often invisible, repair. They have access to materials and techniques not available in standard DIY kits.
- Safety Concerns: If the crack is in a load-bearing tile or a fixture that could pose a safety risk if it fails (e.g., a shower tray that might collapse), it’s always best to consult a professional.
Preventing Future Damage: Maintenance Tips
A successful repair is great, but preventing future damage is even better. Simple maintenance practices can significantly extend the life of your ceramic surfaces.
Regular Cleaning and Sealing
- Gentle Cleaning: Use non-abrasive cleaners and soft cloths or sponges for regular cleaning. Harsh chemicals and abrasive scrubbers can damage the glaze and make ceramic more susceptible to scratching and chipping.
- Sealing Grout: For tiled areas, ensure the grout lines are properly sealed. Grout is porous and can absorb water, leading to mildew and potential substrate damage. Re-seal grout annually, especially in wet areas.
- Re-sealing Repaired Areas: If your repair kit recommended a sealant, ensure you re-apply it periodically as per the manufacturer’s instructions, particularly in high-wear or wet areas.
Avoiding Impact and Thermal Shock
- Protect Surfaces: Use cutting boards on kitchen worktops and bath mats in tubs to cushion against accidental drops.
- Temperature Control: Avoid pouring boiling water directly into cold sinks or bathtubs. Allow hot items to cool slightly before placing them on ceramic surfaces. This minimises the risk of thermal shock.
Common Mistakes to Avoid
Even with the best kit, mistakes can happen. Being aware of common pitfalls can help you avoid them.
Rushing the Process
Patience is a virtue in ceramic repair. Each step, from cleaning to curing, requires adequate time. Rushing can lead to poor adhesion, uneven finishes, or a repair that fails prematurely. For instance, not allowing the area to dry completely before applying the compound is a common error.
Inadequate Surface Preparation
As mentioned, a clean, dry, and debris-free surface is non-negotiable. Skipping cleaning or not degreasing properly will almost certainly result in a weak bond and a failed repair.
Incorrect Colour Matching
This is a frequent source of frustration. Not testing the colour on an inconspicuous area, or trying to match under poor lighting, can lead to a repair that stands out. Always test, allow to dry, and compare before committing to the full repair. Remember, the colour of the wet compound can differ significantly from its cured state.
Featured Product Deep Dive: Hupeyna Tile & Shower Repair Kit
The Hupeyna Tile & Shower Repair Kit is another specialised solution, focusing on the common repair needs of tiles and shower trays. Its emphasis on colour variety and ease of use makes it a strong contender for DIY enthusiasts.
Shower Tray Repair Kit, Hupeyna Tub, Tile and Shower Repair Kit, Bathtub Repair Kit White for Chips Dents Cracks…

-
Comprehensive Damage Repair: Effectively fixes a wide range of common issues in tubs, sinks, and showers, including chips, cracks, deep scratches, holes, and dents.
-
Broad Surface Compatibility: Expertly formulated to work on numerous materials such as porcelain, acrylic, fiberglass, ceramic, and enamel. It’s also suitable for repairing granite, quartz, and marble countertops.
-
Custom Color Matching: The kit comes with color pastes that allow you to tint the white base formula, making it easy to match various shades like beige, almond, grey, and more for a perfect finish.
-
Durable & Seamless Finish: Creates a strong, waterproof bond that results in a virtually invisible and long-lasting repair. The high-quality formula ensures the patched area is durable and requires no additional topcoats.
-
Cost-Effective DIY Solution: Save time, effort, and the high cost of hiring a professional. This easy-to-use kit provides a professional-quality restoration in just a few simple steps.
Overview and Key Features
This kit is resin-based, likely an acrylic or epoxy blend, designed for repairing chips, scratches, and holes. Key features include:
- Extensive Colour Choices: A standout feature is the inclusion of “more colour choices.” The product page shows a wide palette of pre-mixed colour pastes, allowing for a good match to various tile and fixture shades. This reduces the need for complex custom blending.
- Versatile Application: Suitable for ceramic tiles, shower trays, sinks, bathtubs, and even marble surfaces. This broad compatibility makes it useful for multiple repair tasks within the bathroom and kitchen.
- Strong Adhesion: Formulated to provide a durable and adhesive repair that withstands the typical conditions of a bathroom environment.
- Easy to Use: Marketed as a user-friendly kit, making it accessible for those without professional repair experience.
Ideal Use Cases (Tiles, Shower Trays)
The Hupeyna kit is particularly effective for:
- Bathroom Wall and Floor Tiles: Repairing chips or cracks in ceramic or porcelain tiles in the bathroom.
- Shower Tray Damage: Addressing damage to the surface of shower trays, which are prone to chips from dropped items.
- Sink and Bathtub Cosmetic Repairs: Suitable for smaller chips and scratches on sinks and bathtubs where a wide range of colour matching is needed.
- Kitchen Tiles: Fixing chips or cracks in kitchen wall tiles or splashbacks.
Application Tips for Vertical Surfaces
Repairing vertical surfaces like wall tiles or the side of a shower enclosure presents a unique challenge: gravity.
- Thicker Consistency: If the repair compound is too runny, it will sag. Some kits allow for slight adjustments to consistency, or you may need to work with very thin layers, allowing each to set slightly before adding more.
- Masking Tape Dams: For larger chips on vertical surfaces, you can create a temporary “dam” around the repair area using painter’s tape. This helps contain the compound and prevents it from running down the surface while it sets. Remove the tape before the compound fully hardens.
- Smooth with a Spreader: Use a plastic spreader or a flexible card to apply and smooth the compound. Work from the bottom up if layering, and ensure an even finish to minimise sanding later.
- Support During Cure: For very large repairs, consider temporary support if possible to prevent the compound from slumping during the initial curing phase.
Pros and Cons
Pros:
Cons:
Beyond Cracks: Repairing Chips, Scratches, and Holes
While the focus is often on cracks, specialized ceramic repair kits are equally adept at tackling other common forms of damage, restoring the overall appearance and integrity of your surfaces.
Chip Repair: Filling and Blending
Chips are perhaps the most common type of ceramic damage, often caused by dropped objects. The repair process involves filling the void and then blending the new material with the surrounding surface.
- Filling: For chips, the repair compound acts as a filler. You’ll apply the mixed resin (epoxy or acrylic) into the chipped area, ensuring it fills the void and is slightly proud of the surface.
- Blending: The key to an invisible chip repair is meticulous colour matching and then carefully smoothing the cured compound. After curing, wet-sanding with progressively finer grits of sandpaper (e.g., 600, 1000, 2000-grit) will level the repair with the original surface. Finally, polishing with a fine abrasive compound can restore the shine.
Scratch Removal: Polishing and Buffing
For shallow scratches that haven’t penetrated the glaze deeply, a repair kit might not be necessary. Instead, a ceramic polishing compound or a fine abrasive paste can often buff out minor imperfections. For deeper scratches that have gone through the glaze, a thin application of a colour-matched repair compound, followed by careful sanding and polishing, can make them disappear. The goal is to fill the scratch line and then smooth it to match the surrounding texture and sheen.
Hole Repair: Structuring and Reinforcing
Repairing a hole, especially one that goes completely through a ceramic item (like a missing piece of tile or a hole in a sink), is more involved than a simple crack or chip.
- Backing Material: If the hole is through-and-through, you’ll first need to create a temporary backing. This could be a piece of tape, plastic, or even cardboard secured to the underside of the hole. This prevents the repair compound from simply falling through.
- Building Layers: The repair compound (preferably a strong epoxy putty or a thick epoxy resin) is then built up in layers. Each layer should be allowed to partially cure before the next is applied. This layering provides structural integrity.
- Reinforcement: For larger holes, embedding a small piece of fibreglass mesh within the layers of resin can significantly increase the strength of the repair, preventing it from cracking or collapsing under stress.
- Finishing: Once the hole is filled and cured, the surface is sanded, colour-matched, and polished to blend seamlessly with the surrounding ceramic.
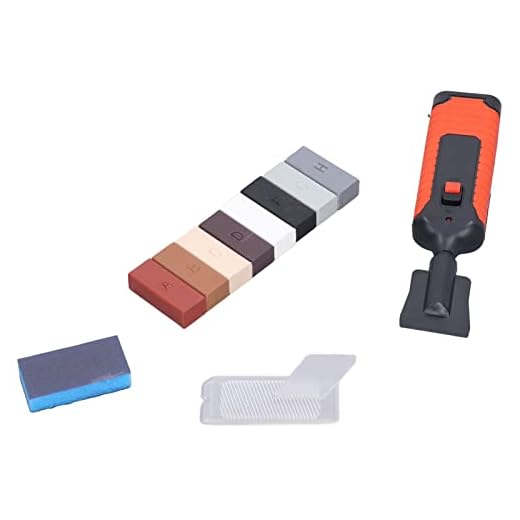
Featured Product Deep Dive: Markinchus Stone Repair Kit
The Markinchus Stone Repair Kit offers a distinct approach to repairing surface damage, particularly on stone, furniture, and tiles. Unlike the resin-based kits, this one utilises a wax-based system, making it ideal for cosmetic, non-structural repairs.
Stone Repair Kit, Tile Repair Kit, Furniture Scratch Repair Kit, Tile Repair Electric Heating Pen Wax Block Set Crack…
-
Complete Repair Kit: Includes everything needed for repairs: 8 colored wax blocks, an electric heating pen, a scraping block, a high-density polishing sponge, a frosted sponge, and a jersey cloth.
-
Versatile Application: Primarily designed for fixing small potholes on ceramic and porcelain tiles, but also effective for repairing nail holes in walls.
-
Durable & Efficient: The wax blocks offer strong adhesion for a lasting fix, making them a highly efficient and easy-to-use tool for DIY furniture and tile repair.
-
Simple to Operate: The compact electric heating pen is designed for ease of use—just slide the switch and press the button to begin melting the wax.
Overview and Key Features
This kit is centred around a set of coloured wax blocks and an electric heating pen. Its key features include:
- Wax-Based System: The core of the kit is a collection of hard wax blocks in various colours. These waxes are melted and filled into the damaged area.
- Electric Heating Pen: A battery-operated heating pen is used to melt the wax directly into the crack or chip. This allows for precise application and blending.
- Comprehensive Accessories: The kit includes multiple wax colours (often 8 or more), a scraping block, polishing sponge, and other tools necessary for application and finishing.
- Easy Colour Blending: The variety of wax colours allows for excellent colour matching by melting and blending different shades directly on the surface or in a mixing area.
- Quick Application: The repair is almost instantaneous as the wax cools and hardens quickly, requiring no curing time.
Ideal Use Cases (Stone, Furniture, Tiles)
The Markinchus kit is best suited for:
- Furniture Repairs: Excellent for chips, scratches, and small holes in stone-topped furniture (e.g., coffee tables, sideboards), wooden furniture with a hard finish, or laminate surfaces.
- Decorative Items: Ideal for repairing chips on decorative ceramic or stone items that are not exposed to water or high heat.
- Cosmetic Tile Repairs: For minor chips or scratches on wall tiles or floor tiles in low-traffic, dry areas where a quick, invisible cosmetic fix is desired.
- Worktop Scratches: Can be used for superficial scratches on kitchen worktops where a more robust epoxy repair isn’t necessary or desired.
Application Tips for Diverse Materials
Using a wax-based kit requires a different technique than resin-based ones:
- Clean and Dry: As always, ensure the surface is clean and dry.
- Select and Melt Wax: Choose the wax colours that best match your surface. Melt a small amount of the chosen wax directly into the damaged area using the heating pen.
- Blend Colours: If blending, melt a base colour, then add small amounts of other colours to achieve the desired shade. The heating pen allows for precise blending.
- Scrape and Polish: Once the wax has cooled and hardened (which happens quickly), use the scraping block to remove any excess wax, making the repair flush with the surface. Finish by polishing with the provided sponge for a smooth finish.
- Not for Wet Areas: Crucially, remember that wax is not waterproof for prolonged exposure and can melt with heat. Avoid using this kit in bathtubs, sinks, or shower trays, or on surfaces exposed to direct heat.
Pros and Cons
Pros:
Cons:
Longevity and Durability of Ceramic Repairs
Once you’ve completed a repair, a natural question arises: how long will it last? The durability of a ceramic repair depends on several factors, including the type of kit used, the quality of the application, and the environment the repaired item is in.
How Long Do Repairs Last? Factors Influencing Lifespan
- Type of Repair Kit: Epoxy-based repairs are generally the most durable and long-lasting, often considered permanent when applied correctly. Acrylic-based repairs offer good durability but may not match the extreme strength of epoxy. Wax-based repairs are the least permanent, designed for cosmetic, temporary fixes.
- Surface Preparation: A repair is only as good as its foundation. If the surface wasn’t thoroughly cleaned, dried, and prepared, even the strongest compound will fail prematurely.
- Application Quality: Precise mixing ratios, proper application techniques (e.g., layering for deep damage), and thorough smoothing contribute significantly to the repair’s longevity.
- Environmental Factors: Repairs in high-traffic areas (e.g., floor tiles) or those exposed to constant moisture (e.g., bathtubs, sinks) will experience more stress and may show wear faster than repairs on decorative items or wall tiles.
- Original Damage Severity: A repair to a hairline crack will generally last longer than a repair to a large, structural fracture, as the latter inherently has more underlying stress.
With proper application and care, a high-quality epoxy or acrylic repair can last for many years, often for the remaining lifespan of the ceramic item itself.
Water Resistance and Heat Resistance
- Water Resistance: Most epoxy and acrylic repair kits, especially those designed for bathrooms and kitchens, are formulated to be highly water-resistant or even waterproof once fully cured. This means they won’t degrade or allow water to seep through, protecting the underlying substrate. Wax-based repairs, however, are generally not water-resistant and should not be used in wet environments.
- Heat Resistance: Ceramic itself is very heat resistant, but the repair compounds have varying tolerances. Epoxy resins can typically withstand temperatures up to 100∘C to 150∘C (depending on the specific formulation) without softening or degrading. Acrylics have similar or slightly lower heat resistance. Wax-based repairs, as noted, have very low heat resistance and will melt if exposed to significant heat. This is why wax kits are unsuitable for areas near stovetops or fireplaces.
Maintenance of Repaired Areas
Once repaired, treat the area with care. Use non-abrasive cleaners and avoid harsh scrubbing, especially immediately after the repair. While the repair is designed to be durable, excessive force or chemical exposure can still degrade it over time. Regular, gentle cleaning is usually sufficient. If the repair is in a high-wear area, periodically inspect it for any signs of degradation and reapply a sealant if recommended by the kit manufacturer.
Environmental and Safety Considerations
Working with chemical compounds always requires attention to safety. Modern ceramic repair kits are generally safe for home use, but understanding their components and taking proper precautions is essential.
Understanding Product Ingredients: VOCs and Allergens
- VOCs (Volatile Organic Compounds): Some resins and hardeners can release VOCs during mixing and curing. These are organic chemicals that can evaporate into the air and may cause respiratory irritation or other health effects, especially in poorly ventilated areas. Look for kits that are labelled “low VOC” or “non-toxic,” like the MendMight kit.
- Allergens and Sensitisers: Certain components in resins and hardeners can be skin sensitisers, meaning repeated exposure can lead to allergic reactions like skin rashes or irritation. Isocyanates, for example, are common sensitisers found in some two-part systems. Always check the product’s safety data sheet (SDS) if you have known sensitivities.
Proper Ventilation and Personal Protective Equipment (PPE)
To minimise exposure to fumes and potential skin contact:
- Ventilation: Always work in a well-ventilated area. Open windows and doors, or use an exhaust fan, especially when working with larger quantities of repair compound or in enclosed spaces like bathrooms.
- Gloves: Wear chemical-resistant gloves (nitrile or neoprene are usually recommended) to prevent skin contact. Disposable gloves are often included in kits; use them.
- Eye Protection: Safety glasses or goggles should be worn to protect your eyes from splashes or fumes.
- Masks: For kits with stronger odours or if you are sensitive to fumes, consider wearing a respirator mask (e.g., an N95 or a mask with organic vapour cartridges) to protect your respiratory system.
Disposal of Leftover Materials
Proper disposal of leftover repair compounds and mixing tools is important. Do not pour uncured resin or hardener down the drain, as they can harden and clog pipes or contaminate water systems.
- Cure First: If possible, mix any leftover resin and hardener together in a small, disposable container and allow it to fully cure. Once hardened, it can usually be disposed of with regular household waste.
- Check Local Regulations: Always check your local council’s waste disposal guidelines, as some areas may have specific requirements for chemical waste. Never dispose of liquid chemicals in regular bins.
Conclusion: Empowering Your Home Restoration Journey
The days of despairing over a chipped tile or a cracked sink are long gone. Specialized ceramic crack repair kits have revolutionised how we approach home restoration, making professional-looking repairs accessible to everyone. From robust epoxy compounds that create waterproof, structural bonds to easy-to-use wax kits for cosmetic touch-ups, there’s a solution tailored for almost every type of ceramic damage.
Recap of Key Takeaways
We’ve explored the fundamental differences between ceramic and porcelain, understood the science behind adhesion and colour matching, and delved into the various types of kits available. We’ve seen how products like the MendMight Tile, Granite, and Marble Repair Kit, the Tufnein Bathtub Repair Kit, the Hupeyna Tile & Shower Repair Kit, and the Markinchus Stone Repair Kit offer targeted solutions for specific repair challenges. The importance of meticulous surface preparation, precise mixing, and careful application cannot be overstated, as these steps are critical for a durable and aesthetically pleasing repair. We’ve also highlighted the need for proper safety precautions and responsible disposal.
The Value of DIY Repair
Embracing DIY ceramic repair isn’t just about saving money, though that’s a significant benefit. It’s about empowering yourself to maintain and enhance your living space. It fosters a sense of accomplishment and allows you to extend the lifespan of cherished items and fixtures. With the right kit and a bit of patience, you can tackle those imperfections that once seemed daunting, transforming damaged surfaces back into pristine ones.
Final Thoughts on Maintaining Your Ceramic Surfaces
While these kits are incredibly effective, prevention remains the best strategy. Regular, gentle cleaning, avoiding harsh impacts, and being mindful of sudden temperature changes can significantly reduce the likelihood of future damage. However, when accidents do happen, remember that the solution is now readily available. Specialized ceramic crack repair kits are more than just products; they are tools that empower you to preserve the beauty and functionality of your home’s ceramic surfaces, ensuring they continue to look their best for years to come.
For more on fixing ceramics around the home, why not check out Ceramic Arts Network, Instructables, The Green Mad House, or Reddit Pottery?


