The Amazon Basics No. 4 Hand Plane: Your Definitive Guide to a Workshop Staple
The complete guide to the Amazon Basics No. 4 hand plane. We break down if this budget tool is a bargain or a bust for UK DIYers and woodworkers.
This post may contain affiliate links. If you make a purchase through these links, we may earn a commission at no additional cost to you.
Let’s be honest, there’s something deeply satisfying about shaping wood with a hand plane. The whisper-quiet shhhhff as a perfect shaving peels away, the glassy-smooth surface left behind – it’s a world away from the scream of a power tool. For generations of woodworkers in Britain, from grandad in his shed to the apprentice in a bustling workshop, the hand plane has been a trusted companion.
But getting into this traditional craft can feel a bit daunting. A top-of-the-line plane from a heritage brand can set you back a pretty penny, which is a big ask if you’re just trying to fix a sticky door or dip your toes into woodworking. This is where the Amazon Basics No. 4 Adjustable Universal Bench Hand Plane steps in. It’s cheap, it’s cheerful, and it promises to do the job.

- Professional quality Durable cast iron body provides stability and strength
- Excellent control Strong plastic handle with ergonomic grip
- Strong steel blade Durable alloy steel blade for quality cuts
- Easy adjustments Adjustable mechanism for precise results
- Note Do not use it directly without setting the “factory setting” after receiving the item, please follow Point 5. Assembling/disassembling the user manual.
But can a budget-friendly tool from a global giant really hold its own? Is it a genuine bargain that can unlock the joys of woodworking, or is it a false economy that will only lead to frustration?
This is the ultimate, no-nonsense guide to the Amazon Basics No. 4. We’re going to take it apart, piece by piece, and find out what makes it tick. We’ll cover everything you need to know: how to set it up straight from the box, how to sharpen it to a razor’s edge, and how to use it to get brilliant results. Whether you’re a complete beginner wondering what all the fuss is about or a seasoned woodworker curious about the budget competition, we’ve got you covered.
What Exactly is a No. 4 Hand Plane?
Before we dive into the Amazon Basics model, let’s get our bearings. What does “No. 4” actually mean?
Think of hand planes like a family of tools, each with a specific job. The numbers are part of a system started by a famous American company called Stanley back in the 19th century. Their “Bailey” pattern planes became so popular that the numbering system stuck, and almost everyone uses it today.
The No. 4 Smoothing Plane, to give it its full title, is the versatile all-rounder of the family. It’s the Ford Escort or the Victoria sponge of the tool world – reliable, common as muck, and brilliant at its main job.
- Size: It’s typically about 9-10 inches long. This makes it big enough to flatten small boards and create a smooth surface, but not so long and heavy that it’s a pain to use.
- Job: Its main purpose is smoothing. After you’ve done the heavy work of cutting wood to size, the No. 4 is the tool you reach for to get that final, perfect finish before you apply any varnish or paint. It’s also fantastic for little jobs around the house, like shaving a bit off the bottom of a door that’s sticking on the carpet.
Because of its versatility, the No. 4 is the plane most experts recommend for a beginner. It’s the perfect starting point for learning the fundamental skills of woodworking.
A Quick Trip Through Hand Plane History
Hand planes aren’t a new invention. In fact, archaeologists have found recognisable wooden planes in the ruins of Pompeii, meaning they’ve been around for at least 2,000 years. For centuries, they were made almost entirely of wood, with a simple iron blade wedged in place.
The big change came during the Industrial Revolution here in Britain and in America. Companies like Stanley started mass-producing planes with cast iron bodies. These were more stable, more durable, and easier to adjust. The design they perfected, with the frog, the depth adjustment knob, and the lateral adjustment lever, is the one we still see on the Amazon Basics No. 4 today. It was such a good design that it’s barely changed in over 150 years.
Owning a hand plane connects you to this long and proud history of craftsmanship. Every time you use it, you’re using a tool that a Roman carpenter or a Victorian cabinet maker would instantly recognise.
Unboxing the Amazon Basics No. 4: First Impressions
So, what do you get for your money? The Amazon Basics No. 4 arrives in a simple cardboard box. Inside, the plane itself is coated in a thin layer of protective oil to stop it from rusting during its long journey from the factory.
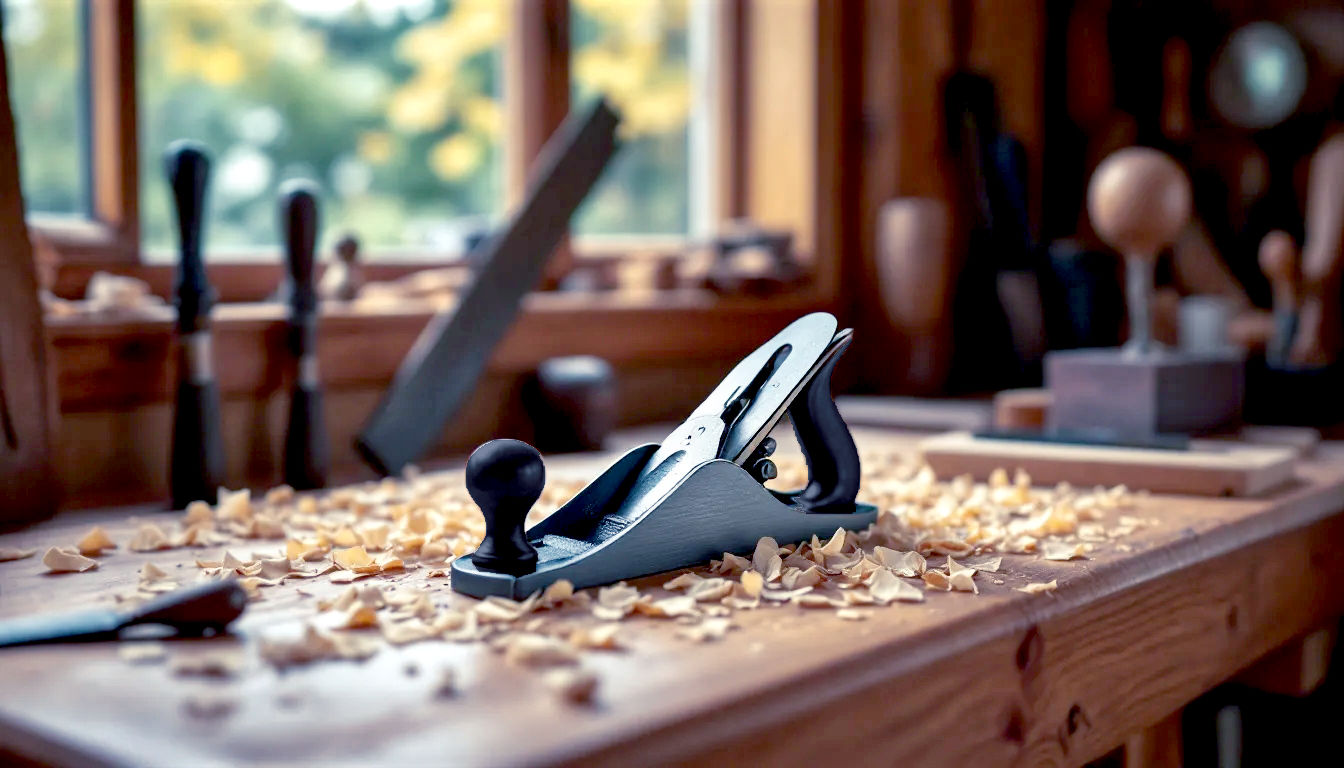
The Key Parts Explained
Let’s get to know the anatomy of our plane. It might look complicated, but once you know the names of the bits, it all makes sense.
- The Body (or Sole): This is the main cast iron block. The bottom, the part that slides over the wood, is called the sole. The flatter this is, the better the plane will work.
- The Blade (or Iron): This is the business end. It’s a sharp, bevelled piece of steel that does the cutting. On the Amazon plane, it’s made of “alloy steel.”
- The Chip Breaker (or Cap Iron): This sits on top of the blade. Its job is to curl and break the wood shaving as it’s cut, which helps to prevent the wood from tearing.
- The Lever Cap: This is the shiny, curved piece that holds the blade and chip breaker firmly in place. It has a lever on top that you flip to lock or unlock it.
- The Frog: This is the clever bit. It’s a cast iron assembly that the blade sits on. You can move the frog forwards or backwards to change the size of the mouth – the opening in the sole where the blade sticks out. A smaller mouth is better for fine, finishing work, while a wider mouth is for taking off more wood.
- The Tote (Rear Handle): The handle at the back you hold with your dominant hand. On the Amazon model, it’s made of black plastic.
- The Knob (Front Handle): The handle at the front. You use this to guide the plane. Again, it’s plastic.
- Depth Adjustment Knob: This brass-coloured wheel moves the blade up and down. Turn it clockwise to make the blade go deeper for a thicker shaving, and anti-clockwise to retract it.
- Lateral Adjustment Lever: This little lever pokes out from behind the blade. It moves the blade from side to side, allowing you to make sure the cutting edge is perfectly parallel to the sole.
Build Quality: What Can You Expect for Under £20?
Let’s be realistic. A hand plane that costs less than a round of drinks in a London pub is not going to have the same fit and finish as a premium tool from Lie-Nielsen or Clifton that costs ten times as much. The name of the game here is value.
- The Body: The casting is solid and weighty, which is a good thing. A heavy plane has more momentum, which helps it glide through the wood smoothly. However, the finish is a bit rough around the edges – literally. The paint is functional rather than beautiful, and some of the edges might feel a bit sharp.
- The Sole: Out of the box, the sole is unlikely to be perfectly flat. We’ll cover how to fix this in the setup section. This is one of the most common compromises on budget planes.
- The Handles: The plastic tote and knob are probably the most obvious sign that this is a budget tool. They feel okay in the hand, but they lack the warmth and comfortable feel of the polished rosewood or cherry handles you’d find on a vintage Stanley or a modern premium plane. They do the job, but they don’t feel special.
- The Blade: The 2-inch (or 5 cm) wide alloy steel blade is the heart of the tool. The quality of the steel and the sharpness of the edge will determine how well it cuts. We’ll need to do some serious work on this to get it ready.
The verdict so far? It’s a solid lump of iron with all the right parts in all the right places. It feels sturdy enough for DIY use, but it’s definitely built to a price. It’s a project tool – a “kit,” as one reviewer cleverly put it – that needs some work to turn it into a great performer.
The Most Important Step: Setting Up Your Plane
You can’t just take this plane out of the box and start making perfect shavings. If you try, you will be disappointed. The “factory setting” is just for shipping. To get this tool working properly, you need to give it some TLC. This process of tuning up a new plane is called fettling.
Think of it like buying a decent but affordable bicycle. You wouldn’t expect to win the Tour de France on it straight from the shop. You’d need to adjust the gears, pump up the tyres, and set the saddle height just right. It’s the same with a budget hand plane.
Grab a cup of tea, put on some music, and let’s get this tool ready for action.
What You’ll Need:
- Sandpaper: A few sheets of various grits. Get 120, 240, and 400 grit. You can buy this from any DIY shop like B&Q or Screwfix.
- A Flat Surface: This is crucial. A piece of thick float glass, a granite offcut from a kitchen worktop supplier, or the top of a cast iron machine (like a table saw) works perfectly. Don’t use a piece of wood, as it won’t be flat enough.
- A Sharpening Stone: This is a non-negotiable investment. You cannot do woodworking without a way to sharpen your tools. A simple and effective option for a beginner is a combination diamond stone (e.g., 400/1000 grit). They cut fast and stay flat.
- Screwdrivers: To take the plane apart.
- A Small Hammer: For fine adjustments.
- Some Light Oil: 3-in-1 oil is perfect.
- Rags or Paper Towels: For cleaning.
Step 1: Take It Apart and Clean It
First, let’s dismantle the plane. Flip the lever on the lever cap, and it will pop right off. Lift out the blade and chip breaker assembly. Now, unscrew the tote and knob. You’ll also see two screws holding the frog in place – undo these and lift the frog out.
You’re now left with the bare cast iron body. Use a rag and some white spirit or degreaser to wipe off all that sticky shipping oil. Give every part a good clean.
Step 2: Flattening the Sole (Lapping)
This is the most important part of the setup. The sole of the plane needs to be perfectly flat so it can glide over the wood and produce an even cut.
- Prepare your surface: Take your flat piece of glass or granite and lay it on your workbench.
- Stick down the sandpaper: Spray a tiny bit of water or light adhesive on the glass and stick the 120-grit sandpaper to it. Make sure there are no air bubbles.
- Get lapping: Take the plane body (with the blade removed!) and place it on the sandpaper. Now, just rub it back and forth. Use even pressure and try to cover the whole sheet of sandpaper.
- Check your progress: After a minute, lift the plane and look at the sole. You’ll see shiny spots where the sandpaper has been grinding away the high points. The dull, untouched areas are the low spots. Your goal is to keep going until the entire sole, from toe to heel and side to side, has a consistent, uniform scratch pattern.
- Refine the finish: Once it’s flat with the 120 grit, repeat the process with the 240 grit and then the 400 grit. This will make the sole smoother, so it glides better.
This process can take a while, maybe 15-30 minutes, depending on how out-of-flat the plane was to begin with. Be patient – it’s worth it. Once it’s done, give the sole a wipe with a lightly oiled rag to prevent rust.
Step 3: Sharpening the Blade
A plane is only as good as its blade. The blade that comes with the Amazon Basics plane will not be sharp enough to use out of the box. Some users have even reported it arriving with chips or a blunt edge. It needs to be properly sharpened.
Learning to sharpen is a fundamental skill in woodworking, and it’s incredibly rewarding.
- Flatten the Back: The back of the blade (the non-bevelled side) needs to be as flat and smooth as the sole. Just like you did with the plane body, rub the back of the blade on your sharpening stone (or sandpaper on glass), starting with the coarsest grit. You only need to flatten the first inch or so from the cutting edge. Keep going until you have a consistent, polished surface right to the edge.
- Hone the Bevel: Now for the main event. The blade is ground at an angle, usually about 25 degrees. We want to create a tiny, secondary bevel (a “micro-bevel”) at a slightly higher angle, around 30 degrees. This makes sharpening much quicker.
- Place your sharpening stone on a non-slip mat.
- Put a few drops of water on the stone (if it’s a water stone) or light oil (if it’s an oil stone). Diamond stones can be used dry.
- Hold the blade with the bevel flat on the stone. Now, lift the back of the blade just a tiny amount – a couple of degrees. This is the angle for your micro-bevel. A honing guide can help here, but it’s good to learn by feel.
- Push the blade forward along the stone, applying gentle pressure. Keep the angle consistent. Do this 10-15 times.
- Remove the Burr: You’ll feel a tiny wire of metal, called a burr, form on the flat back of the blade. To remove it, lay the back of the blade flat on your finest stone and give it one or two light passes.
- Test for Sharpness: A properly sharpened blade should be able to shave hair off your arm (be careful!) or cleanly slice a piece of paper.
This might sound tricky, but there are thousands of brilliant videos on YouTube that show this process clearly. Don’t be afraid to practise. A sharp blade is safer and much more enjoyable to use.
Step 4: Reassembly and Adjustment
Now that we’ve got a flat sole and a sharp blade, it’s time to put it all back together.
- Re-install the frog: Place the frog back onto the body. For now, position it so the front edge is roughly in line with the back of the mouth. Tighten the screws.
- Prepare the blade assembly: Screw the chip breaker to the blade. The edge of the chip breaker should be about 1-2mm back from the cutting edge of the blade. Make sure it’s seated tightly.
- Install the blade: Place the blade assembly onto the frog, bevel-side down. Pop the lever cap over the top and press the lever down to lock it. It should be firm, but you shouldn’t have to force it. If it’s too tight or too loose, adjust the screw on the lever cap.
- Set the depth: This is the crucial part. Hold the plane up and look down the sole. Turn the brass knob anti-clockwise until you can’t see the blade at all. Now, slowly turn it clockwise. You will see a thin, dark line appear as the blade emerges from the mouth. You want it to be barely visible – a shaving the thickness of a human hair is a good starting point.
- Set it laterally: Now make sure that dark line is perfectly even all the way across the mouth. If it’s heavier on one side, use the lateral adjustment lever to nudge it until it’s perfectly parallel.
Your plane is now set up and ready to make some shavings.
Using the Amazon Basics No. 4: Techniques for Success
Using a hand plane is all about technique. It’s a rhythmic, physical skill.
- The Stance: Stand with your feet apart, with the workbench at a comfortable height. You should be able to move your whole body, not just your arms.
- The Grip: Hold the tote in your dominant hand, with your index finger extended along the side of the plane. Your other hand goes on the front knob, using your thumb and fingers to apply pressure.
- The Motion: Start the cut with pressure on the front knob to keep the plane flat. As you move through the cut, transfer the pressure evenly between the front and back. As you finish the cut, put the pressure on the tote at the back. This stops the plane from “rocking” and rounding the ends of your board.
- Reading the Grain: Wood has a direction, like stroking a cat. Planing “with the grain” (from head to tail) will give you a smooth cut. Planing “against the grain” (from tail to head) will cause the wood fibres to tear out, leaving a rough surface. Look at the side of the board to see which way the grain lines are running.
- Taking Fine Shavings: The secret to a good finish is taking very thin, wispy shavings. If the plane is jamming or hard to push, it means your blade is set too deep. Retract it and try again. A well-tuned plane should glide through the wood with minimal effort.
Common Jobs for a No. 4 in a British Home
- Fixing a Sticking Door: The classic job. If a wooden door has swollen in the damp British weather, a few shavings off the top or side edge will have it closing smoothly again.
- Easing a Sticking Drawer: The wooden runners on old drawers can get worn or swell. A quick pass with the No. 4 can make them slide like new.
- Chamfering Edges: Instead of a sharp 90-degree corner on a piece of wood (like a shelf), you can use the plane to create a small 45-degree bevel, called a chamfer. It looks much nicer and is less likely to splinter.
- Small-Scale Flattening: If you have a small board for a project – say, for a bird box or a small shelf – the No. 4 is perfect for getting one face perfectly flat.
The Verdict: Is the Amazon Basics No. 4 Worth Buying?
After all that, we come to the big question: should you spend your hard-earned cash on this plane? The answer is a definite “yes, but…”
This is not a tool for a professional cabinet maker who uses a plane all day, every day. For them, the ergonomics of the plastic handles and the time spent on initial setup would be a false economy. They would be better off investing in a premium tool.
But for the rest of us – the DIYers, the weekend hobbyists, the people who are curious about woodworking but don’t want to spend a fortune – the Amazon Basics No. 4 represents absolutely fantastic value for money.
Who it’s perfect for:
- The absolute beginner: If you want to learn how a hand plane works and how to set one up, this is an incredibly cheap way to do it. The skills you learn fettling this plane are the exact same skills you’d need for a vintage plane you found at a car boot sale.
- The occasional DIYer: For the person who just needs to fix a door once a year or build a simple project, this plane, once set up, will do the job perfectly well.
- The curious woodworker on a budget: If you’re not sure if woodworking is for you, this is a low-risk way to get a feel for hand tools.
Who should probably avoid it:
- The serious professional or dedicated hobbyist: If you value your time highly and want a tool that works perfectly out of the box, this isn’t for you. You’d be better served by brands like Lie-Nielsen, Veritas, or even a well-restored vintage Stanley.
- Anyone who isn’t prepared to sharpen: If the thought of spending half an hour with a sharpening stone fills you with dread, you will never get this plane to work well. A sharp blade is everything.
The Competition: What Are the Alternatives?
- Second-hand Stanley/Record Planes: For a similar price, you can often find a rusty old British-made Stanley or Record No. 4 at a car boot sale or on eBay. These are often made from better quality materials than the Amazon plane, but they will require just as much, if not more, restoration work. They are a great option if you enjoy bringing old tools back to life.
- Other Budget Brands: Brands like Silverline or Faithfull offer planes in a similar price bracket. They are all likely made in the same few factories in India or China and will have very similar pros and cons to the Amazon Basics model.
- Premium Brands: If you have more to spend, the sky’s the limit. A new No. 4 from a brand like Clifton (made in Sheffield) or Veritas (from Canada) will be a thing of beauty, perfectly flat and sharp out of the box. But you’ll be paying £200-£300 for the privilege.
Final Thoughts
The Amazon Basics No. 4 Hand Plane is a fascinating product. It’s a tool that democratises a traditional craft, making it accessible to almost anyone. It forces the user to engage with the tool on a mechanical level, to learn the essential skills of flattening and sharpening that are at the very heart of woodworking.
It’s not perfect. The plastic handles are a let-down, and the blade needs immediate attention. But the core of the tool – the solid, heavy cast iron body – is perfectly serviceable. With a little bit of patience and elbow grease, you can turn this sub-£20 bargain into a genuinely capable and satisfying tool to use.
If you’re prepared to put in that initial effort, you won’t find better value for money. It’s a gateway tool, a diamond in the rough that, once polished, can give you results that are just as good as a plane costing ten times as much. And the satisfaction you’ll get from taking a cheap, mass-produced object and turning it into a precision instrument? Well, you can’t put a price on that.
Amazon Basics No.4 Adjustable Universal Bench Hand Plane – 2-Inch Blade and Plastic Handles for Precision Woodworking, 5 cm, Grey/Black
Further Reading
For those who wish to delve deeper into the world of hand planes and woodworking, these resources are highly respected in the UK and beyond:
- Paul Sellers’ Website & Blog:https://paulsellers.com/
- Paul Sellers is a British woodworker who has become a global icon for his dedication to teaching traditional hand tool methods. His blog and YouTube channel are arguably the single best free resource for learning how to set up and use tools like the No. 4 plane.
- The English Woodworker:https://www.theenglishwoodworker.com/
- Run by Richard Maguire, this site offers fantastic tutorials, courses, and insights into hand tool woodworking from a UK perspective.
- Workshop Heaven:https://www.workshopheaven.com/
- While a tool retailer, their website has an excellent “Woodworking Wisdom” section with articles and guides on tool use and selection, written by experts.
- Lost Art Press:https://lostartpress.com/
- An American publisher, but their books, particularly “The Anarchist’s Tool Chest” by Christopher Schwarz, are considered essential reading for anyone serious about building a collection of hand tools and understanding their use.