The Great British Guide to Scrapbooking: From First Photo to Finished Page
Discover the joy of memory keeping. This ultimate guide covers the essential scrapbooking tools, a step-by-step layout tutorial, and budget tips for UK beginners.
This post may contain affiliate links. If you make a purchase through these links, we may earn a commission at no additional cost to you.
We’ve all got one. A shoebox tucked away in a wardrobe, a forgotten folder on a computer, or just a chaotic camera roll on our phone. It’s a jumble of memories: that sunny holiday in Cornwall, a blurry picture from a brilliant party, your grandparents’ wedding day, a baby’s first steps. They’re precious moments, but they’re trapped. Scrapbooking is how you set them free.
Forget any old-fashioned ideas of dusty, cluttered albums. Modern scrapbooking is a powerful, creative, and deeply satisfying way to tell your stories. It’s part design, part journaling, and part history project. It’s about turning that digital mess or that box of fading photos into a beautiful, touchable record of your life. Think of it as creating your own personal museum, where every exhibit tells a story that truly matters.
This guide is your complete starting point. We’ll walk you through everything, from the absolute must-have supplies to designing your very first page. Whether you’re a total craft novice or just looking for a new creative outlet, you’re in the right place. Let’s get those memories out of the box and into a book where they belong.
What Exactly Is Scrapbooking? (And What It Isn’t)
At its heart, scrapbooking is the art of preserving memories in a creative way. It involves arranging photos, memorabilia, and written stories (called ‘journaling’) on a page, usually within a special album. The goal isn’t just to store pictures; it’s to tell the story behind the pictures.
Who was there? What was happening? How did you feel? That’s the magic scrapbooking adds. It provides context, emotion, and detail that a simple photo alone can’t capture.
Scrapbook vs. Photo Album: The Story’s the Thing
So, what’s the difference between a scrapbook and a regular photo album you’d pick up at a department store? It’s a bit like the difference between a list of ingredients and a finished cake.
- A photo album is for storage. It holds your pictures, often in simple plastic sleeves. It’s practical, but it’s just a container.
- A scrapbook is for storytelling. Each page is a mini-masterpiece, designed to showcase a specific memory. It combines photos with text, colours, and decorative elements to bring that moment to life. You’re not just saving a photo; you’re saving the feeling.
A photo album says, “Here’s a picture from the beach.” A scrapbook page says, “Remember that ridiculously windy day at West Wittering? The ice cream melted in about five seconds, the dog stole our sandwiches, and we laughed until our sides hurt. It was the best day.”
Why Bother? The Surprising Perks of a Paper Passion
Scrapbooking is more than just a pleasant way to pass a rainy Sunday afternoon. It comes with some genuinely brilliant benefits.
- It’s a mindful escape. In a world of endless screens and notifications, the simple, hands-on act of cutting paper and placing photos is incredibly calming. It focuses your mind, reduces stress, and gives you a welcome break from digital noise.
- It connects you to your past. Sifting through old photos brings memories flooding back. It’s a chance to reflect on your life, appreciate the people in it, and see how far you’ve come.
- It creates a priceless family heirloom. Imagine your children or grandchildren looking through your scrapbooks in 50 years. They won’t just see photos; they’ll read your stories in your own words. It’s a gift that connects generations.
- It sparks your creativity. You don’t need to be an artist to scrapbook. It’s a fun, low-pressure way to play with colour, layout, and design. You’ll be amazed at what you can create.
A Brief Jaunt Through Scrapbooking History
While the modern scrapbooking boom kicked off in the 1980s, the idea of collecting and curating personal memories is centuries old. In 18th and 19th-century Britain, people kept ‘commonplace books’. These were journals filled with handwritten poems, quotes, drawings, and personal notes.
Victorian society, with its love for sentiment and decoration, took this to the next level. Friendship albums became hugely popular, where friends would write messages and stick in small mementos like pressed flowers or locks of hair. Even Mark Twain, the famous author, was a huge fan and actually patented his own self-pasting scrapbook in 1872!
The key moment for modern scrapbooking was the realisation that the chemicals in old photo albums were actually damaging the photos. This led to the development of ‘archival-safe’ materials, designed to protect memories for the long haul, and the modern craft was born.
Gearing Up: Your Essential Beginner’s Scrapbooking Kit
Walking into a craft shop like Hobbycraft or The Range can be overwhelming. There are aisles of colourful, sparkly things! But you don’t need it all to start. In fact, it’s better to begin with the basics and build from there.
Here’s your no-fuss shopping list for everything you really need.
1. The Album: Your Story’s Home
This is the book that will hold your finished pages. The most common size by far is 12×12 inches, as it gives you plenty of space to be creative. You can also find albums in A4, 8×8 inches, and other sizes.
Most beginner-friendly albums use a ‘post-bound’ or ‘ring-binder’ system. This is brilliant because it means you can add, remove, and rearrange pages easily. You’ll also need to buy page protectors – these are the clear plastic sleeves your finished pages will slide into, keeping them safe from sticky fingers and spills.
2. The Paper: Your Canvas
Paper is the foundation of your page. You’ll need two main types.
Cardstock: The Foundation
This is the thick, sturdy paper that serves as your background. It comes in every colour imaginable. Start with a multi-pack of basic colours, including white, cream, and black. These are incredibly versatile and will work with almost any photo.
Patterned Paper: The Personality
This is the fun stuff! Patterned paper adds colour, theme, and style to your page. You might use it as a border, a background layer, or to cut out decorative shapes. Don’t go mad at first. Buy a ‘paper pad’ – a book of coordinating designs – so you know the patterns will work well together.
A Very Important Note: The ‘Acid-Free’ Rule
If you see one phrase in a craft shop, make it this one: “acid-free and lignin-free.” This is non-negotiable for any paper or adhesive that will touch your photos. Regular paper contains acids and a substance called lignin, which break down over time and will turn your photos yellow and brittle. Archival-safe materials ensure your memories will last a lifetime and beyond. This is the single most important rule in scrapbooking.
3. Adhesives: The Unsung Heroes
Choosing the right glue is more important than you’d think. A wet, school-style PVA glue will warp your paper and can damage photos. You need something strong, neat, and, of course, acid-free.
- Tape Runner: This is the best all-rounder for beginners. It’s like a Tipp-Ex mouse, but it rolls out a thin line of double-sided tape. It’s clean, quick, and easy.
- Glue Dots: These are tiny, super-sticky dots of glue, perfect for attaching small, lumpy things like buttons or ribbon.
- Foam Pads: These are small, double-sided sticky foam squares. They add a bit of height to elements on your page, creating a cool 3D effect.
4. Cutting Tools: Precision is Key
Good, clean cuts will make your pages look instantly more professional.
- Paper Trimmer: This is a worthwhile investment. It’s a board with a built-in blade that gives you perfectly straight cuts every time. A 12-inch trimmer is ideal.
- Sharp Scissors: You’ll need a small, sharp pair of scissors for cutting out more detailed shapes. Keep them for paper only, as cutting other materials will blunt them.
- Craft Knife and Cutting Mat: For even more precision, a craft knife (like a scalpel) is fantastic. Always use it with a self-healing cutting mat to protect your table.
5. Pens: Giving Your Memories a Voice
You’ll need a pen for journaling. Again, look for one that is ‘archival quality’ or ‘pigment ink’. This means the ink is fade-resistant and waterproof, so your words won’t disappear over the years. A simple black pen with a fine tip is the perfect starting point.
6. The Photos: The Heart of the Matter
Finally, the most important supply: your photos! Don’t feel you have to scrapbook every single picture you’ve ever taken. Choose a few favourites that tell a specific story. You can print them at home or use an online service or a high-street shop. A mix of sizes can add interest to your page. Standard 6×4 inch prints are a great place to start.
The ‘Nice-to-Haves’: Levelling Up Your Toolkit
Once you’ve got the basics down and you’re enjoying the process, you might want to add a few more creative tools to your collection.
- Stickers and Embellishments: These are the little decorative extras – things like alphabet stickers for titles, themed stickers, buttons, ribbons, and die-cut shapes. They add personality and flair.
- Stamps and Ink: Clear acrylic stamps and a black ink pad allow you to add custom titles, patterns, and phrases to your pages.
- Punches: These tools punch out perfect shapes from paper, like hearts, stars, or circles. They’re a quick and easy way to create your own embellishments.
Your First Page: A Step-by-Step Guide
Right, you’ve got your kit. You’ve picked out a few photos. Now for the exciting bit: making your very first page. Don’t panic! We’ll break it down into simple, manageable steps. The goal here is to have fun, not to create a museum-worthy masterpiece on your first try.
Step 1: Pick Your Story (and Your Photos)
Choose one to three photos that are all from the same event or moment. A single photo is absolutely fine for your first page! Let’s say you’ve chosen a great picture from a family walk in the woods.
Step 2: Choose Your Papers
Look at the colours in your photo. For our woodland walk photo, there might be greens, browns, and the blue of your coat.
- Pick a background cardstock. A neutral cream or a soft brown would work well.
- Pick one or two patterned papers. A subtle leaf pattern or a simple stripe in a coordinating green would be perfect.
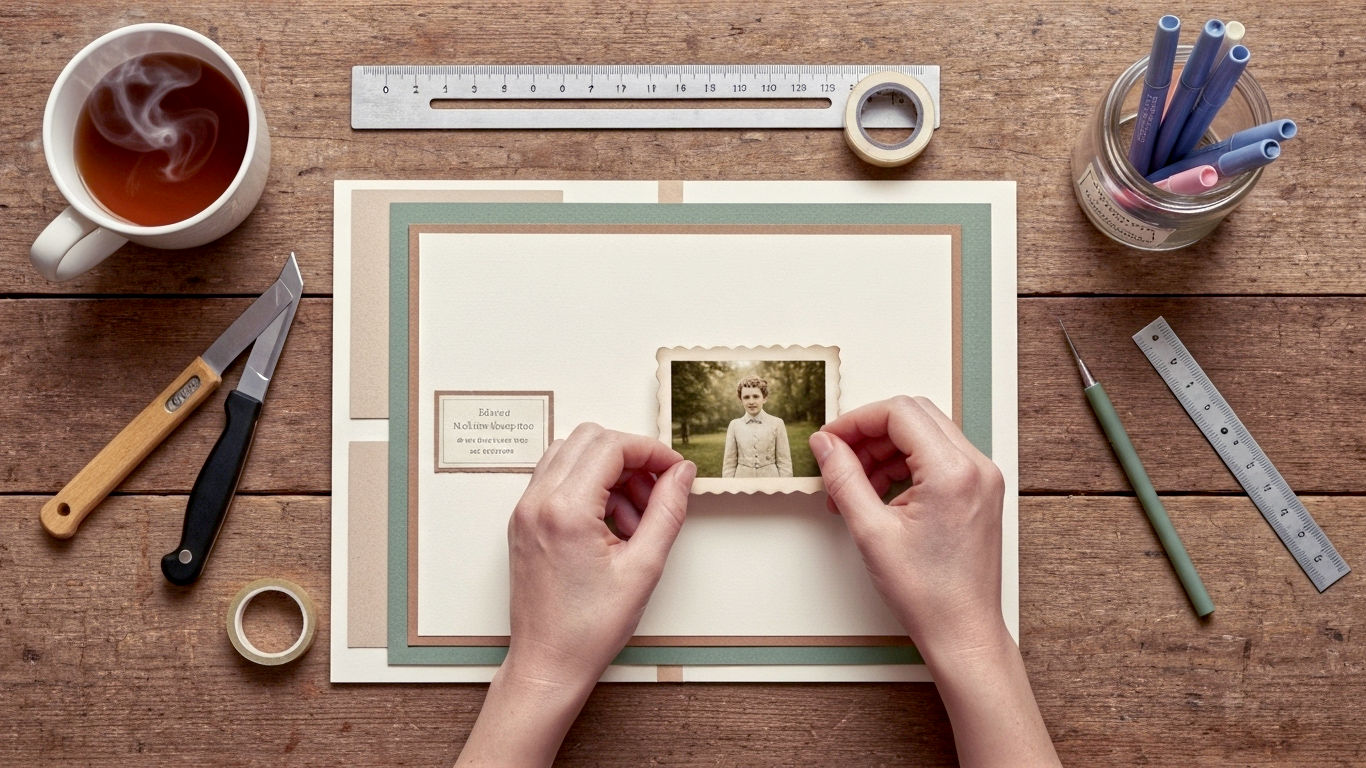
Step 3: Crop and Mat Your Photos
Don’t be afraid to trim your photos. Is there a boring bit of sky or a distracting dustbin in the background? Cut it off! This helps you focus on the most important part of the image.
Next, ‘mat’ your photo. This is a classic scrapbooking technique that makes your pictures pop. Simply cut a piece of coloured cardstock slightly larger than your photo and stick the photo in the centre of it. It creates a lovely little frame. A border of about ¼ inch is a good starting point.
Step 4: The Layout Puzzle
This is where you play. Before you stick anything down, arrange your matted photo and your pieces of patterned paper on the background cardstock.
- Try placing a wide strip of patterned paper across the middle of the page.
- Place your photo on top of it.
- Try cutting a smaller rectangle of a second patterned paper to tuck behind one edge of the photo.
Move things around until you find a composition that looks pleasing to your eye. There’s no right or wrong answer!
Step 5: Write Your Story (Journaling)
Find a space on your layout for your words. You can write directly onto the background paper or, for a neater look, write on a small, trimmed piece of light-coloured cardstock.
What should you write?
- Who: Who is in the photo?
- What: What was happening?
- Where: Where were you?
- When: The date is always a good thing to include!
- Why: Why was this moment special? A funny quote or a heartfelt feeling.
Keep it simple. A few sentences are all you need.
Step 6: The Fun Bit – Embellishments!
Now add a little flair. This is where you might add a title using alphabet stickers (e.g., “Woodland Walk”). You could add a few small leaf-shaped embellishments or a button. The key is not to go overboard. Let your photo be the star of the show.
Step 7: The Final Stick-Down
Once you’re happy with how everything looks, it’s time to commit. Using your tape runner, carefully stick everything down, starting with the bottom layers first.
And that’s it! You’ve made your first scrapbook page. Slide it into a page protector, pop it in your album, and give yourself a well-deserved pat on the back (and maybe a biscuit).
Key Principles of a Great Layout
As you get more confident, you can start to think a bit more about design. You don’t need an art degree – just a few simple principles.
The Focal Point: Where Do You Look First?
Every page should have one main thing that draws the eye – this is your focal point. 99% of the time, this will be your best photo. Arrange the other elements on the page to support and draw attention to that main picture.
Visual Flow and Balance: Guiding the Eye
A good layout guides the viewer’s eye around the page in a logical way. A common trick is to use a ‘visual triangle’. This just means placing three key things (e.g., your main photo, your title, and your journaling block) in a rough triangle shape. This forces the eye to move between them, taking in the whole page.
Balance is also important. Try not to cram everything into one corner. If you have a heavy cluster of photos on the left, add your title or journaling to the right to balance it out.
The Rule of Threes (or Odds)
Our brains are funny things; they find items grouped in odd numbers (1, 3, 5) more appealing than even numbers. So, when you’re adding small embellishments like buttons or stickers, try grouping them in threes. It’s a simple trick that just works.
Scrapbooking on a Shoestring Budget
Scrapbooking can seem like an expensive hobby, but it really doesn’t have to be. With a bit of classic British “make do and mend” spirit, you can create beautiful pages without breaking the bank.
- Start with less. Don’t buy every gadget. The basic kit is all you need for a long time.
- Use what you have. Old maps from a holiday, ticket stubs, pretty security envelopes, birthday cards, and even nice wrapping paper can all be used on your pages.
- Buy in sales. Craft shops have sales all the time. Stock up on basics like cardstock and adhesive when they’re on offer.
- Print photos smartly. Look for deals on photo printing services, and don’t be afraid to print multiple smaller photos on a single 6×4 sheet to save money.
Common Pitfalls for Newbies (And How to Dodge Them)
Every beginner makes a few mistakes. Here are the most common ones and how to avoid them.
- Using the wrong adhesive. That cheap glue stick from the corner shop will fail over time, and your pages will fall apart. Invest in proper, acid-free adhesive.
- Overcrowding the page. It’s tempting to use all your new, shiny supplies at once. Resist! Less is often more. Give your photos room to breathe.
- Forgetting the story. Don’t forget to add journaling! In twenty years, you might not remember the details of that day. Your words are just as important as your pictures.
- Aiming for perfection. Your pages do not have to be perfect. They are handmade. A slightly wonky cut or a spelling mistake just adds to the charm. The important thing is that you are capturing your memories.
The Digital Frontier: Is Online Scrapbooking for You?
For those who are more comfortable with a mouse than a glue stick, digital scrapbooking is a fantastic alternative. It uses photo editing software (like Photoshop Elements or free online tools like Canva) to create pages on a computer. You use digital ‘papers’ and ‘embellishments’ to build your layout, which can then be printed out or shared online.
Pros: No mess, you can undo mistakes easily, and it takes up no physical space. Cons: It can have a steeper learning curve, you miss the hands-on fun of paper, and printing costs can add up.
It’s worth exploring if you’re tech-savvy, but for many, the tactile joy of traditional scrapbooking is hard to beat.
Finding Your Tribe: Inspiration and Community in the UK
One of the best things about scrapbooking is the friendly and supportive community that surrounds it.
- Social Media: Pinterest and Instagram are bottomless pits of inspiration. Search for hashtags like #scrapbookingideas, #scrapbooklayout, and #ukcrafters.
- Blogs and YouTube: There are hundreds of talented UK-based crafters who share tutorials, tips, and inspiration on their blogs and YouTube channels.
- Local Groups: Check notice boards in your local library, community centre, or craft shop. There may be a local scrapbooking group or ‘crop’ (a get-together where people craft) that you can join.
Conclusion: Your Story, Your Way
Scrapbooking is a journey, not a destination. It’s a wonderfully flexible hobby that can be anything you want it to be: a simple way to organise your photos, a deep dive into your family history, or a full-blown artistic outlet.
The most important advice is simple: just start. Don’t wait until you have the ‘perfect’ photos or all the fanciest tools. Pick a memory you love, gather a few basic supplies, and put it on a page. Tell its story. It doesn’t need to be perfect; it just needs to be yours. You’re not just sticking paper together; you’re building a legacy, one story at a time. Now, go and set those memories free.
Further Reading
To continue your scrapbooking adventure, here are a few highly respected resources:
- Hobbycraft Blog: A great UK-based resource for tutorials and product guides.
- Scrapbook.com: A huge US-based site with an enormous gallery, forums, and online shop. A fantastic resource for inspiration.
- Mixed Up Crafters Facebook Group: An active and friendly UK-based Facebook group for sharing projects and chatting with fellow paper-crafters.
- Hey Little Magpie: A popular UK-based online store and blog with lots of inspiration from its design team.