The Beginner’s Guide to Sewing: From Threading a Needle to Your First Project
A friendly, no-faff guide for absolute beginners in the UK. Learn how to use a sewing machine, choose fabric, and make simple projects like cushions and tote bags.
This post may contain affiliate links. If you make a purchase through these links, we may earn a commission at no additional cost to you.
Welcome to the wonderful world of sewing! If you’ve ever admired a perfectly stitched dress, a cosy handmade cushion, or just wanted to fix a button without a faff, you’re in the right place. For centuries, people across Britain have been stitching, mending, and creating with nothing more than a needle and thread. From the intricate tapestries hung in castles to the simple act of darning socks by the fire, sewing is woven into our history.
But let’s be honest, getting started can feel a bit daunting. All those strange tools, the whirring of a machine, and the fear of sewing your finger (don’t worry, we’ll help you avoid that!) can put anyone off. This guide is here to change that. We’re going to break it all down, step-by-step, into simple, bite-sized chunks. Think of it as a friendly chat over a cuppa, where we’ll turn you from a complete beginner into someone who can confidently say, “Thanks, I made it myself!”
Whether you dream of creating your own wardrobe, adding personal touches to your home, or simply want a useful new skill, this is where your journey begins. So, let’s get the kettle on and dive in.
Part 1: Your Sewing Starter Kit – The Essential Tools
Before you can stitch a single thing, you’ll need a few basic tools. You don’t need to dash out and buy the most expensive kit from John Lewis just yet. A few quality essentials will see you through your first projects and beyond. Think of this as your sewing tin, ready for action.
The Absolute Must-Haves
These are the non-negotiables. You simply can’t sew without them.
Needles: Hand and Machine
It sounds obvious, but the right needle makes all the difference.
- Hand-Sewing Needles: These come in various sizes. A mixed pack of ‘sharps’ is a brilliant starting point. They’re a good medium length with a sharp point and a small eye (the hole for the thread), perfect for general stitching.
- Machine Needles: If you have a sewing machine, it will come with a standard needle, usually a size 80/12, which is great for medium-weight fabrics like cotton. Needles get blunt, so it’s wise to have spares. Top Tip: Change your machine needle every 8-10 hours of sewing to avoid skipped stitches and snagged fabric.
Thread: The Glue That Holds It All Together
Walking into a haberdashery and seeing a rainbow of threads can be overwhelming. To start, you only need a few.
- All-Purpose Polyester Thread: This is your workhorse. It’s strong, has a little bit of stretch, and works for most fabrics. Grab a spool of black, white, and a neutral grey or beige. This will cover most of your early projects. Brands like Gutermann or Coats are brilliant and widely available.
Something to Cut With: Scissors and Shears
You need two pairs of cutters, and it’s a golden rule that they are never, ever used for anything else.
- Fabric Shears: These are your pride and joy. They should be sharp, comfortable to hold, and only ever used to cut fabric. Using them on paper will blunt them in a flash. A decent pair of 8-inch dressmaking shears is a great investment.
- Small Embroidery Scissors or Thread Snips: These are perfect for snipping threads close to your fabric without risking a mistaken cut. They’re small, sharp, and incredibly handy to have right next to your machine.
Measuring Tools: Measure Twice, Cut Once
Accuracy is your best friend in sewing. A wonky measurement at the start means a wonky project at the end.
- Tape Measure: A flexible fibreglass tape measure (the kind that doesn’t stretch over time) is essential for taking body measurements and measuring curves.
- Ruler or Metre Stick: A clear acrylic ruler, at least 30cm long, is fantastic for drawing straight lines and marking seam allowances directly onto fabric.
Marking Tools: Your Guide for Cutting and Stitching
You need a way to transfer pattern markings onto your fabric.
- Tailor’s Chalk: The classic choice. It comes in little triangular or pencil forms and brushes off easily. It’s best for woven fabrics.
- Fabric Pens: These come in two main types: air-erasable (the marks disappear after a day or two) and water-soluble (the marks wash out). Always test them on a scrap of your fabric first!
The “Really-Good-to-Have” Extras
Once you’ve got the basics, these items will make your sewing life much easier.
Pins and Pincushion
Holding fabric pieces together before you sew is crucial. Glass-headed pins are best because they won’t melt if you accidentally iron over them. And a pincushion—either a classic tomato-shaped one or a magnetic dish—will stop them from ending up all over the floor.
Seam Ripper
Meet your best friend and worst enemy. No one is perfect, and you will make mistakes. The seam ripper (also called an unpicker) is a small, sharp tool designed to unpick stitches without damaging your fabric. Every sewer, from beginner to expert, has one within arm’s reach. Don’t be afraid to use it!
Iron and Ironing Board
Pressing your fabric is not the same as ironing your shirts. In sewing, you press seams open or to one side as you go. It’s one of the biggest secrets to making your projects look professional rather than lumpy and homemade. A good steam iron is a game-changer.
Part 2: Getting to Know Your Sewing Machine
For many, the sewing machine is the most intimidating piece of kit. It looks complicated, makes a noise, and seems to have a mind of its own. But a basic sewing machine is actually quite simple. It’s designed to do one main thing: create a strong, even stitch far faster than you ever could by hand.
You don’t need a fancy computerised machine with 200 stitches. A reliable, basic machine that can do a straight stitch and a zigzag stitch is all you need to start. Brands like Brother, Janome, and Singer all make excellent entry-level models. You can often find great second-hand machines on places like Gumtree or Facebook Marketplace, but it’s wise to take someone who knows about machines with you.
The Main Parts of Your Machine
Let’s demystify your machine. Get it out of the box, pop it on a table, and let’s take a tour. Your manual is your bible here, but most machines have these key parts:
- Spool Pin: This holds your reel of thread at the top.
- Thread Guide: A series of hooks and channels that guide the thread from the spool down to the needle.
- Tension Dial: This controls how tight the top thread is. For now, you can probably leave it on the automatic or middle setting.
- Take-Up Lever: This little arm pops up and down as you sew, helping to create the stitches. Your thread must go through this.
- Needle and Needle Clamp: This is where the needle is held. A small screw holds it in place.
- Presser Foot: This foot holds the fabric down against the feed dogs as you sew. You lower it with a lever at the back of the machine.
- Feed Dogs: These are the little metal teeth under the presser foot that grip your fabric and pull it through the machine. This is why you don’t need to push or pull your fabric!
- Bobbin Winder: This is where you wind thread onto the little mini-spool (the bobbin) that forms the bottom part of the stitch.
- Bobbin Case: The little compartment under the needle where the bobbin lives.
- Stitch Selector Dial: This lets you choose your stitch—straight, zigzag, etc.
- Stitch Length Dial: This controls the length of your stitches. A medium length (around 2.5mm) is good for most things.
- Handwheel: On the right-hand side of the machine. It lets you turn the machine over by hand, which is useful for precise needle placement. Crucial Tip: Always turn the handwheel towards you, never away.
- Reverse Lever/Button: This lets you sew backwards to secure your stitches at the beginning and end of a seam.
Your First Task: Threading the Machine and Winding a Bobbin
This is the first hurdle for every new sewer. It looks fiddly, but once you’ve done it a few times, it’ll become second nature.
Winding the Bobbin
Your machine needs two threads to make a stitch: one from the top (the spool) and one from the bottom (the bobbin).
- Place your spool of thread on the spool pin.
- Follow the diagram in your manual (or often printed on the machine itself) to guide the thread to the bobbin winder.
- Thread the end through the tiny hole in the bobbin and place the bobbin on the winder.
- Engage the winder (usually by pushing it to one side), and gently press the foot pedal. The machine will whir and wind the thread onto the bobbin. Keep it neat and don’t overfill it.
- Snip the thread, and you’re done!
Threading the Top Thread
Again, your manual is your best friend. Most modern machines have numbers printed on them to show you the way.
- Make sure the presser foot is up and the needle is at its highest point (use the handwheel to check). This is really important as it opens up the tension discs.
- Place your spool on the pin.
- Follow the numbered path, guiding the thread through the various hooks and guides.
- Hook it around the take-up lever. This is the bit that goes up and down. If you can’t see it, turn the handwheel towards you until it appears.
- Guide the thread down to the needle and thread it through the eye, from front to back. Many machines have a handy needle threader to help with this.
Inserting the Bobbin and Bringing Up the Thread
- Open the bobbin compartment.
- Pop your wound bobbin in, making sure the thread is coming off in the correct direction (your manual will show you this).
- Hold the top thread gently with one hand.
- Turn the handwheel towards you for one full rotation. The top needle will go down, catch the bobbin thread, and bring a loop of it up.
- Gently pull the loop to bring the bobbin thread tail all the way up.
- You should now have two threads—one top, one bottom. Tuck them both under the presser foot and towards the back of the machine.
Congratulations! You’ve threaded your machine. That’s genuinely the hardest part over.
Let’s Do Some Practice Stitches
Don’t jump straight to your project. Grab a scrap of medium-weight cotton (an old pillowcase is perfect), fold it in half, and let’s practice.
- Place the fabric under the presser foot.
- Lower the presser foot using the lever. This engages the tension and holds the fabric.
- Hold the thread tails for the first few stitches to stop them getting tangled.
- Gently press the foot pedal. The machine will start to sew. Your job is simply to guide the fabric with your hands, keeping it straight. Don’t push or pull it! Let the feed dogs do the work.
- Practice sewing in a straight line. Use the edge of the presser foot as a guide.
- Practice turning a corner: sew up to the corner, stop with the needle down in the fabric, lift the presser foot, pivot the fabric, lower the presser foot, and continue sewing.
- Practice backstitching: at the beginning and end of a seam, sew forward a few stitches, then press the reverse button to sew backwards over them for a few stitches. This locks your seam and stops it from unravelling.
Check your stitches. They should look neat and even on both the top and bottom. If you have loops, it’s likely a tension or threading issue. The most common fix? Re-thread the whole machine from scratch. It solves 90% of problems.
Part 3: Understanding Fabric and Patterns
Now for the fun bit: choosing what to make and what to make it with. The fabric you choose will have a huge impact on your finished project.
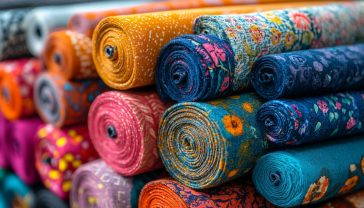
A Beginner’s Guide to Fabric
Fabric is generally divided into two main families: wovens and knits.
- Wovens: These are made from threads woven together at right angles, just like a basket. They are stable and don’t stretch much, which makes them perfect for beginners. Examples include:
- Cotton Poplin: Crisp, easy to sew, and comes in thousands of prints. Perfect for shirts, simple dresses, and cushion covers.
- Chambray: Looks a bit like denim but is much lighter and softer. Great for tops and casual trousers.
- Linen: Beautiful and breathable, but it does crease a lot! Best for simple shapes.
- Knits: These are made from a single yarn looped together, like in a jumper. They are stretchy. This makes them comfy to wear but trickier to sew for a beginner. It’s best to stick to wovens for your first few projects. Examples include jersey (t-shirt fabric) and French terry (sweatshirt fabric).
When you buy fabric, you’ll also need to know about the selvedge. This is the tightly woven edge of the fabric that runs along both sides. It won’t fray. The direction parallel to the selvedge is called the grainline, and it has the least amount of stretch. Most pattern pieces need to be lined up with this grainline.
Always, always pre-wash your fabric before you cut it! Most fabrics, especially natural ones like cotton and linen, will shrink a bit in their first wash. It’s heartbreaking to spend hours making something, only for it to be too small after you wash it. Wash and dry it exactly as you would the finished garment.
How to Read a Sewing Pattern
Sewing patterns are your roadmap. They look like a sheet of complicated diagrams and instructions, but they all follow a similar logic. For your first project, choose a pattern labelled “Beginner” or “Very Easy.” Independent pattern companies like Tilly and the Buttons or Nina Lee make fantastic, modern patterns with very clear instructions.
Here’s what you’ll find inside the pattern envelope:
- The Envelope: The front shows a picture of the finished item. The back tells you what fabric to use, how much you’ll need, and what other supplies (notions) like zips or buttons are required.
- The Instruction Sheet: This is your step-by-step guide. Read it all the way through before you start! It will have diagrams showing you how to lay out your pattern pieces on the fabric and how to sew them together.
- The Pattern Sheet: This is a big, thin sheet of paper with all the pattern pieces printed on it. You’ll need to find your size (based on your body measurements, not your high street size!) and cut the pieces out. Some people prefer to trace their size onto tracing paper so they can keep the original pattern intact.
Key Pattern Markings to Know:
- Grainline Arrow: A long, straight arrow. This MUST be placed parallel to the selvedge of your fabric.
- Notches: Little triangles or lines along the edge of the pieces. These are for matching up different pieces accurately.
- Dots/Circles: These often mark things like pocket placement or the top of a sleeve.
- Seam Allowance: This is the distance between the cutting line and the stitching line. It’s usually 1.5cm (5/8 inch) in commercial patterns, but always check!
Part 4: Your First Sewing Projects
The best way to learn is by doing. Start with something simple and small. The satisfaction of finishing your very first project will give you the confidence to try something more ambitious. Choose a project that uses straight lines and simple shapes.
Project 1: The Simple Cushion Cover
This is the perfect first project. It’s just a few straight seams, and you’ll have something useful and lovely for your home at the end.
You will need:
- A piece of cotton fabric (about half a metre)
- A cushion pad (e.g., 40cm x 40cm)
- Your sewing kit (machine, thread, pins, scissors, ruler)
Method (for an easy envelope-style cover):
- Cut Your Fabric: For a 40cm x 40cm cushion pad, you need one piece of fabric that is 41cm wide by 85cm long. This gives you a small seam allowance and the overlap at the back.
- Hem the Short Edges: On each of the two short (41cm) edges, fold the raw edge over by about 1cm and press. Fold it over another 1cm to hide the raw edge, press again, and pin. Stitch this hem down close to the folded edge. This is called a double hem.
- Fold and Pin: Lay your fabric right side up. Fold one hemmed edge in towards the centre. Fold the other hemmed edge in so it overlaps the first one. The total length of the folded fabric should now be 40cm. The two hemmed edges should overlap in the middle. Pin down the two un-sewn sides.
- Sew the Sides: Stitch down the two pinned sides, using a 1cm seam allowance. Remember to backstitch at the start and end.
- Finish: Snip the corners diagonally (be careful not to cut your stitches!) to reduce bulk. Turn the cushion cover the right way out, poke out the corners so they are nice and sharp, give it a final press, and pop your cushion pad inside. You did it!
Project 2: A Handy Tote Bag
Another fantastic beginner project that’s incredibly useful. No more paying 10p for a plastic bag!
You will need:
- About half a metre of sturdy woven fabric like cotton canvas or denim.
- Matching thread.
Method:
- Cut Your Fabric: Cut two identical rectangles for the bag body (e.g., 40cm wide x 45cm tall). Cut two identical rectangles for the straps (e.g., 10cm wide x 60cm long).
- Make the Straps: Take one strap piece. Fold it in half lengthwise, wrong sides together, and press. Open it out. Now fold the two long raw edges into the centre crease you just made, and press. Fold the whole thing in half along the original crease. You should have a neat strap that is four layers thick with no raw edges showing. Pin and stitch down both long edges. Repeat for the other strap.
- Attach the Straps: Take one of the main bag pieces, right side up. Pin the ends of one strap to the top edge, making sure the strap isn’t twisted. Place them about 8cm in from each side. Baste (sew with a long stitch length) them in place within the seam allowance. Repeat for the other bag piece and the other strap.
- Sew the Bag: Place your two main bag pieces right sides together, with the straps sandwiched in between. Pin along the two sides and the bottom.
- Stitch it Up: Sew down the two sides and across the bottom, using a 1.5cm seam allowance.
- Finish the Top Edge: Fold the top raw edge down by 1cm and press. Fold it down again by about 3cm to create a neat top hem, enclosing the raw edges of the straps. Pin and stitch all the way around the top, close to the bottom of the fold.
- Turn and Press: Turn the bag the right way out, give it a good press, and you’re ready to go shopping!
Common Beginner Mistakes (and How to Avoid Them!)
- Wonky Cutting: Take your time. Use a sharp pair of shears and cut on a flat surface.
- Forgetting to Backstitch: Your seams will just fall apart. Make it a habit!
- Sewing Too Fast: You’re not in a race. Use the foot pedal to control your speed. Go slow and steady.
- Not Pressing Seams: It seems like a chore, but it makes the biggest difference to the finish. Press as you go.
- Choosing a Slippery or Stretchy Fabric: Stick with stable cottons for your first few makes. It will be a much more enjoyable experience.
Part 5: Where to Go From Here
Once you’ve got a few simple projects under your belt, a whole world of creativity opens up. You could try making a simple pair of pyjama bottoms, an A-line skirt, or some simple curtains for your home.
The key is to keep learning and keep practising. Don’t be afraid to make mistakes—every single person who sews has a pile of projects that went a bit wrong. That’s how you learn.
Finding Inspiration and Help
The sewing community is one of the friendliest and most supportive you’ll find.
- Online: Websites like The Fold Line and blogs from sewers are brilliant for pattern reviews and inspiration. Instagram is a treasure trove—search hashtags like #sewing, #memade, and #isew.
- In Person: Look for local sewing classes or workshops in your town. It’s a great way to learn new skills and meet fellow enthusiasts. Many local fabric shops run their own courses.
- TV: The Great British Sewing Bee has done wonders for bringing sewing back into the mainstream and is packed with tips and inspiration.
Sewing is a skill for life. It’s a practical way to mend and make-do, a creative outlet, and a wonderfully mindful activity that takes you away from your screen. It connects you to generations of people who have stitched out of necessity and for pleasure.
So, go on. Dust off that old machine in the loft, or treat yourself to a starter kit. Be patient with yourself, embrace the process, and soon you’ll be looking at your own handmade creations with a huge amount of pride. Happy sewing!
Further Reading
- The Fold Line: An online sewing pattern shop with a huge database of patterns, reviews, and a blog. (https://thefoldline.com)
- Tilly and the Buttons: Fantastic beginner-friendly sewing patterns with clear, photo-led instructions and online workshops. (https://www.tillyandthebuttons.com)
- The Victoria and Albert Museum (V&A): Explore their incredible fashion and textiles collection online for historical inspiration. (https://www.vam.ac.uk/collections/fashion)
- Love Sewing Magazine: A popular UK magazine full of projects, tips, and patterns. (https://www.sewmag.co.uk)